
Get ready for some laughter and silliness with our free crochet pattern for a Rubber Chicken Amigurumi! This quirky and entertaining project will bring a smile to your face as you create your very own squishy, squeezable rubber chicken. Whether you want to surprise a friend with a unique gift or add a whimsical touch to your home decor, this free pattern has got you covered. Perfect for gag gifts, party decorations, or a whimsical addition to your collection, this crochet pattern is a must-try for anyone seeking a fun and quirky project. Let your creativity shine as you choose vibrant colors and add finishing touches to your lovable crochet rubber chicken. Get the pattern today and get ready to embark on a hilarious crochet adventure!
Don’t forget to join my Facebook group, you can ask your questions, and share your finished projects. I will regularly ask you what pattern you would like to see next (or you can even suggest something even if I am not asking!).
I hope you will enjoy and understand the pattern. If you have any questions, please write to me, I will try my best to help you. And I would love to see your work! I encourage you to share your finished creations on social media using the hashtag #natalinacraft. It’s a fantastic way to inspire others and showcase your talent. 
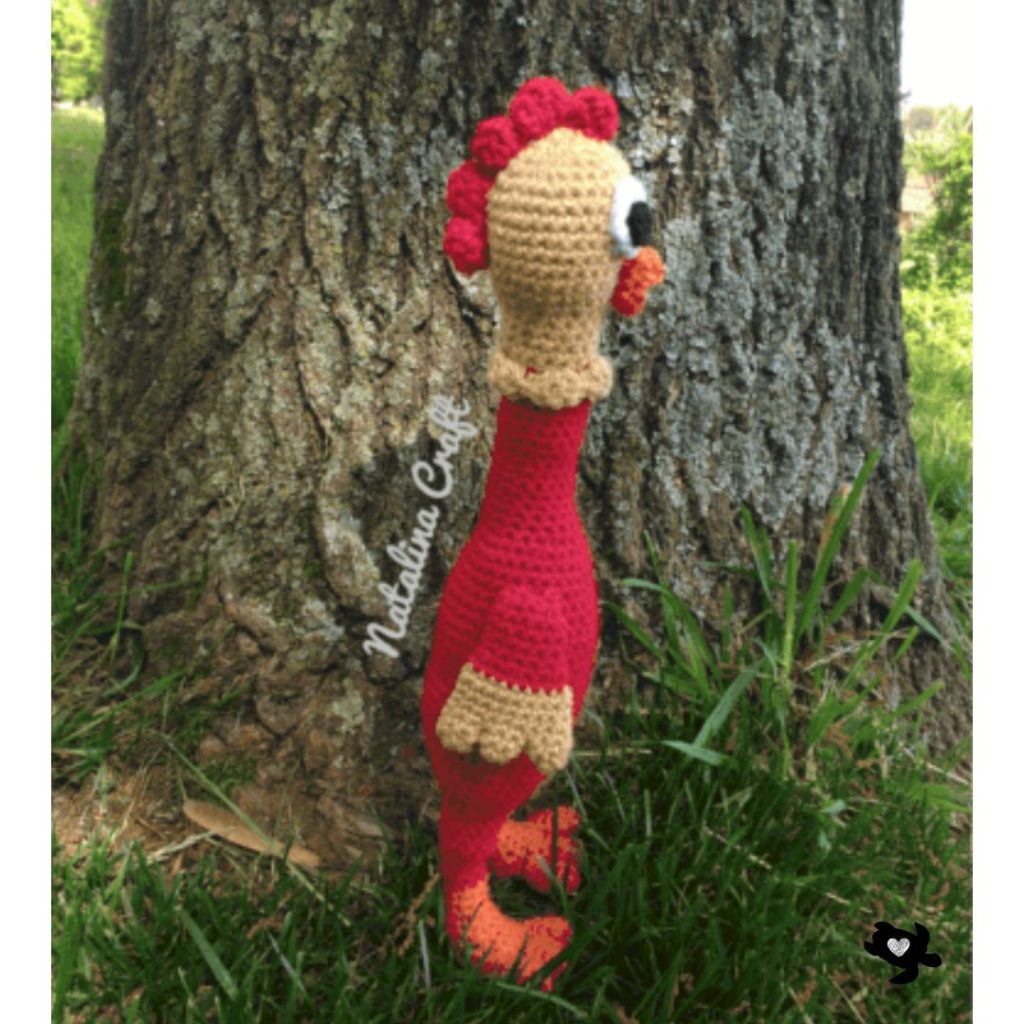
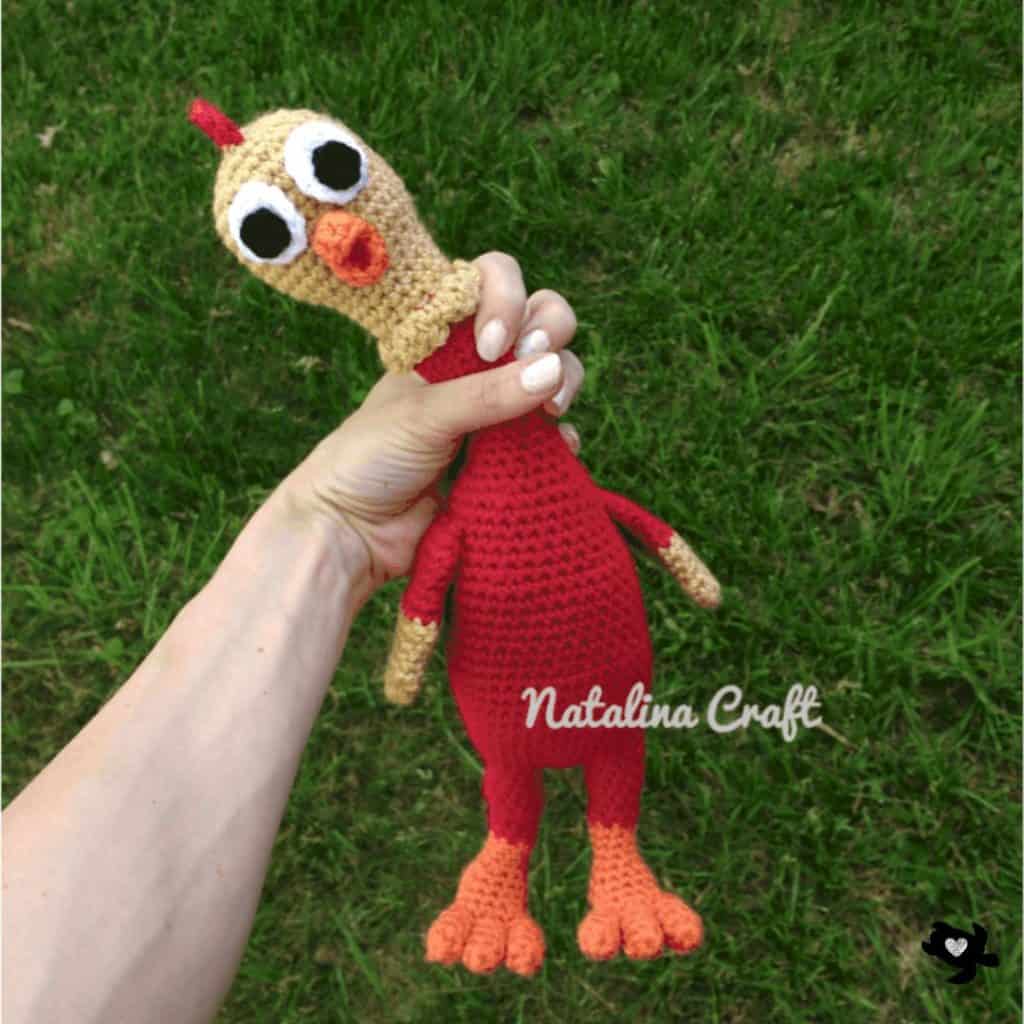

Rubber Chicken Amigurumi
Start Here
- Please read the entire pattern before starting.
- This pattern is written using US crochet terms.
Finished Size
Approx. 14 in / 36 cm tall when made with the indicated yarn.
Materials
- Worsted yarn in orange, red, brown and a small amount of white and black yarn for the eyes
- Size 3 mm crochet hook
- Size 4 mm crochet hook
- 2 Squeakers: 1 3/4″ in diameter
- Poly-Fil Fiberfill stuffing
- Stitch markers
- Tapestry needle
Abbreviations
- chain (ch)
- magic ring (mr)
- single crochet (sc)
- increase (inc)
- invisible decrease (dec)
- slip stitch (sl st)
- Double crochet (dc)
Yarn Used
Worsted yarn in black, brown, orange, red and white I used Stylecraft Special Aran in Black (color 1002), White (color 1001), Spice (color 1711), Lipstick (color 1246) and Camel (color 1420)
How to crochet a Rubber Chicken Amigurumi?
General Notes
- Work in continuous rounds unless stated otherwise
- Do not turn unless instructed
- Use a stitch marker to mark the first stitch of each round
- Stuff firmly but evenly as you go
Feet and legs :
Toes (make 3 per foot)
With orange yarn and a 4 mm hook.
First & Second Toes
- Round 1: 6 sc in a magic ring . (6)
- Rounds 2–4: 1 sc in all sts. (6)
Sl st in the next stitch, fasten off.
Third Toe
- Round 1: 6 sc in a magic ring (6)
- Rounds 2 to 4: sc in all (6)
Do not sl st and do not cut yarn.
Joining the Toes
Lay the three toes flat in front of you, all facing the same direction.
- Round 5:
- 1 sc in next 3 sts of third toe
- Join second toe: 1 sc in 1 stitch of the second toe, then 1 sc in next 2 sts
- Join first toe: 1 sc in 1 stitch of the first toe, then 1 sc in next 5 sts
- 1 sc in remaining 3 sts of second toe
- 1 sc in remaining 3 sts of first toe
All toes are now joined. (18)
- Round 6: (1 sc in the next st, 1 dec) x6. (12)


Heel
- Worked in rows
- Row 7: 1 sc in the next 6 st. (6)
- Rows 8 to 10: ch1, turn; 1 sc in the next 6 st. (6)


- Resume Working in Rounds
- Round 11:
Ch 1, turnt o work around the heel edge; 1 sc in next 6 sts,
work 3 sc evenly along the side of the heel rows,
1 sc in next 6 sts,
work 3 sc evenly along the other side of the heel rows.
(18)
Stuff the toes.

- Round 12: [1 sc in next 6 st, 2 dec, 1 sc in the next 4 st, 2 dec]. (14)
- Round 13: [1 sc in next 6 st, 1 dec, 1 sc in the next 4 st, 1 dec]. (12)
- Round 14: [1 sc in next 2 st, 1 dec] x3. (9)
- Rounds 15 to 17: 1 sc in all. (9)
Stuff the foot. 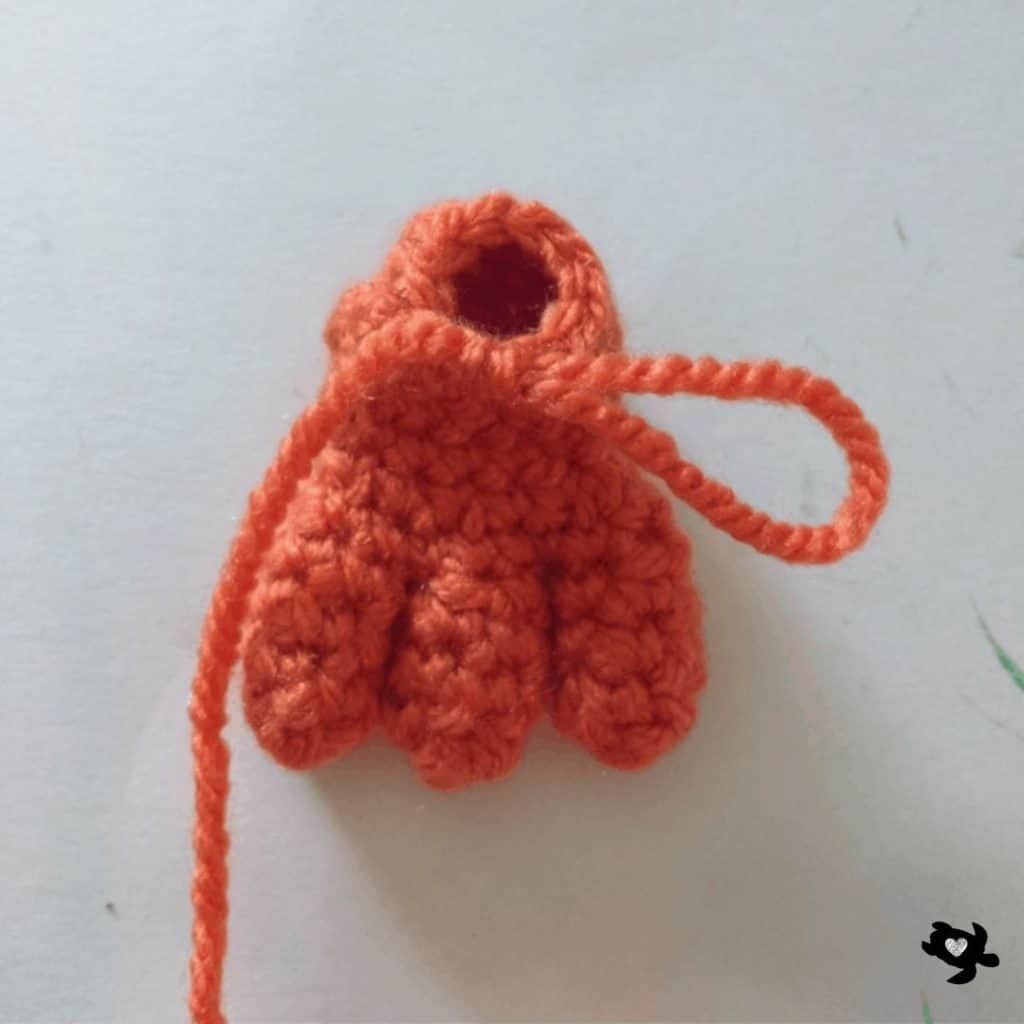
- Rounds 18 to 20: 1 sc in all. (9)
- Round 21: (1 sc in the next 2 st, 1 inc) x3. (12)
- Rounds 22 to 27: 1 sc in all. (12)
Stuff the leg.
Fasten off.
Make a second leg the same way.


Body and head :
- Worked in rounds.
With red yarn and a 4 mm hook.
- Round 1: 6 sc in a magic ring (6)
- Round 2: inc 6 times (12)
Joining the Legs
Place both legs beside the body circle.

- Round 3:
- Sc in next 3 sts of body circle
- Join left leg: insert hook through one leg stitch and one body circle stitch, sc; repeat for next 2 sts (leg joined with 3 sts)
- Sc in next 3 sts of body circle
- Join right leg the same way (3 sts)


Continue the Body
- Round 4: 1 sc in all st, all around. (24)
- Round 5: [sc in next 3 st, 1 inc in next st] x6. (30)
- Round 6: [sc in next 4 st, 1 inc in next st] x6. (36)
- Round 7: [sc in next 5 st, 1 inc in next st] x6. (42)
- Rounds 8 to 15: 1 sc in all st. (42)
- Round 16: [sc in next 5 st, 1 dec in next st] x6. (36)
- Rounds 17 to 22: 1 sc in all st. (36)
Begin stuffing.
Insert first squeaker at the base of the body.
- Round 23: [sc in next 4 st, 1 dec in next st] x6. (30)
- Rounds 24 to 28: 1 sc in all st. (30)
- Round 29: [sc in next 3 st, 1 dec in next st] x6. (24)
Continue stuffing.
Insert second squeaker near the top. 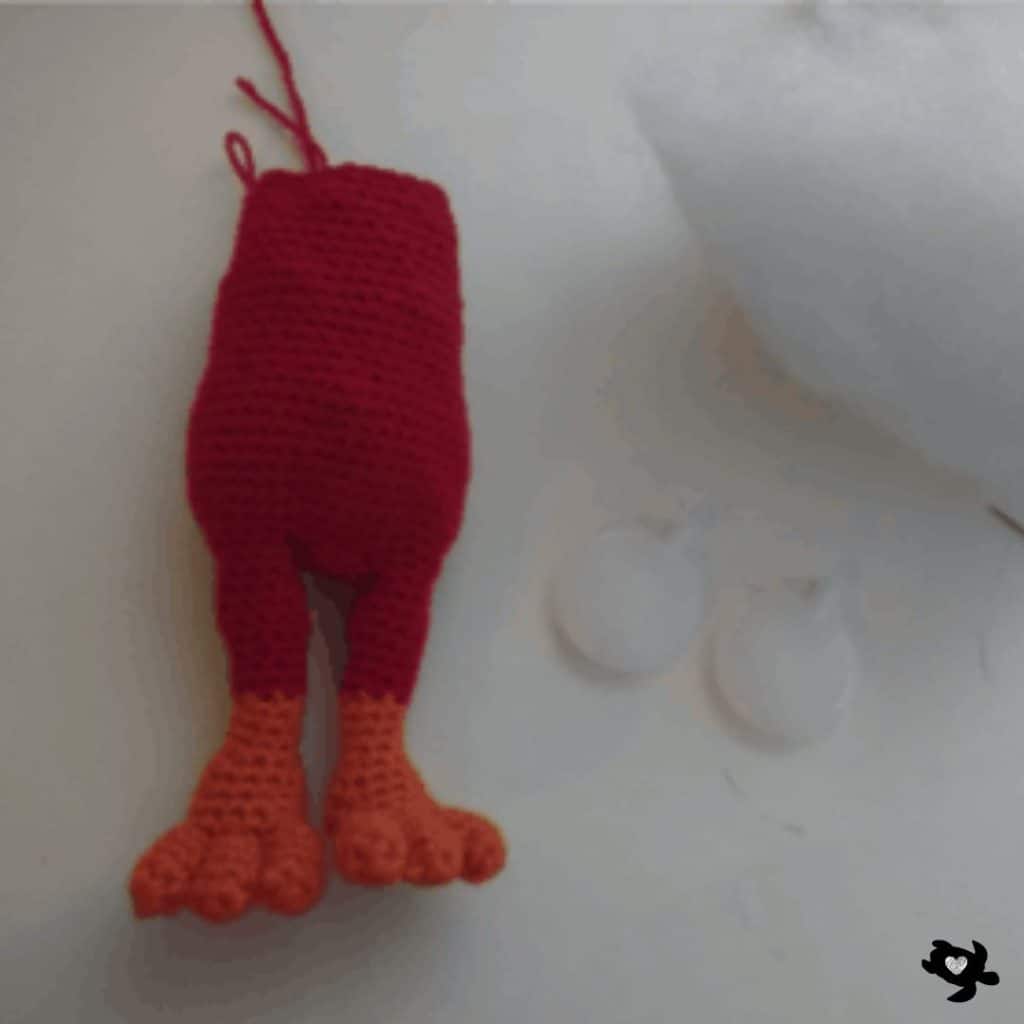

- Round 30: [sc in next 2 st, 1 dec in next st] x6. (18)
- Rounds 31 to 45: 1 sc in all st. (18)
Neck Color Change
Change to brown yarn.
- Round 46: Work in the front loops only (FLO): [3 DC in the next st, 1 sc in the next st, skip the next st] x6. (18)
- Round 47: Work in the back loops only (BLO) of round 45: 1 sc in all st. (18)
- Round 48: 1 sc in all st. (18)


- Round 49: 1 sc in all st. (18)
- Round 50: [1 sc in next 2 st, 1 inc in next st] x6. (24)
- Round 51: [1 sc in next 3 st, 1 inc in next st] x6. (30)
- Rounds 52 to 58: 1 sc in all st. (30)
- Round 59: [1 sc in next 3 st, 1 dec in next st] x6. (24)
- Round 60: [1 sc in next 2 st, 1 dec in next st] x6. (18)
- Round 61: [1 sc in next st, 1 dec in next st] x6. (12)
- Round 62: dec in all st. (6)
Fasten off and close the head. 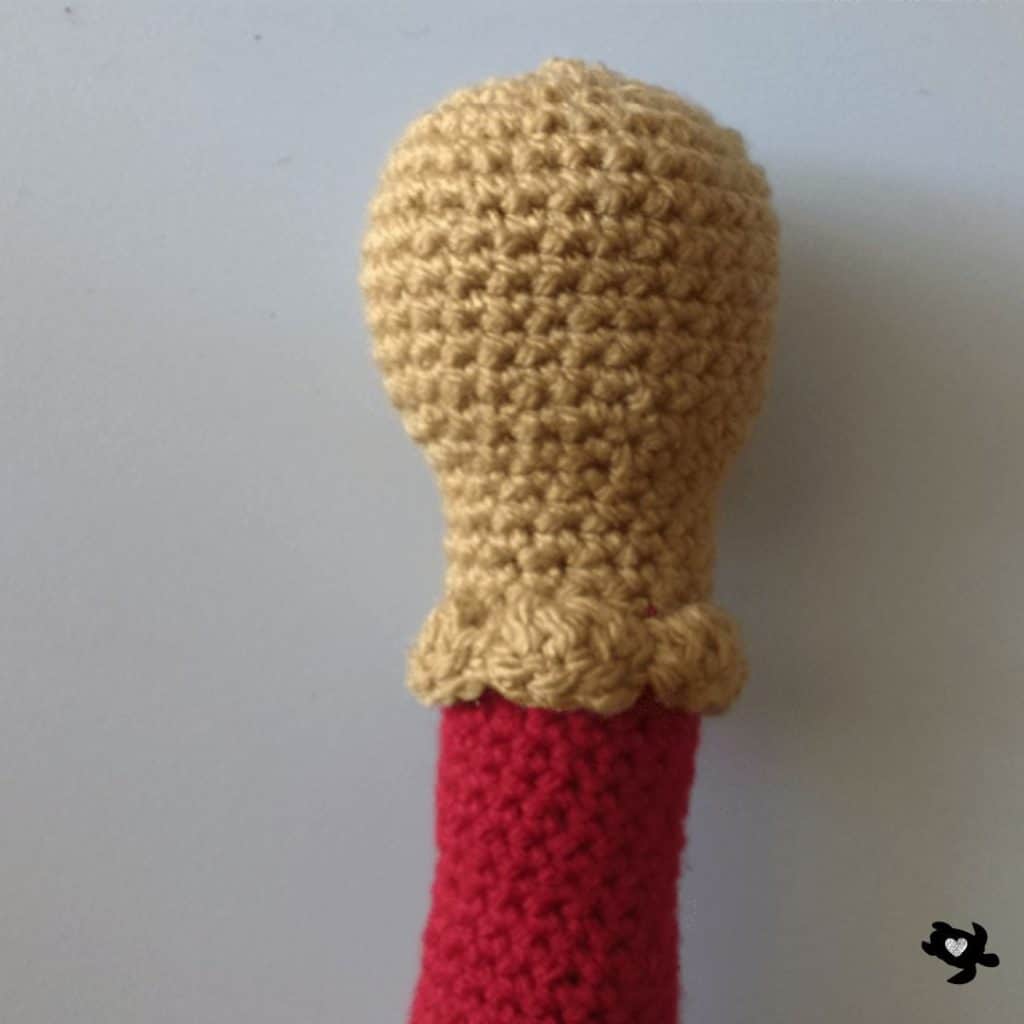
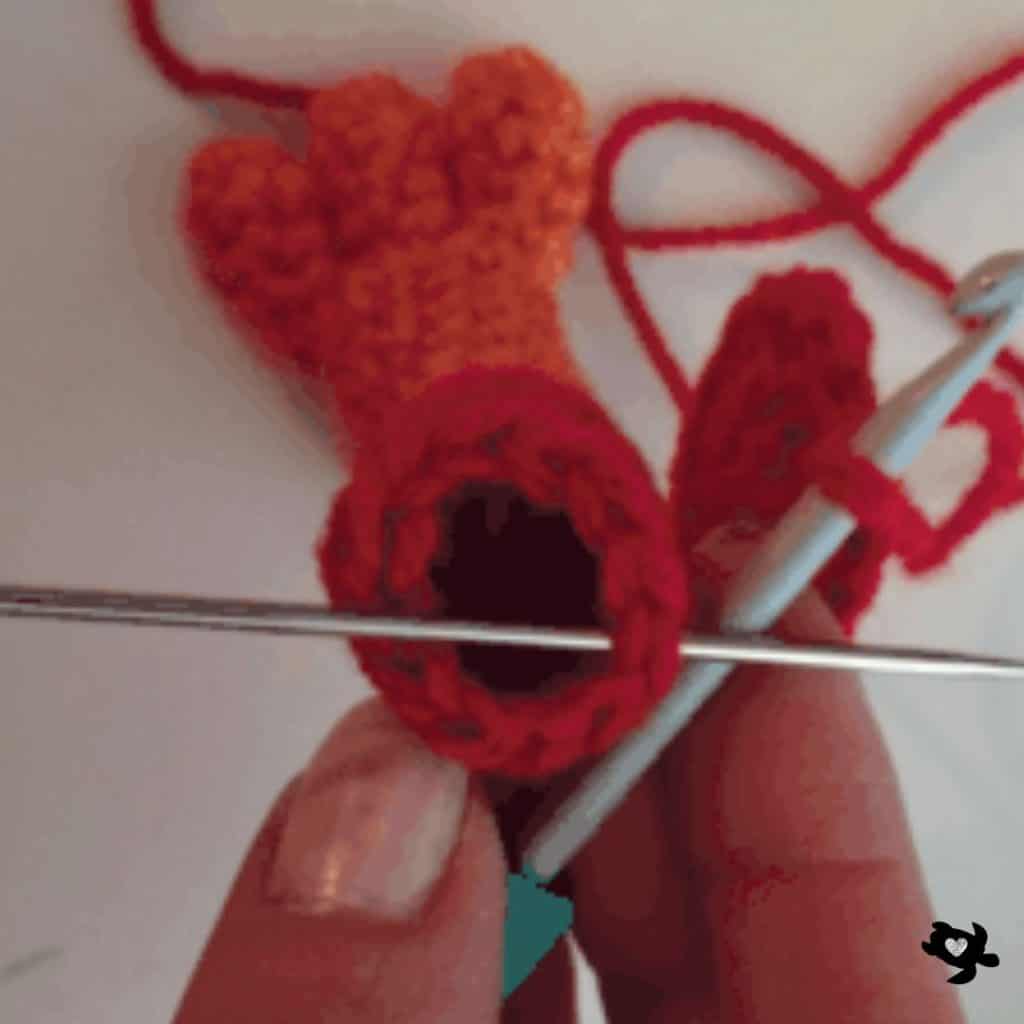
Comb :
With red yarn and 4 mm hook.
- Row 1: ch 16.
- Row 2:
1 sc in 2nd ch from hook,
[3 DC, 2 sc] repeated across, ending with 1 sc. (25)
Leave a long tail.
Sew comb to the top of the head, centered between Rounds 60–61.


Eyes (make 2) :
With 3 mm hook.
White Part
- Round 1: 6 sc in a magic ring (6)
- Round 2: inc 6 times (12)
Sl st, fasten off, leave tail.
Black Part
- Round 1: start 5 sc in a magic ring (5)
Sl st, fasten off, leave tail.
Sew black part onto white.
Attach eyes with the top of the eyes between Rounds 58–59, spaced by 2 sts.

Beak :
With orange yarn and 4 mm hook.
- Round 1: 5 sc in a magic ring (5)
- Round 2: inc 5 times (10)
- Round 3: [1 DC in next 4 st, 1 sl st in next st] x2. (10)
Fasten off, leave tail.
Sew under the eyes.


Wings (make 2) :
With brown yarn, 4 mm hook.
Feathers (make 3)
Make 2 feathers:
- Round 1: 6 sc in mr. (6)
- Round 2: sc in all sts. (6)
- Sl st, fasten off.
Third feather:
- Round 1: 6 sc in mr. (6)
- Round 2: sc in all sts. (6)
Do not fasten off.


Joining Feathers
-
- Round 3: Join feathers exactly like toes, attaching all three. (18)Lay the three feathers flat in front of you, all facing the same direction.
- 1 Sc in next 3 sts of third toe
- Join second feather: 1 sc in 1 stitch of the second feather, then 1 sc in next 2 sts
- Join first feather: 1 sc in 1 stitch of the first feather, then 1 sc in next 5 sts
- 1 Sc in remaining 3 sts of second feather
- 1 Sc in remaining 3 sts of first feather
- Round 3: Join feathers exactly like toes, attaching all three. (18)Lay the three feathers flat in front of you, all facing the same direction.

- Rounds 4 to 6: sc in all (18)
Change to the red yarn.
- Round 7: sc in all. (18)
- Round 8: [sc in next st, 1 dec in next st] x6. (12)
- Rounds 9 to 12: sc in all. (12)
- Round 13: [sc in next 2 st, 1 dec in next st] x3. (9)
Fasten off and sew wings to body between Rounds 27–28.


🎉 Finished!
Congratulations on completing your Rubber Chicken Amigurumi 🐔
This fun, squeaky creation is guaranteed to make people smile!
Copyright Notice
All rights reserved. This pattern and all accompanying photographs are the property of Natalina Craft and are protected by copyright law. This pattern is for personal use only. Any unauthorized reproduction, redistribution, or publication of this pattern, in whole or in part, is strictly prohibited.
You are welcome to sell finished items made from this pattern in small quantities. While crediting Natalina Craft as the designer is not required, it is always greatly appreciated—especially when selling online—so others can find the original pattern. Thank you for respecting these guidelines.
Rubber Chicken Amigurumi
Rubber Chicken crochet pattern
Instructions
- Please read the entire pattern before starting.
- This pattern is written using US crochet terms.
- Worsted yarn in orange, red, brown and a small amount of white and black yarn for the eyes
- Size 3 mm crochet hook
- Size 4 mm crochet hook
- 2 Squeakers: 1 3/4" in diameter
- Poly-Fil Fiberfill stuffing
- Stitch markers
- Tapestry needle
- chain (ch)
- magic ring (mr)
- single crochet (sc)
- increase (inc)
- invisible decrease (dec)
- slip stitch (sl st)
- Double crochet (dc)
- Work in continuous rounds unless stated otherwise
- Do not turn unless instructed
- Use a stitch marker to mark the first stitch of each round
- Stuff firmly but evenly as you go
- Round 1: 6 sc in a magic ring . (6)
- Rounds 2–4: 1 sc in all sts. (6)
- Round 1: 6 sc in a magic ring (6)
- Rounds 2 to 4: sc in all (6)
- Round 5:
- 1 sc in next 3 sts of third toe
Join second toe: 1 sc in 1 stitch of the second toe, then 1 sc in next 2 sts
Join first toe: 1 sc in 1 stitch of the first toe, then 1 sc in next 5 sts
1 sc in remaining 3 sts of second toe
1 sc in remaining 3 sts of first toe- Round 6: (1 sc in the next st, 1 dec) x6. (12)
- Worked in rows
- Row 7: 1 sc in the next 6 st. (6)
- Rows 8 to 10: ch1, turn; 1 sc in the next 6 st. (6)
- Resume Working in Rounds
- Round 11:Ch 1, turnt o work around the heel edge; 1 sc in next 6 sts,work 3 sc evenly along the side of the heel rows,1 sc in next 6 sts,work 3 sc evenly along the other side of the heel rows.(18)
- Round 12: [1 sc in next 6 st, 2 dec, 1 sc in the next 4 st, 2 dec]. (14)
- Round 13: [1 sc in next 6 st, 1 dec, 1 sc in the next 4 st, 1 dec]. (12)
- Round 14: [1 sc in next 2 st, 1 dec] x3. (9)
- Rounds 15 to 17: 1 sc in all. (9)
- Rounds 18 to 20: 1 sc in all. (9)
- Round 21: (1 sc in the next 2 st, 1 inc) x3. (12)
- Rounds 22 to 27: 1 sc in all. (12)
- Worked in rounds.
- Round 1: 6 sc in a magic ring (6)
- Round 2: inc 6 times (12)
- Round 3:
Sc in next 3 sts of body circle
Join left leg: insert hook through one leg stitch and one body circle stitch, sc; repeat for next 2 sts (leg joined with 3 sts)
Sc in next 3 sts of body circle
Join right leg the same way (3 sts)- Round 4: 1 sc in all st, all around. (24)
- Round 5: [sc in next 3 st, 1 inc in next st] x6. (30)
- Round 6: [sc in next 4 st, 1 inc in next st] x6. (36)
- Round 7: [sc in next 5 st, 1 inc in next st] x6. (42)
- Rounds 8 to 15: 1 sc in all st. (42)
- Round 16: [sc in next 5 st, 1 dec in next st] x6. (36)
- Rounds 17 to 22: 1 sc in all st. (36)
- Round 23: [sc in next 4 st, 1 dec in next st] x6. (30)
- Rounds 24 to 28: 1 sc in all st. (30)
- Round 29: [sc in next 3 st, 1 dec in next st] x6. (24)
- Round 30: [sc in next 2 st, 1 dec in next st] x6. (18)
- Rounds 31 to 45: 1 sc in all st. (18)
- Round 46: Work in the front loops only (FLO): [3 DC in the next st, 1 sc in the next st, skip the next st] x6. (18)
- Round 47: Work in the back loops only (BLO) of round 45: 1 sc in all st. (18)
- Round 48: 1 sc in all st. (18)
- Round 49: 1 sc in all st. (18)
- Round 50: [1 sc in next 2 st, 1 inc in next st] x6. (24)
- Round 51: [1 sc in next 3 st, 1 inc in next st] x6. (30)
- Rounds 52 to 58: 1 sc in all st. (30)
- Round 59: [1 sc in next 3 st, 1 dec in next st] x6. (24)
- Round 60: [1 sc in next 2 st, 1 dec in next st] x6. (18)
- Round 61: [1 sc in next st, 1 dec in next st] x6. (12)
- Round 62: dec in all st. (6)
- Row 1: ch 16.
- Row 2:1 sc in 2nd ch from hook,[3 DC, 2 sc] repeated across, ending with 1 sc. (25)
- Round 1: 6 sc in a magic ring (6)
- Round 2: inc 6 times (12)
- Round 1: start 5 sc in a magic ring (5)
- Round 1: 5 sc in a magic ring (5)
- Round 2: inc 5 times (10)
- Round 3: [1 DC in next 4 st, 1 sl st in next st] x2. (10)
- Round 1: 6 sc in mr. (6)
- Round 2: sc in all sts. (6)
- Sl st, fasten off.
- Round 1: 6 sc in mr. (6)
- Round 2: sc in all sts. (6)
- Round 3: Join feathers exactly like toes, attaching all three. (18)
Lay the three feathers flat in front of you, all facing the same direction. - 1 Sc in next 3 sts of third toe
Join second feather: 1 sc in 1 stitch of the second feather, then 1 sc in next 2 sts
Join first feather: 1 sc in 1 stitch of the first feather, then 1 sc in next 5 sts
1 Sc in remaining 3 sts of second feather
1 Sc in remaining 3 sts of first feather- Rounds 4 to 6: sc in all (18)
- Round 7: sc in all. (18)
- Round 8: [sc in next st, 1 dec in next st] x6. (12)
- Rounds 9 to 12: sc in all. (12)
- Round 13: [sc in next 2 st, 1 dec in next st] x3. (9)
Rubber Chicken Amigurumi
Start Here
Finished Size
Approx. 14 in / 36 cm tall when made with the indicated yarn.
Materials
Abbreviations
Yarn Used
Worsted yarn in black, brown, orange, red and white I used Stylecraft Special Aran in Black (color 1002), White (color 1001), Spice (color 1711), Lipstick (color 1246) and Camel (color 1420)
How to crochet a Rubber Chicken Amigurumi?
General Notes
Feet and legs :
Toes (make 3 per foot)
With orange yarn and a 4 mm hook.
First & Second Toes
Sl st in the next stitch, fasten off.
Third Toe
Do not sl st and do not cut yarn.
Joining the Toes
Lay the three toes flat in front of you, all facing the same direction.
All toes are now joined. (18)
Heel
Stuff the toes.
Stuff the foot. Change to red yarn.
Stuff the leg.Fasten off.
Make a second leg the same way.
Body and head :
With red yarn and a 4 mm hook.
Joining the Legs
Place both legs beside the body circle.
Continue the Body
Begin stuffing.Insert first squeaker at the base of the body.
Continue stuffing.Insert second squeaker near the top.
Neck Color Change
Change to brown yarn.
Fasten off and close the head.
Comb :
With red yarn and 4 mm hook.
Leave a long tail.Sew comb to the top of the head, centered between Rounds 60–61.
Eyes (make 2) :
With 3 mm hook.
White Part
Sl st, fasten off, leave tail.
Black Part
Sl st, fasten off, leave tail.
Sew black part onto white.Attach eyes with the top of the eyes between Rounds 58–59, spaced by 2 sts.
Beak :
With orange yarn and 4 mm hook.
Fasten off, leave tail.
Sew under the eyes.
Wings (make 2) :
With brown yarn, 4 mm hook.
Feathers (make 3)
Make 2 feathers:
Third feather:
Do not fasten off.
Joining Feathers
Change to the red yarn.
Fasten off and sew wings to body between Rounds 27–28.
🎉 Finished!
Congratulations on completing your Rubber Chicken Amigurumi 🐔This fun, squeaky creation is guaranteed to make people smile!
Copyright Notice
All rights reserved. This pattern and all accompanying photographs are the property of Natalina Craft and are protected by copyright law. This pattern is for personal use only. Any unauthorized reproduction, redistribution, or publication of this pattern, in whole or in part, is strictly prohibited.
You are welcome to sell finished items made from this pattern in small quantities. While crediting Natalina Craft as the designer is not required, it is always greatly appreciated—especially when selling online—so others can find the original pattern. Thank you for respecting these guidelines.
bonjour,
J’aimerais bien les explications du poulet bruyant en français.
merci
Bonjour, j’essaie de le faire au plus vite! Merci
Bonjour, votre poulet est trop cute j aimerais avoir la version française SVP Merci! vous faites de belle chose
Bonjour, merci beaucoup! J’essaie de faire la version française au plus vite!
Bonjour, votre poulet est trop cute puis je avoir le patron en français SVP Merci passer une belle journée Le soleil est présent il faut en profité
Je vous ai répondu sur l’autre commentaire. Merci beaucoup. Une très belle journée à vous aussi.
Bonjour,
puis-je avoir les explications françaises du poulet , il est trop mignon, s’il vous plaît ? MERCI Cordialement
Bonjour, merci beaucoup! J’essaie de le faire au plus vite!
Such a cute idea!
Thank you Sarah!
I love how easy your pattern is to read and follow along! I also love all the pictures to follow along with the process. Looks like a super fun pattern to try! 🙂
Thank you very much Heather!
I am struggling with the feathers, I am not understanding how to do them. Do I fold the small round or leave them open flat? I hope you can help. The rest of the pattern was so easy abs quick.
Thanks
Hi, I am so sorry for my late reply, I had to take a little break from my blog. Let me know if you still need some help.
Why won’t the squeaky chicken print. Says it’s free but when i try print it says not shareable. Don’t even see a place to buy it. Please help me with this problem. Thank you, Judy
Hi, I just added a printable version (without pictures) at the end of the page. Let me know if it works!
Worked perfect
Thank you .
You are very welcome.
Thank you!
How do you insert squeakers d[you just put them in surrounded with stuffing or do the have to be sewed in. Thank you . My first time using squeakers
Hi, I just put them inside the stuffing.
Where do buy the squeaker? Thank you. I love your clear instructions. I look forward to making this for my friend.
I bought them on Amazon but I recently saw some at my local craft store too. You can search for “Squeaker replacement” or “squeaker for dog toys” Thank you for your nice words!
Hello, I’m having trouble understanding the toes. When joining does the 6 sc only goes across the first 2 toes?
Hello, sorry for my late reply. you will have to do 3 sc in the 3rd toe, 3 sc in the second toe, 6 sc in the first toe, then 3 sc in the 3 remaining st of 2nd toe, and 3 sc in the 3 remaining st of the 3rd toe. Does this help?
HELP please 🙏
I am stuck on Rnd 4 of the body , but maybe I stuffed up on joining the ring to the legs .
But I have undone it and will wait for a reply as to how this part is done.
my count doesn’t add up and from the photos , it looks like you crochet the whole way around the ring before crocheting around the both the legs also ? but it doesn’t mention this in the instructions .
Hi, thank you for reaching out! Sorry for the delay. I will try my best to help you. Please let me know if your are still stuck after my explanations.
At the end of Round 2 of the body, you should have: a circle of 12 st and 2 legs with 12 st as well. In Round 3 of the body, you will join the circle to the legs as follow: 1 sc in 3 st of the circle, 1 sc in 3 st of both circle and a leg, 1 sc in 3 st of the circle, 1 sc in 3 st of both circle and 2nd leg. The 9 remaning st of the legs will stay unworked at this time. I added a drawing to the pattern, let me know if it helps. On Round 4, you shouldn’t work on the 6 sc (3 sc in each side) you made to join the legs. You will only work on the 9 remaining stitches of the legs (x2) and the 3 stitches of the circles (x2) – so you will have a total of 24 st (9 + 3 + 9 +3). Let me know if it helps!
I just finished the crocheted rubber chicken. I was able to easily follow along with your instructions. The pictures helped me to understand how the pieces went together. Thank you I appreciate the free pattern.
Thank you so much! I am glad you enjoyed the pattern!