
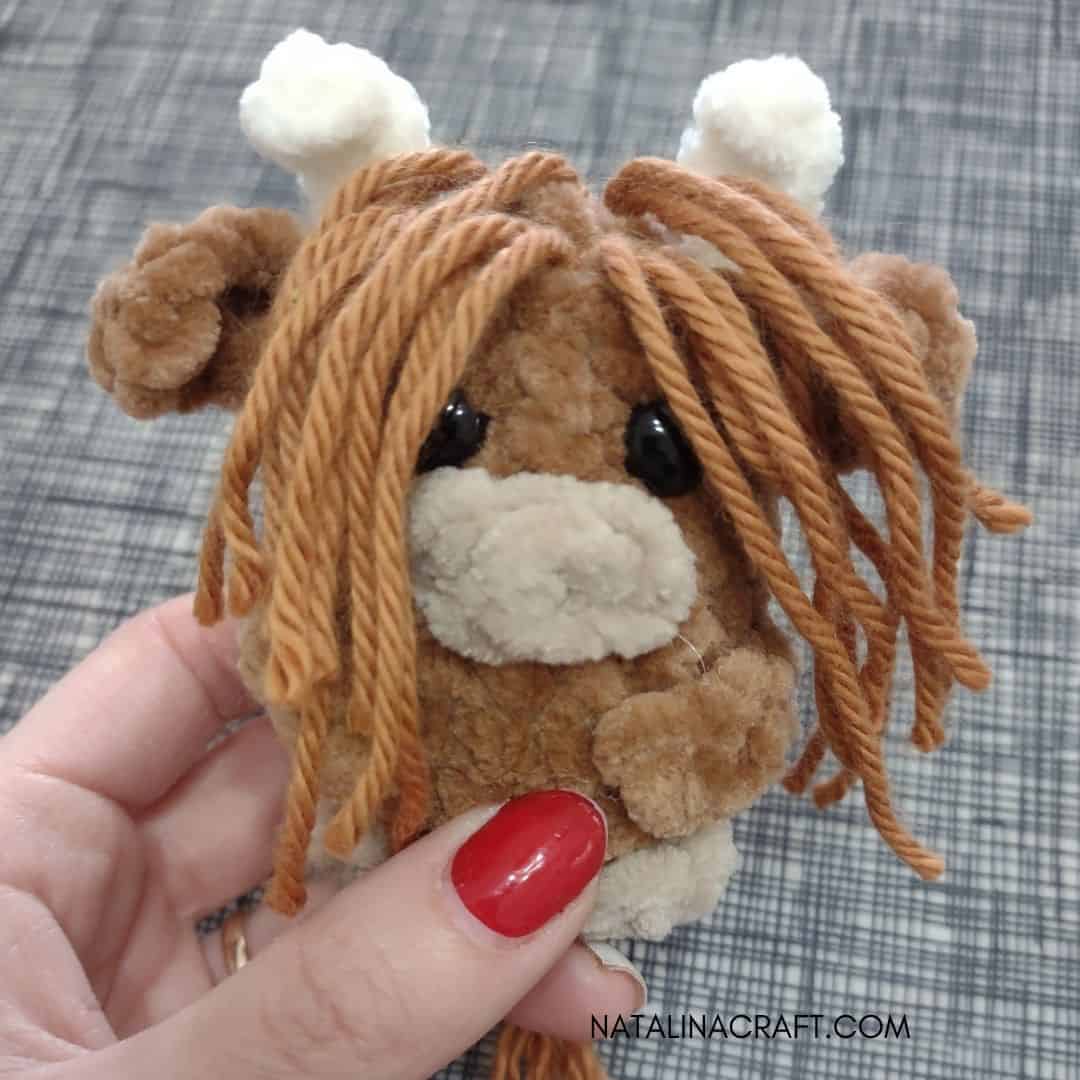
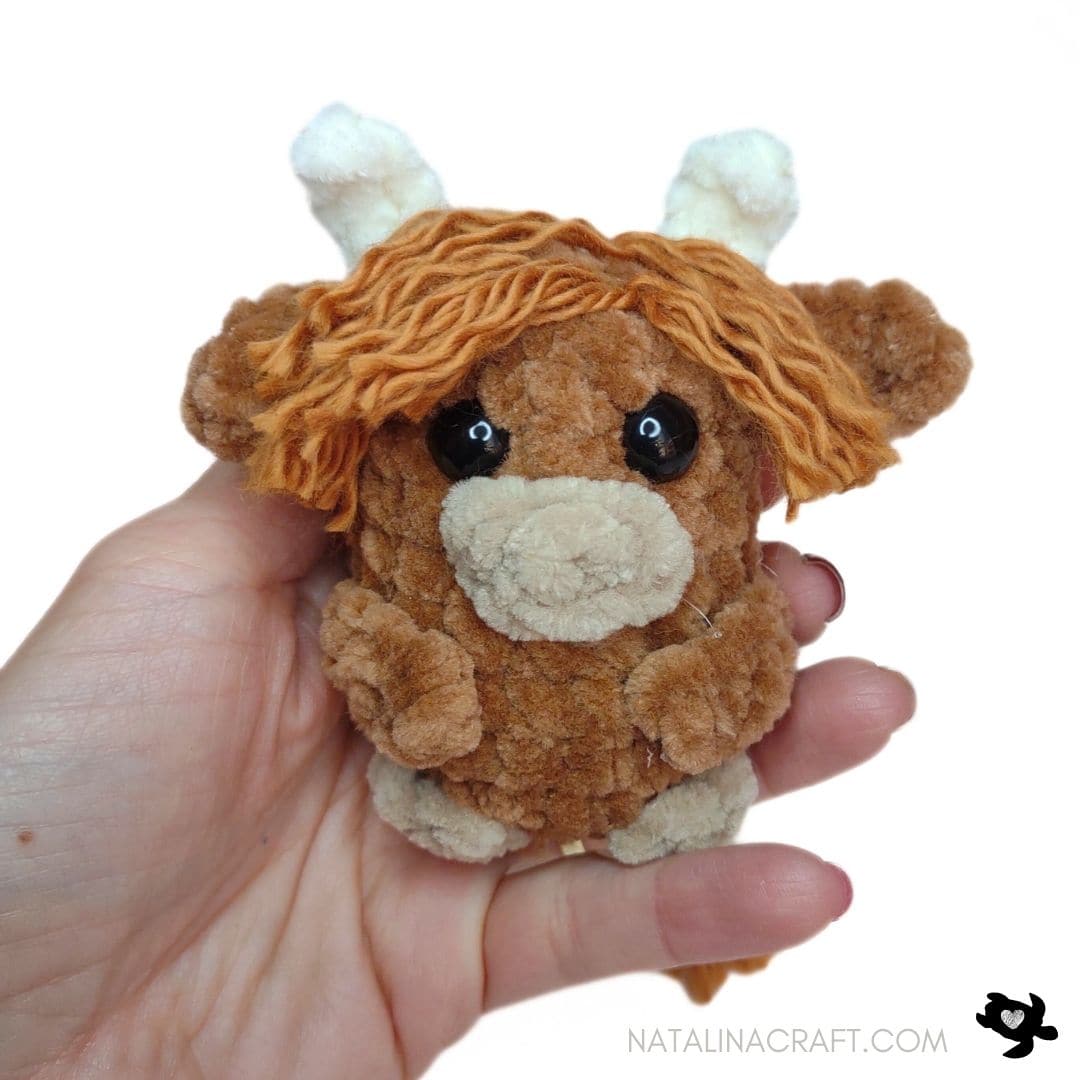
In this blog post, I am thrilled to share a delightful free crochet pattern for a charming small highland cow amigurumi that fits perfectly in the palm of your hand. With its irresistibly adorable design and quick, easy crocheting process, this little cutie is also perfectly suited to double as a whimsical keychain. Let’s gather our supplies and embark on a whimsical crochet adventure together!
Don’t forget to join my Facebook group HERE, you can ask your questions, and share your finished projects. I will regularly ask you what pattern you would like to see next (or you can even suggest something even if I am not asking!).
I hope you will enjoy and understand the pattern. If you have any questions, please write to me, I will try my best to help you. And I would love to see your work! Don’t forget to share your finished projects using the hashtag #natalinacraft. I love seeing your beautiful work!


Highland Cow – Free Crochet Pattern
Start Here
Please read the entire pattern before starting.
This pattern is written using US crochet terms.
Parts
- Body
- 2 ears
- 2 horns
- 2 arms
- 2 legs
- Tail
- Snout
- Hair
Finished Size
- Approx. 1.5 in (4 cm) using light worsted yarn
- Approx. 2.5 in (7 cm) using plush yarn
Material:
Yarn Options
Worsted version (small cow):
- Worsted yarn in Light brown, dark brown, and cream.
- Hair: worsted yarn in dark brown.
Plush version (larger cow):
- Plush yarn in light brown, dark brown, and cream
- Hair: worsted yarn in dark brown.
Hooks
- 2.75 mm (US C-2) for worsted yarn
- 4.5 mm (US 7) for plush yarn
Other
- 2 black safety eyes: 6 mm (worsted) or 10 mm (plush)
- Polyfill stuffing
- Tapestry needle
- Stitch marker (optional)
- Optional: fabric/hot glue (helpful for securing very small pieces)
Abbreviations
- ch – chain
- mr – magic ring
- sc – single crochet
- inc – increase
- dec – invisible decrease
- sl st – slip stitch
- HDC – Half double crochet
- DC – Double crochet
Body
- Worked in continuous rounds. Use a stitch marker if needed.
- Stuff as you go.
With light brown yarn:
- Round 1: 6 sc in a magic ring (6)
Plush option: ch 2, 6 sc in 2nd ch from hook - Round 2: [6 inc]. (12)
- Round 3: [1 inc in the next st, 1 sc]x6. (18)
- Rounds 4-10: [1 sc in all st]. (18)
- Round 11: [1 dec, 1 sc]x6. (12)
👉 Insert safety eyes between Rounds 9 and 10, spaced by 2 stitches.
For best results, place eyes before starting Round 12.
Stuff firmly.
- Round 12: [6 dec]. (6)
Fasten off, leaving a long tail. Close the opening with a tapestry needle.


Snout
With light brown yarn:
-
- Row 1: ch 4.
- Row 2: starting in the 2nd ch from the hook: 3 sc. (3)
Fasten off, leaving a long tail.
Thread the yarn through the first chain to close the snout.
Sew the snout centered below the eyes, spanning approximately Round 8.
Optional: secure the back of the snout with a small amount of fabric/hot glue.


Ears (make 2)
With dark brown yarn:
- Row 1: ch 5.
- Row 2: starting in the 2nd ch from the hook: 1 sc, 1 HDC, 1 DC, 1 sc. (4)
Fasten off, leaving a long tail.
Sew the ears to the head around Round 10, spaced evenly (approximately 8 stitches apart).


Horns (make 2)
With cream yarn:
- Row 1: ch 5.
- Row 2: starting in the 2nd ch from the hook: 1 sl st in each chain. (4)
Fasten off, leaving a long tail.
Sew the horns over Round 11, spaced approximately 4 stitches apart.


Tail
With dark brown yarn:
- Row 1: ch 7.
- Row 2: starting in the 2nd ch from the hook: 1 sl st in each chain. (6)
Fasten off, leaving a long tail.
Tail Hair
- Worsted version: cut 1 strand of worsted dark brown yarn (~5.5 in / 14 cm)
- Plush version: cut 2 strands of worsted dark brown yarn (~5.5 in / 14 cm)
Attach the hair to the first stitch of the tail using a latch-knot: fold the yarn in half, pull the loop through the stitch with your crochet hook, pass the yarn ends through the loop, and tighten.
Separate strands and trim to desired length.
Sew the tail to the back of the body between Rounds 3 and 4.


Arms (make 2)
With dark brown yarn:
- Row 1: ch 5.
- Row 2: starting in the 2nd ch from the hook: 1 sc in each chain. (4)
Fasten off, leaving a long tail.
Sew the arms to the body between Rounds 5 and 6, spaced by 3 stitches.
Optional: A small amount of fabric/hot glue can help secure tiny pieces.


Legs (make 2)
With light brown yarn:
- Round 1: 5 sc in a magic ring (5)
Plush option: ch 2, 5 sc in 2nd ch from hook
Fasten off, leaving a long tail.
Thread yarn through the first stitch to close the leg.
Sew the legs to the body between Rounds 2 and 3, spaced by 2 stitches.
Place the right side of each leg against the body.
Optional: A small amount of fabric/hot glue can help secure tiny pieces.


Hair
Worsted Version
Cut 7 strands of worsted dark brown yarn (~5.5 in / 14 cm).
- Insert 4 strands between Rounds 11–12
- Insert 3 strands between Rounds 12–13
Attach each strand using a latch-knot method: fold the yarn in half, pull the loop through the stitch with your crochet hook, pass the yarn ends through the loop, and tighten.
Separate strands and trim to desired length.


Plush Version
Cut 10 strands of dark brown yarn (~5.5 in / 14 cm).
- Insert 6 strands between Rounds 11–12
- Insert 4 strands between Rounds 12–13
Attach each strand using a latch-knot method: fold the yarn in half, pull the loop through the stitch with your crochet hook, pass the yarn ends through the loop, and tighten.
Separate strands and trim to the desired length.


🎉 Congratulations!
Your Highland Cow is complete 🐮🧶
Thank you for crocheting along—I hope you loved making this tiny, fluffy cow as much as I did!


Copyright Notice
All rights reserved. This pattern and all accompanying photographs are the property of Natalina Craft and are protected by copyright law. This pattern is for personal use only. Any unauthorized reproduction, redistribution, or publication of this pattern, in whole or in part, is strictly prohibited.
You are welcome to sell finished items made from this pattern in small quantities. While crediting Natalina Craft as the designer is not required, it is always greatly appreciated—especially when selling online—so others can find the original pattern.
Thank you for respecting these guidelines.
Highland Cow – Crochet Pattern
Highland Cow - Crochet Pattern
Instructions
Highland Cow - Free Crochet Pattern
Start Here
Please read the entire pattern before starting.This pattern is written using US crochet terms.
Parts
- Body
- 2 ears
- 2 horns
- 2 arms
- 2 legs
- Tail
- Snout
- Hair
Finished Size
- Approx. 1.5 in (4 cm) using light worsted yarn
- Approx. 2.5 in (7 cm) using plush yarn
Material:
Yarn Options
Worsted version (small cow):
- Worsted yarn in Light brown, dark brown, and cream.
- Hair: worsted yarn in dark brown.
Plush version (larger cow):
- Plush yarn in light brown, dark brown, and cream
- Hair: worsted yarn in dark brown.
Hooks
- 2.75 mm (US C-2) for worsted yarn
- 4.5 mm (US 7) for plush yarn
Other
- 2 black safety eyes: 6 mm (worsted) or 10 mm (plush)
- Polyfill stuffing
- Tapestry needle
- Stitch marker (optional)
- Optional: fabric/hot glue (helpful for securing very small pieces)
Abbreviations
- ch – chain
- mr – magic ring
- sc – single crochet
- inc – increase
- dec – invisible decrease
- sl st – slip stitch
- HDC - Half double crochet
- DC - Double crochet
Body
- Worked in continuous rounds. Use a stitch marker if needed.
- Stuff as you go.
With light brown yarn:
- Round 1: 6 sc in a magic ring (6)Plush option: ch 2, 6 sc in 2nd ch from hook
- Round 2: [6 inc]. (12)
- Round 3: [1 inc in the next st, 1 sc]x6. (18)
- Rounds 4-10: [1 sc in all st]. (18)
- Round 11: [1 dec, 1 sc]x6. (12)
👉 Insert safety eyes between Rounds 9 and 10, spaced by 2 stitches.For best results, place eyes before starting Round 12.
Stuff firmly.
- Round 12: [6 dec]. (6)
Fasten off, leaving a long tail. Close the opening with a tapestry needle.
Snout
With light brown yarn:
- Row 1: ch 4.
- Row 2: starting in the 2nd ch from the hook: 3 sc. (3)
Fasten off, leaving a long tail.Thread the yarn through the first chain to close the snout.
Sew the snout centered below the eyes, spanning approximately Round 8.
Optional: secure the back of the snout with a small amount of fabric/hot glue.
Ears (make 2)
With dark brown yarn:
- Row 1: ch 5.
- Row 2: starting in the 2nd ch from the hook: 1 sc, 1 HDC, 1 DC, 1 sc. (4)
Fasten off, leaving a long tail.
Sew the ears to the head around Round 10, spaced evenly (approximately 8 stitches apart).
Horns (make 2)
With cream yarn:
- Row 1: ch 5.
- Row 2: starting in the 2nd ch from the hook: 1 sl st in each chain. (4)
Fasten off, leaving a long tail.
Sew the horns over Round 11, spaced approximately 4 stitches apart.
Tail
With dark brown yarn:
- Row 1: ch 7.
- Row 2: starting in the 2nd ch from the hook: 1 sl st in each chain. (6)
Fasten off, leaving a long tail.
Tail Hair
- Worsted version: cut 1 strand of worsted dark brown yarn (~5.5 in / 14 cm)
- Plush version: cut 2 strands of worsted dark brown yarn (~5.5 in / 14 cm)
Attach the hair to the first stitch of the tail using a latch-knot: fold the yarn in half, pull the loop through the stitch with your crochet hook, pass the yarn ends through the loop, and tighten.Fold yarn in half, pull loop through stitch, pass ends through loop, tighten.Separate strands and trim to desired length.
Sew the tail to the back of the body between Rounds 3 and 4.
Arms (make 2)
With dark brown yarn:
- Row 1: ch 5.
- Row 2: starting in the 2nd ch from the hook: 1 sc in each chain. (4)
Fasten off, leaving a long tail.
Sew the arms to the body between Rounds 5 and 6, spaced by 3 stitches.
Optional: A small amount of fabric/hot glue can help secure tiny pieces.
Legs (make 2)
With light brown yarn:
- Round 1: 5 sc in a magic ring (5)Plush option: ch 2, 5 sc in 2nd ch from hook
Fasten off, leaving a long tail.Thread yarn through the first stitch to close the leg.
Sew the legs to the body between Rounds 2 and 3, spaced by 2 stitches.Place the right side of each leg against the body.
Optional: A small amount of fabric/hot glue can help secure tiny pieces.
Hair
Worsted Version
Cut 7 strands of worsted dark brown yarn (~5.5 in / 14 cm).
- Insert 4 strands between Rounds 11–12
- Insert 3 strands between Rounds 12–13
Attach each strand using a latch-knot method: fold the yarn in half, pull the loop through the stitch with your crochet hook, pass the yarn ends through the loop, and tighten.Separate strands and trim to desired length.
Plush Version
Cut 10 strands of dark brown yarn (~5.5 in / 14 cm).
- Insert 6 strands between Rounds 11–12
- Insert 4 strands between Rounds 12–13
Attach each strand using a latch-knot method: fold the yarn in half, pull the loop through the stitch with your crochet hook, pass the yarn ends through the loop, and tighten.Separate strands and trim to the desired length.
🎉 Congratulations!
Your Highland Cow is complete 🐮🧶Thank you for crocheting along—I hope you loved making this tiny, fluffy cow as much as I did!
Copyright Notice
All rights reserved. This pattern and all accompanying photographs are the property of Natalina Craft and are protected by copyright law. This pattern is for personal use only. Any unauthorized reproduction, redistribution, or publication of this pattern, in whole or in part, is strictly prohibited.
You are welcome to sell finished items made from this pattern in small quantities. While crediting Natalina Craft as the designer is not required, it is always greatly appreciated—especially when selling online—so others can find the original pattern.Thank you for respecting these guidelines.
thank you. it’s so cute
Thank you!
Thank you!! It is so well written, everything is clear. Therefore – a lot of comfort by crocheting. Only a pity that I can’t post a picture of the result here:) I made it for my sister and we both love it.
Aww, thank you so much! I’m so glad to hear the pattern was clear and that it brought you comfort while crocheting, that means the world to me. How sweet that you made it for your sister too, I’m sure she treasures it! I wish there was a way to see your picture here, I would love to see it! If you are on facebook or instagram, you can tag me or share it in my private group and i should be able to see it. Thank you for sharing your kind words and for making my design part of such a special gift.