
Hi everyone! After the crochet chick applique, you will find here a new free crochet pattern for a hen applique. Add a touch of farmhouse charm to your projects with this delightful hen design. Perfect for embellishing kitchen towels, baby blankets, or accessories, this crochet appliqué is a fun and creative way to showcase your crafty skills. This is part of my farm crochet applique collection. It is super easy and fast to do. Don’t wait to make yours! Get ready to bring a little farmyard flair to your handmade treasures!
Don’t forget to join my Facebook group here, you can ask your questions, and share your finished projects. I will regularly ask you what pattern you would like to see next (or you can even suggest something even if I am not asking!).
I hope you will enjoy and understand the pattern. If you have any questions, please write to me, I will try my best to help you. And I would love to see your work! Don’t forget to share your finished projects using the hashtag #natalinacraft. I love seeing your incredible work and the joy it brings to your crochet journey. 

Crochet Pattern Hen Appliqué
Start Here:
- Please read the whole pattern properly before starting.
- The pattern is written using US terms.
- The appliqué is worked flat and assembled at the end
Parts:
- Body
- Head
- 2 wings
- 2 feet
- 1 comb (top of the head)
- 1 wattle (below the beak)
Finished Size:
Approx. 4 inches (10 cm)
Material:
- Worsted yarn in white, red and orange
- Size 2.75 mm crochet hook (B/2).
- 2 black safety eyes (7.5 mm)
- Stitch markers (if needed)
- Tapestry needle
Abbreviations:
- chain (ch)
- magic ring (mr)
- single crochet (sc)
- increase (inc)
- invisible decrease (dec)
- slip stitch (sl st)
- half double crochet (hdc)
- double crochet (dc)
How to crochet a Hen Appliqué?
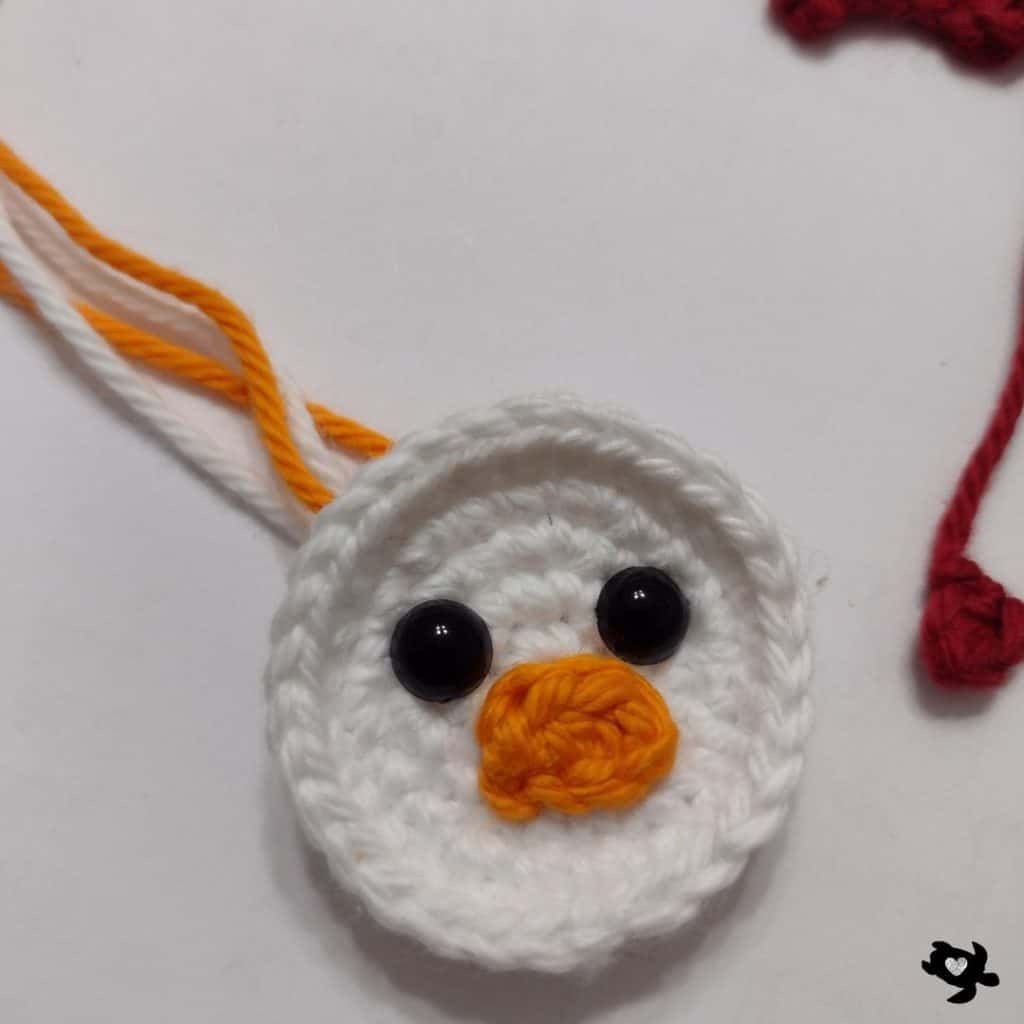
Head
- Worked in continuous rounds. Do not turn.
With white yarn and a 2.75 mm hook:
- Round 1: 6 sc in a magic ring. (6)
- Round 2: inc 6 times. (12)
- Round 3: [1 sc in next st, 1 inc] x6. (18)
- Round 4: [1 sc in next st, 1 inc, 1 sc in next st ] x6. (24)
- Round 5: [1 inc, 1 sc in next 3 st] x6. (30)
Fasten off, leaving a long tail for sewing.
Place the safety eyes between Rounds 2 and 3, spaced by 4 stitches.

Beak
With orange yarn:
- Row 1: ch 4.
- Row 2: starting in the 2nd ch from the hook: 1 sc, 1 hdc, 1 sc. (3)
Fasten off, leaving a long tail.
Sew the beak just below the eyes (Row 2 facing upward). 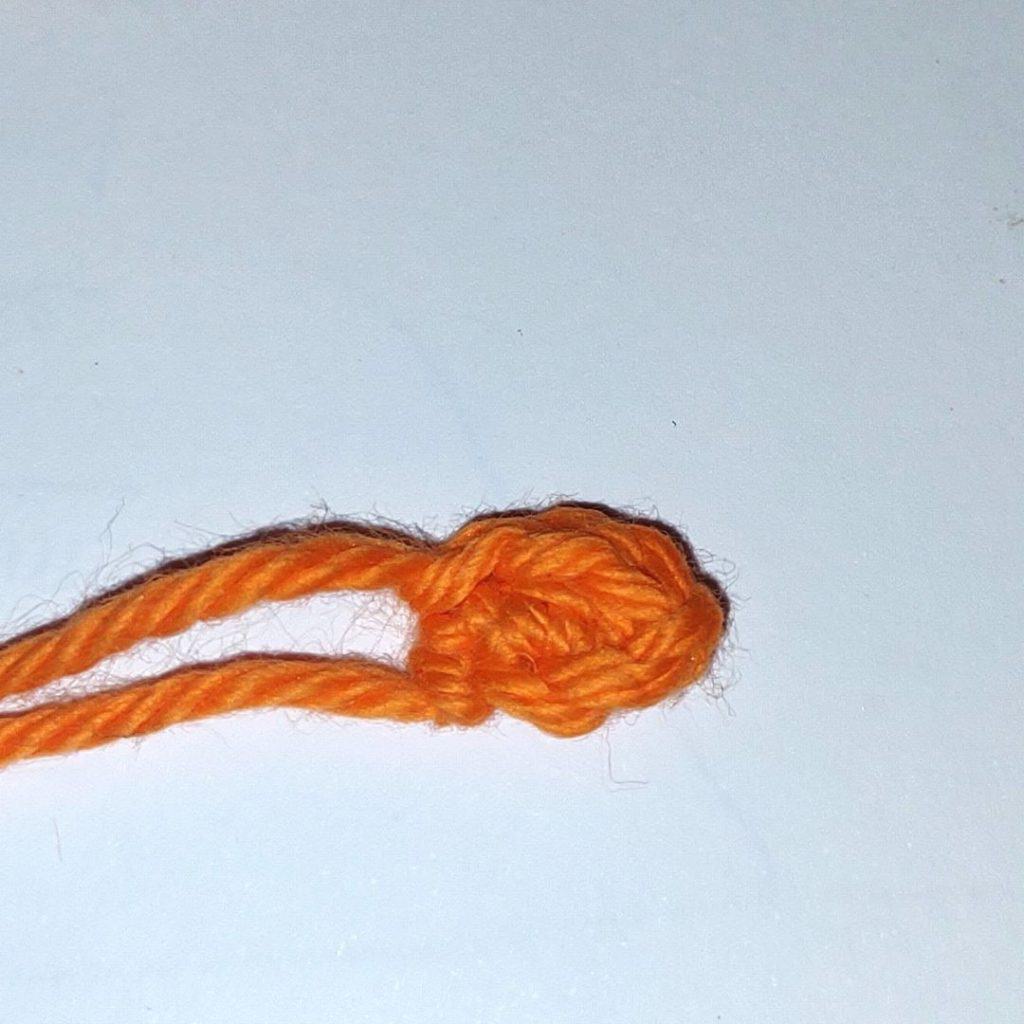
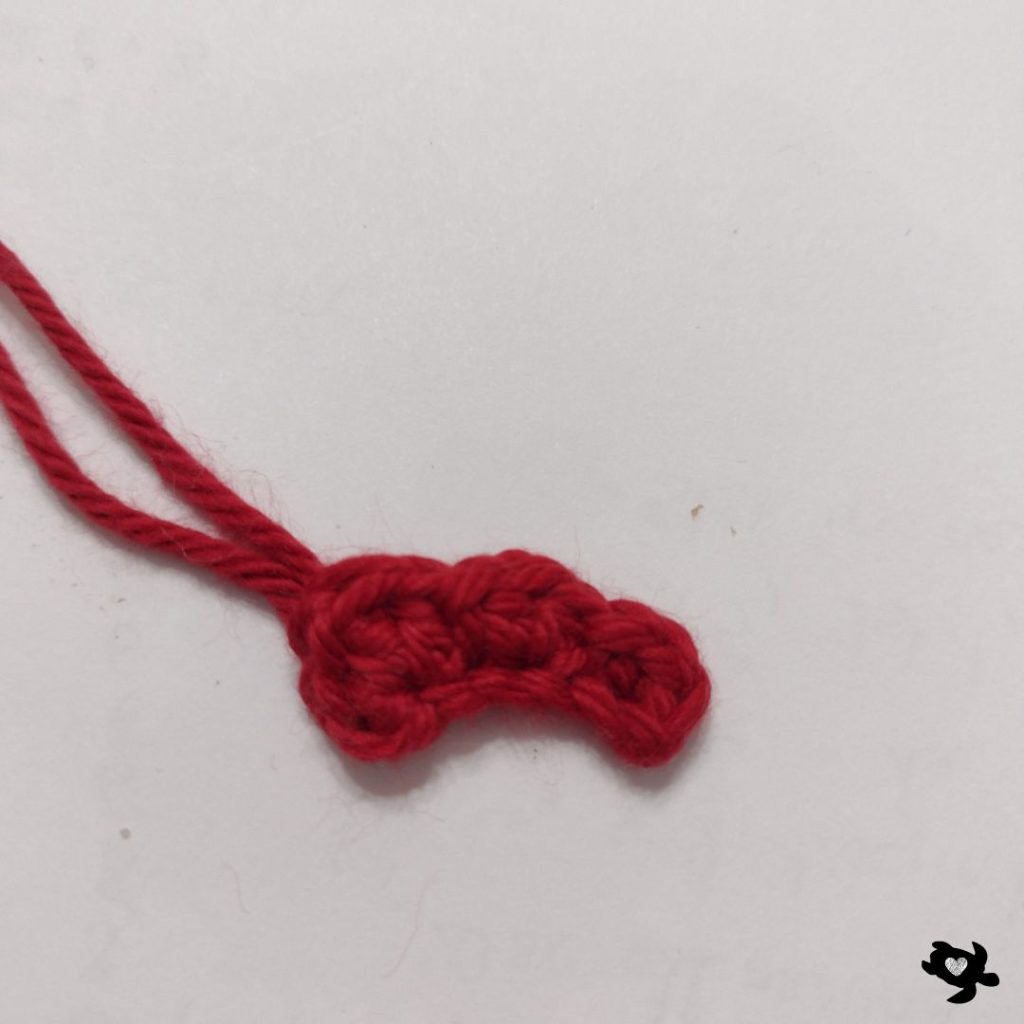
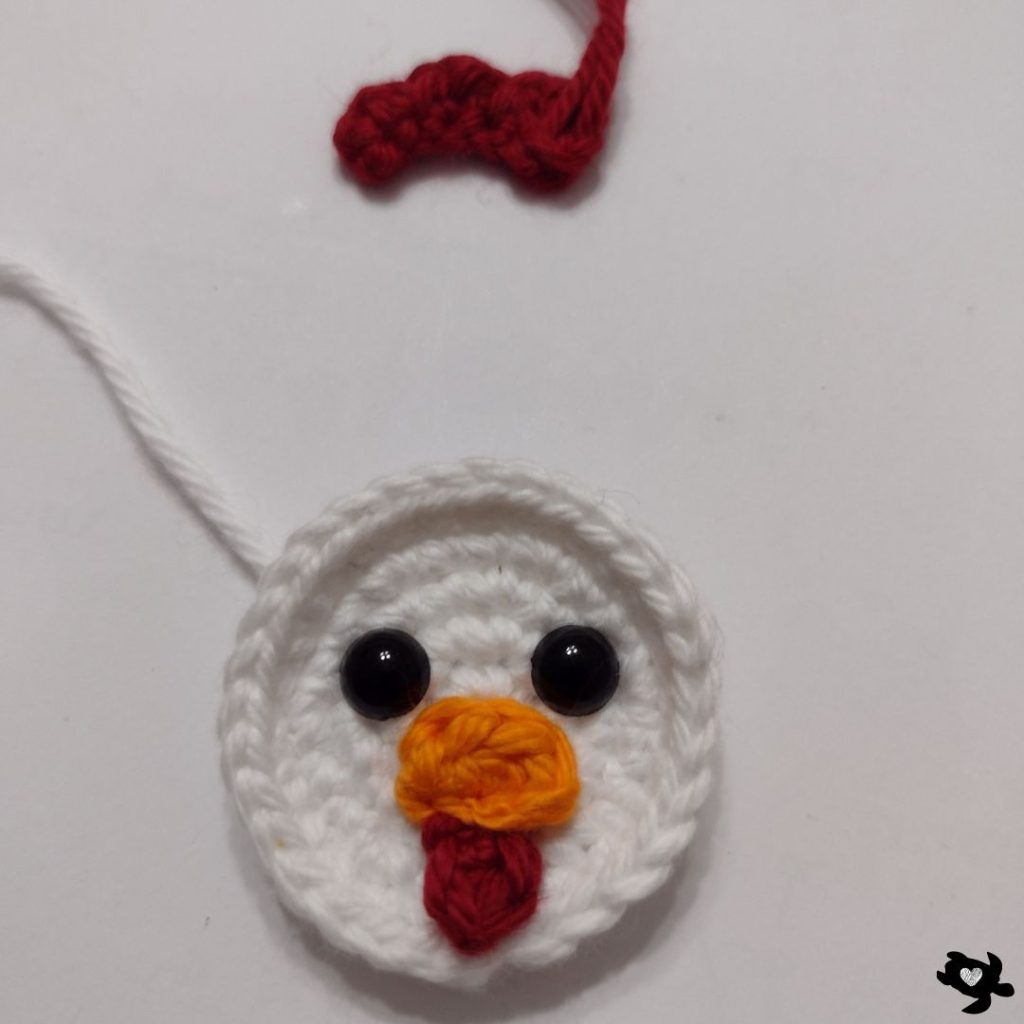
Comb (Top of Head)
- Worked in rows.
With red yarn:
- Row 1: ch 6.
- Row 2: Starting in the 2nd ch from the hook:
2 sc in next st, sl st,
2 hdc in next st, sl st,
2 dc in next st, ch 1, 1 sc in same st (where you just made the 2 dc).
Fasten off, leaving a long tail.
Sew the comb to the top back of the head.

Wattle
- Worked in rows.
With red yarn:
- Row 1: ch 3. (3)
- Row 2: starting in the 2nd ch from the hook: 1 sc in the next 2 st. (2)
Fasten off, leaving a long tail.
Sew the wattle directly below the beak. 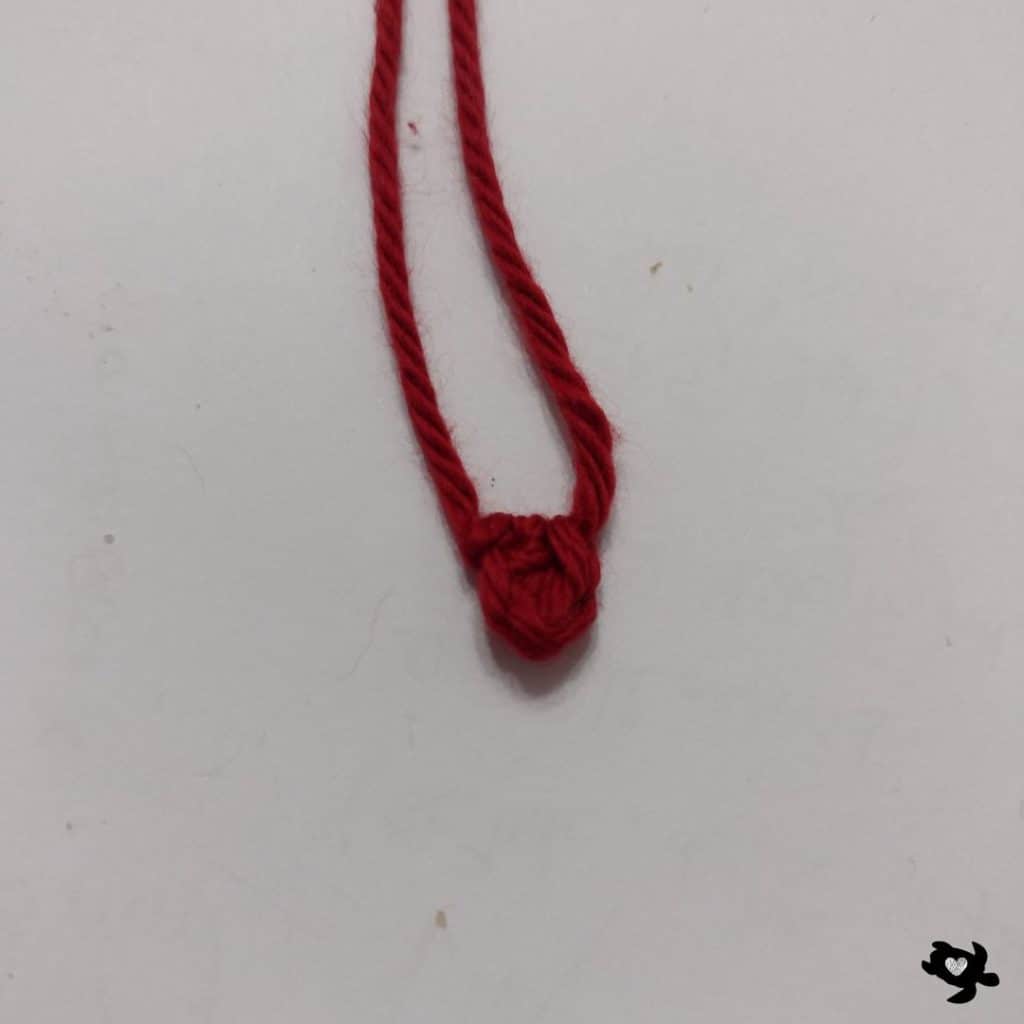
Body
- Worked in rows, then finished with a single crochet border.
With white yarn:
- Row 1: ch 7.
- Row 2: starting from the 2nd ch from the hook: 1 sc in the next 6 ch. (6)
- Row 3: ch1, turn; 1 inc, 1 sc in the next 4 st, 1 inc. (8)
- Rows 4 to 10: ch1, turn; 1 sc in all st. (8)
- Row 11: ch1, turn; 1 dec, 1 sc in the next 4 st, 1 dec. (6)
- Rows 12 to 13: ch1, turn; 1 sc in all st. (6)
- Row 14: ch1, turn; 1 sc in the next 2 st, 1 dec, 1 sc in the next 2 st. (5)
- Row 15: ch1, turn; 1 sc in all st. (5)
Do not turn. Work sc evenly around the entire body (approx. 32 sts). Do not crochet too tightly for this part – you can also use a bigger size crochet.
Fasten off.
Sew the head to the top of the body. Adjust placement to make your hen taller or shorter as desired.

Wings (make 2)
- Worked in rows.
Right Wing
With white yarn:
- Row 1: ch 2.
- Row 2: starting in the 2nd ch from the hook: 1 sc. (1)
- Row 3: ch1, turn; 1 inc. (2)
- Row 4: ch1, turn; 1sc, 1 inc. (3)
- Row 5: ch1, turn; 1 inc, 1 sc in the next 2 st. (4)
- Row 6: ch1, turn; 1 sc in the next 3 st, 1 inc. (5)
- Row 7: ch1, turn; 1 sc in the next 5 st. (5)
Fasten off, leaving a long tail.
Left Wing
With white yarn:
- Row 1: ch 2.
- Row 2: starting in the 2nd ch from the hook: 1 sc. (1)
- Row 3: ch1, turn; 1 inc. (2)
- Row 4: ch1, turn; 1 inc, 1 sc. (3)
- Row 5: ch1, turn; 1 sc in the next 2 st, 1 inc. (4)
- Row 6: ch1, turn; 1 inc, 1 sc in the next 3 st. (5)
- Row 7: ch1, turn; 1 sc in the next 5 st. (5)
Fasten off, leaving a long tail. Sew the wings to each side of the body. 
Feet (make 2).
- Worked in continuous rounds.
With orange yarn:
- Round 1: 6 sc in a magic ring. (6)
- Round 2: ((1 sc, 1 dc, 1 sc) in the next st); 1 sl st; ((1 sc, 1 dc, 1 sc) in the next st). (7)
Fasten off, leaving a long tail.
Note: Not all stitches from Round 1 are used—this is intentional to shape the toes.
Sew the feet along the bottom edge of the body.


🎉 Congratulations!
Your Crochet Hen Appliqué is finished! 🐔✨
I hope you enjoyed making this fun farm friend. If you share your project, don’t forget to tag @natalinacraft and use #natalinacraft—I truly love seeing your work!

Copyright Notice:
All rights reserved. The pattern and photographs presented in this document are the sole property of Natalina Craft and are protected under copyright law. This pattern is provided for personal use only. Any unauthorized reproduction, in whole or in part, or distribution of this pattern or its contents is strictly prohibited.
You are permitted to sell finished items created from this pattern in limited quantities. If you choose to sell your finished products online, it would be greatly appreciated if you include a statement attributing the pattern to Natalina Craft and provide a link back to the original post. Thank you for your understanding and adherence to these guidelines.
Crochet hen Appliqué
Crochet Applique - Hen
Instructions
Crochet Pattern Hen Appliqué
Start Here:
- Please read the whole pattern properly before starting.
- The pattern is written using US terms.
- The appliqué is worked flat and assembled at the end
Parts:
- Body
- Head
- 2 wings
- 2 feet
- 1 comb (top of the head)
- 1 wattle (below the beak)
Finished Size:
Approx. 4 inches (10 cm)
Material:
- Worsted yarn in white, red and orange
- Size 2.75 mm crochet hook (B/2).
- 2 black safety eyes (7.5 mm)
- Stitch markers (if needed)
- Tapestry needle
Abbreviations:
- chain (ch)
- magic ring (mr)
- single crochet (sc)
- increase (inc)
- invisible decrease (dec)
- slip stitch (sl st)
- half double crochet (hdc)
- double crochet (dc)
How to crochet a Hen Appliqué?
Head
- Worked in continuous rounds. Do not turn.
With white yarn and a 2.75 mm hook:
- Round 1: 6 sc in a magic ring. (6)
- Round 2: inc 6 times. (12)
- Round 3: [1 sc in next st, 1 inc] x6. (18)
- Round 4: [1 sc in next st, 1 inc, 1 sc in next st ] x6. (24)
- Round 5: [1 inc, 1 sc in next 3 st] x6. (30)
Fasten off, leaving a long tail for sewing.
Place the safety eyes between Rounds 2 and 3, spaced by 4 stitches.
Beak
With orange yarn:
- Row 1: ch 4.
- Row 2: starting in the 2nd ch from the hook: 1 sc, 1 hdc, 1 sc. (3)
Fasten off, leaving a long tail.Sew the beak just below the eyes (Row 2 facing upward).
Comb (Top of Head)
- Worked in rows.
With red yarn:
- Row 1: ch 6.
- Row 2: Starting in the 2nd ch from the hook:2 sc in next st, sl st,2 hdc in next st, sl st,2 dc in next st, ch 1, 1 sc in same st (where you just made the 2 dc).
Fasten off, leaving a long tail.Sew the comb to the top back of the head.
Wattle
- Worked in rows.
With red yarn:
- Row 1: ch 3. (3)
- Row 2: starting in the 2nd ch from the hook: 1 sc in the next 2 st. (2)
Fasten off, leaving a long tail.Sew the wattle directly below the beak.
Body
- Worked in rows, then finished with a single crochet border.
With white yarn:
- Row 1: ch 7.
- Row 2: starting from the 2nd ch from the hook: 1 sc in the next 6 ch. (6)
- Row 3: ch1, turn; 1 inc, 1 sc in the next 4 st, 1 inc. (8)
- Rows 4 to 10: ch1, turn; 1 sc in all st. (8)
- Row 11: ch1, turn; 1 dec, 1 sc in the next 4 st, 1 dec. (6)
- Rows 12 to 13: ch1, turn; 1 sc in all st. (6)
- Row 14: ch1, turn; 1 sc in the next 2 st, 1 dec, 1 sc in the next 2 st. (5)
- Row 15: ch1, turn; 1 sc in all st. (5)
Do not turn. Work sc evenly around the entire body (approx. 32 sts). Do not crochet too tightly for this part - you can also use a bigger size crochet.Fasten off.
Sew the head to the top of the body. Adjust placement to make your hen taller or shorter as desired.
Wings (make 2)
- Worked in rows.
Right Wing
With white yarn:
- Row 1: ch 2.
- Row 2: starting in the 2nd ch from the hook: 1 sc. (1)
- Row 3: ch1, turn; 1 inc. (2)
- Row 4: ch1, turn; 1sc, 1 inc. (3)
- Row 5: ch1, turn; 1 inc, 1 sc in the next 2 st. (4)
- Row 6: ch1, turn; 1 sc in the next 3 st, 1 inc. (5)
- Row 7: ch1, turn; 1 sc in the next 5 st. (5)
Fasten off, leaving a long tail.
Left Wing
With white yarn:
- Row 1: ch 2.
- Row 2: starting in the 2nd ch from the hook: 1 sc. (1)
- Row 3: ch1, turn; 1 inc. (2)
- Row 4: ch1, turn; 1 inc, 1 sc. (3)
- Row 5: ch1, turn; 1 sc in the next 2 st, 1 inc. (4)
- Row 6: ch1, turn; 1 inc, 1 sc in the next 3 st. (5)
- Row 7: ch1, turn; 1 sc in the next 5 st. (5)
Fasten off, leaving a long tail.
Sew the wings to each side of the body.
Feet (make 2).
- Worked in continuous rounds.
With orange yarn:
- Round 1: 6 sc in a magic ring. (6)
- Round 2: ((1 sc, 1 dc, 1 sc) in the next st); 1 sl st; ((1 sc, 1 dc, 1 sc) in the next st). (7)
Fasten off, leaving a long tail.
Note: Not all stitches from Round 1 are used—this is intentional to shape the toes.
Sew the feet along the bottom edge of the body.
🎉 Congratulations!
Your Crochet Hen Appliqué is finished! 🐔✨I hope you enjoyed making this fun farm friend. If you share your project, don’t forget to tag @natalinacraft and use #natalinacraft—I truly love seeing your work!
Copyright Notice:
All rights reserved. The pattern and photographs presented in this document are the sole property of Natalina Craft and are protected under copyright law. This pattern is provided for personal use only. Any unauthorized reproduction, in whole or in part, or distribution of this pattern or its contents is strictly prohibited.
You are permitted to sell finished items created from this pattern in limited quantities. If you choose to sell your finished products online, it would be greatly appreciated if you include a statement attributing the pattern to Natalina Craft and provide a link back to the original post. Thank you for your understanding and adherence to these guidelines.