
Hi everyone!
Someone in my VIP Facebook group asked if I could design a crochet pattern inspired by the Grinch—and here it is! 🎄💚 This was such a fun project to make and honestly one of my favorite designs. I think it might be because I absolutely love the Grinch!
The body is crocheted in one main piece, so if you don’t enjoy sewing lots of parts, this is a great project for you. You’ll only need to sew on the arms, then add the face details and accessories.
Join my facebook group to ask questions and share your finished projects!
I regularly ask what patterns you’d like to see next, and you’re always welcome to suggest ideas.


Crochet Grinch Pattern – Amigurumi
Start Here
Please read the entire pattern before starting.
- Pattern is written in US terms
- Work in continuous rounds (spiral) unless stated otherwise
- Use a stitch marker to mark the beginning of each round if needed
- Stuff firmly as you crochet
- Embroider facial features before closing the head
Parts
- 2 arms
- 2 legs (joined to form the body and head)
- Hair (yarn strands)
- Hat
- Scarf
Material:
- Worsted yarn 5.5 mm hook in green, yellow, red, and white
- Small amount of black pearl cotton (eyebrows and mouth)
- 3.5 mm crochet hook
- 2 black safety eyes (6 mm)
- Stitch marker
- Tapestry needle
- Small pompom maker or a small white pompom
- Polyfill stuffing
Abbreviations:
- ch = chain
- mr = magic ring
- sc = single crochet
- inc = increase
- dec = invisible decrease
- sl st = slip stitch
- hdc = half double crochet
- dc = double crochet
- fpdc / bpdc = front post / back post double crochet
How to crochet a Grinch?
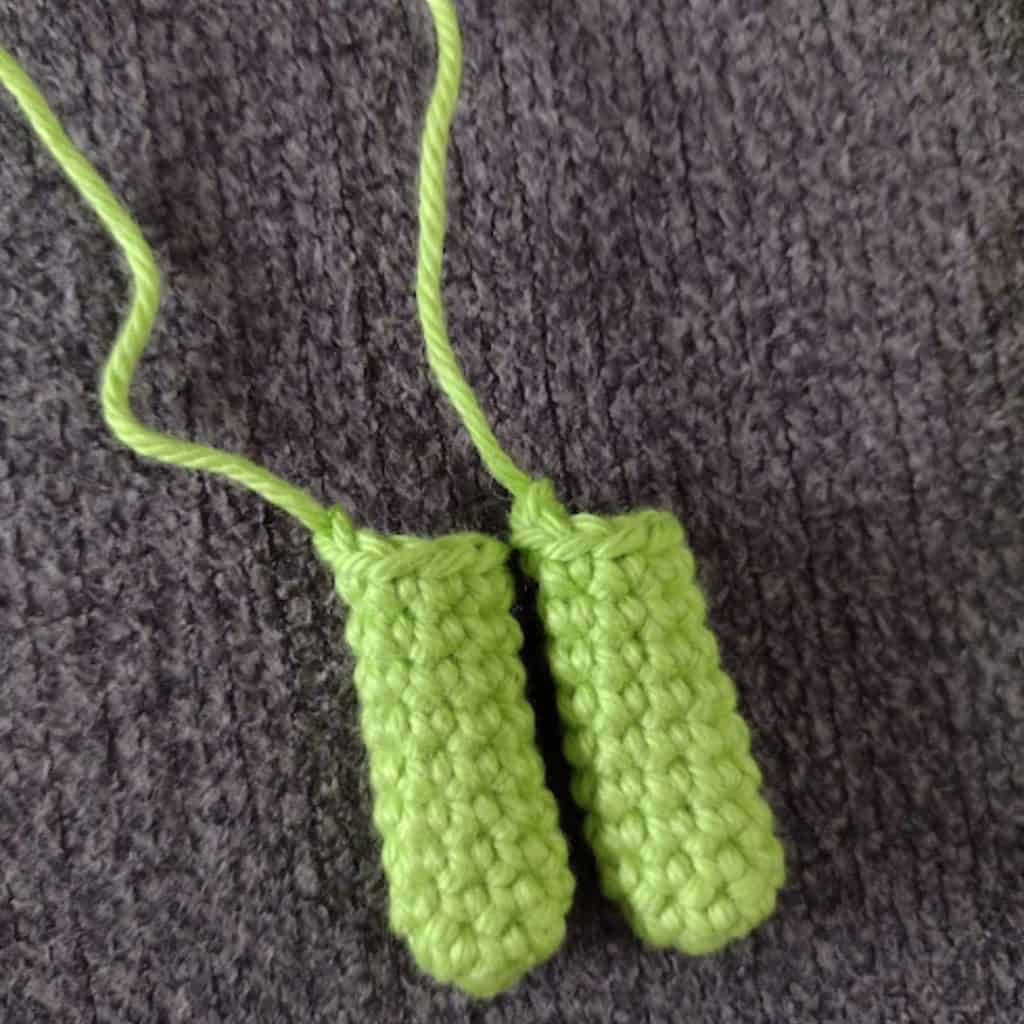
Arms (make 2)
We begin with the hands. With green yarn and a 3.5 mm hook:- Round 1: 6 sc in a magic ring. (6)
- Round 2: [1 inc, 2 sc] x2. (8)
- Round 3-10: [1 sc in all st]. (8)
Set aside.
Legs and body
Legs (Make 2)
With green yarn:- Round 1: 9 sc in a magic ring. (9)
- Round 2: [2 sc, 1 inc] x3. (12)
- Round 3: [1 sc in all st]. (12)
- Round 4: [2 sc, 1 dec] x3. (9)
- Rounds 5-9: [1 sc in all st]. (9)
Joining the Legs
Place both legs next to each other, with the right leg facing you. (see pictures below to help you with this step – ignore the wrong color).
Insert your hook through one stitch on the inside of the right leg and the corresponding stitch on the left leg.
Join green yarn and make:
- 1 sc through both legs
- 1 sc through the next stitch of both legs
The legs are now joined with 2 sc.


Continue the Body
- Round 10: [1 sc in the next 7 st of the left leg, 1 sc in the next 7 st of the right leg]. (14)
- Round 11: [1 sc in all st]. (14)
- Round 12: [1 sc, 1 inc] x7. (21)
- Round 13: [2 sc, 1 inc] x7. (28)
- Rounds 14-16: [1 sc in all st]. (28)
- Round 17: [5 sc, 1 dec] x4. (24)
- Round 18: [1 sc in all st]. (24)
- Round 19: [4 sc, 1 dec] x4. (20)
- Round 20: [1 sc in all st]. (20)
- Round 21: [8 sc, 1 dec] x2. (18)
- Rounds 22-23: [1 sc in all st]. (18)
- Round 24: [1 sc, 1 dec] x6. (12)

Head
- Round 25: [2 sc, 1 dec] x3. (9)
- Rounds 26-27: [1 sc in all st]. (9)
- Round 28: [1 inc in all st]. (18)
- Round 29: [2 sc, 1 inc] x6. (24)
- Round 30: [3 sc, 1 inc] x6. (30)
- Round 31: [1 sc in all st]. (30)
- Round 32: [3 sc, 1 dec] x6. (24)
- Round 33: [1 sc in all st]. (24)
- Round 34: [2 sc, 1 dec] x6. (18)
- Rounds 35-37: [1 sc in all st]. (18)
Attach Arms
-
Sew the arms to the body with the top of the arms aligned with Round 23.
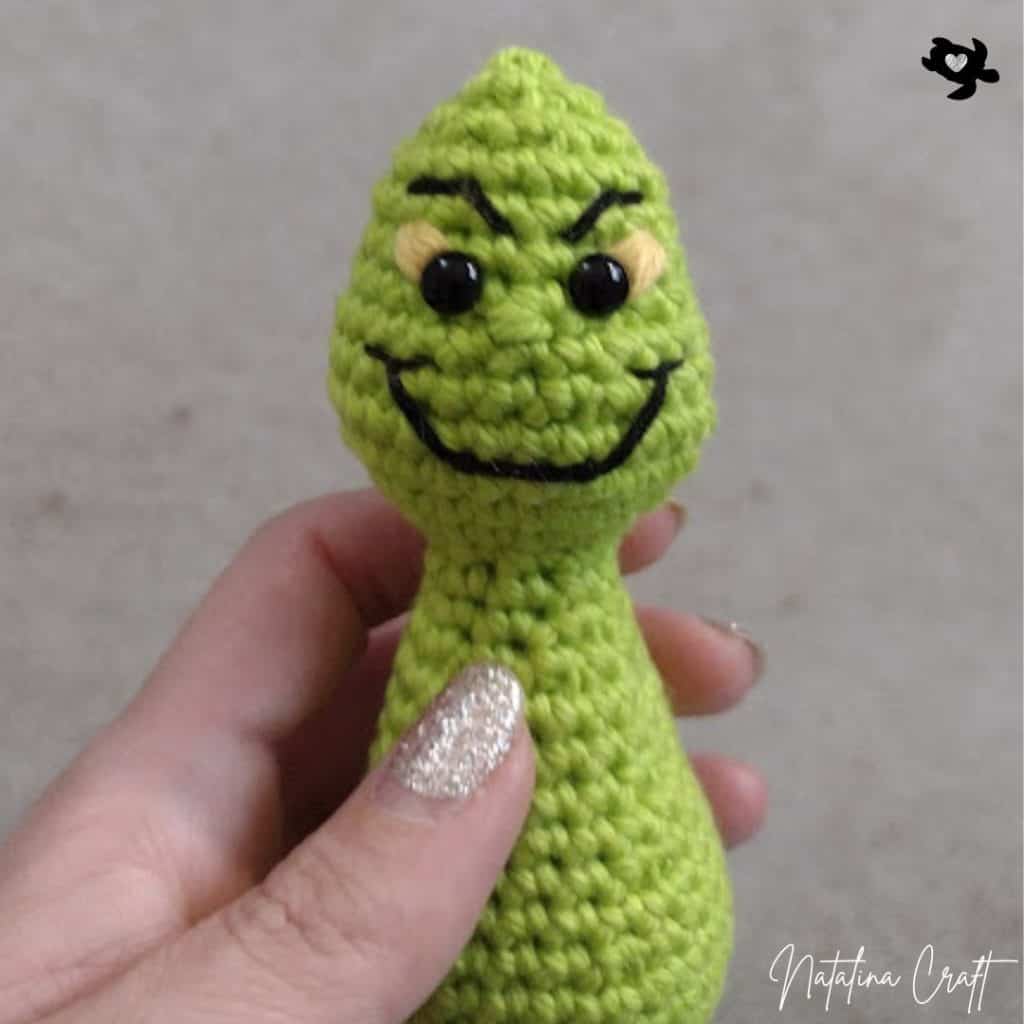
Face Details
Eyes
Place the safety eyes between Rounds 34 and 35, spaced by 2 stitches.
Before securing them, remove one eye and embroider the yellow eyeball using yellow yarn (I used 3 strands). Repeat for the second eye, then secure both safety eyes.


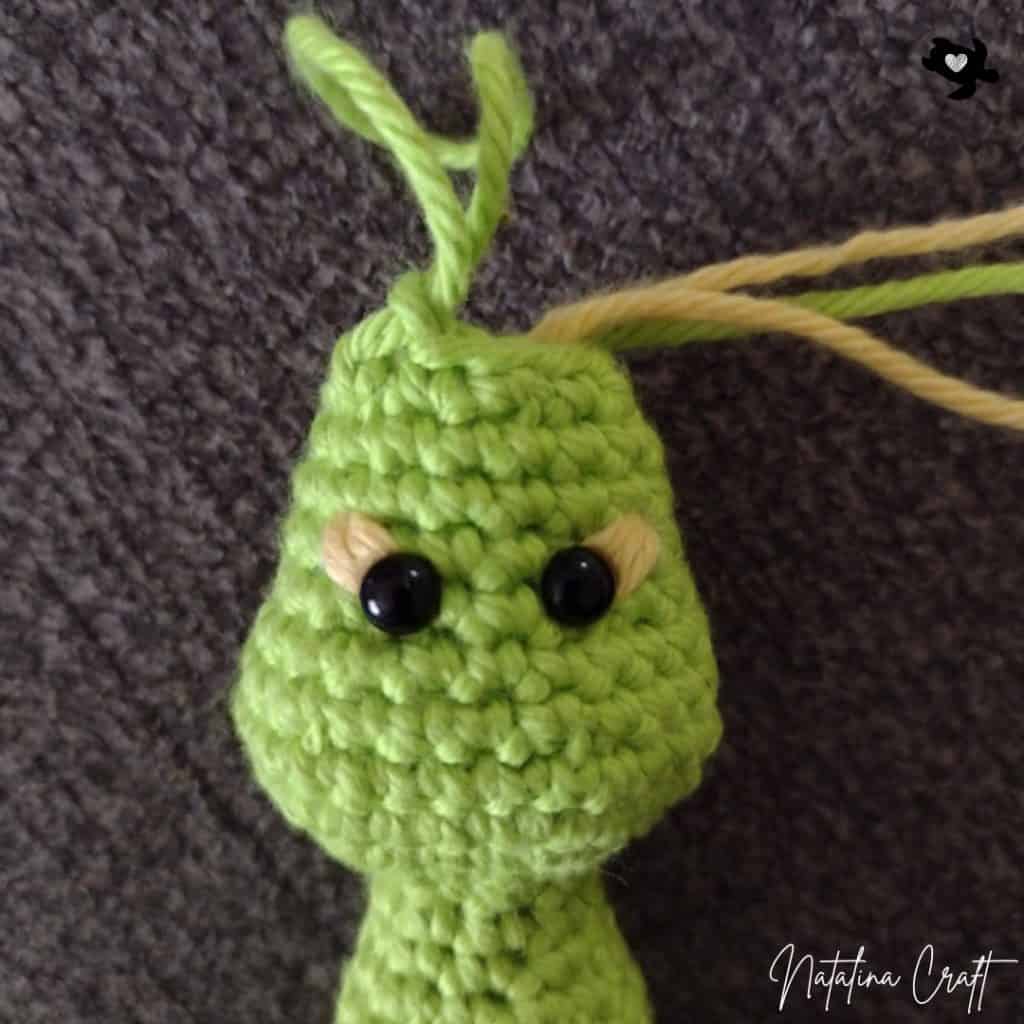
Eyebrows
Using black pearl cotton (2 strands), embroider the eyebrows above the eyes.
The inner edge of each eyebrow sits between Rounds 35 and 36, and the outer edge between Rounds 36 and 37. Secure the embroidery with small anchoring stitches.

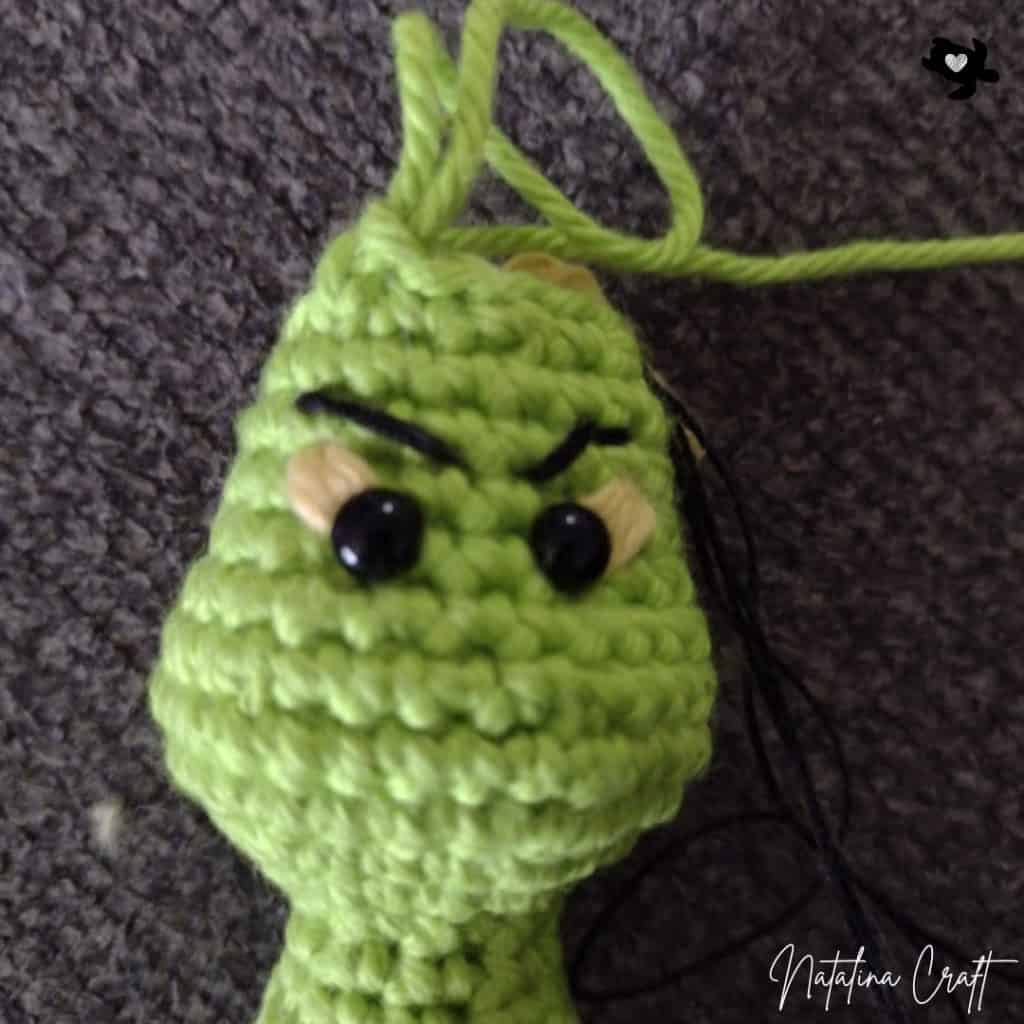

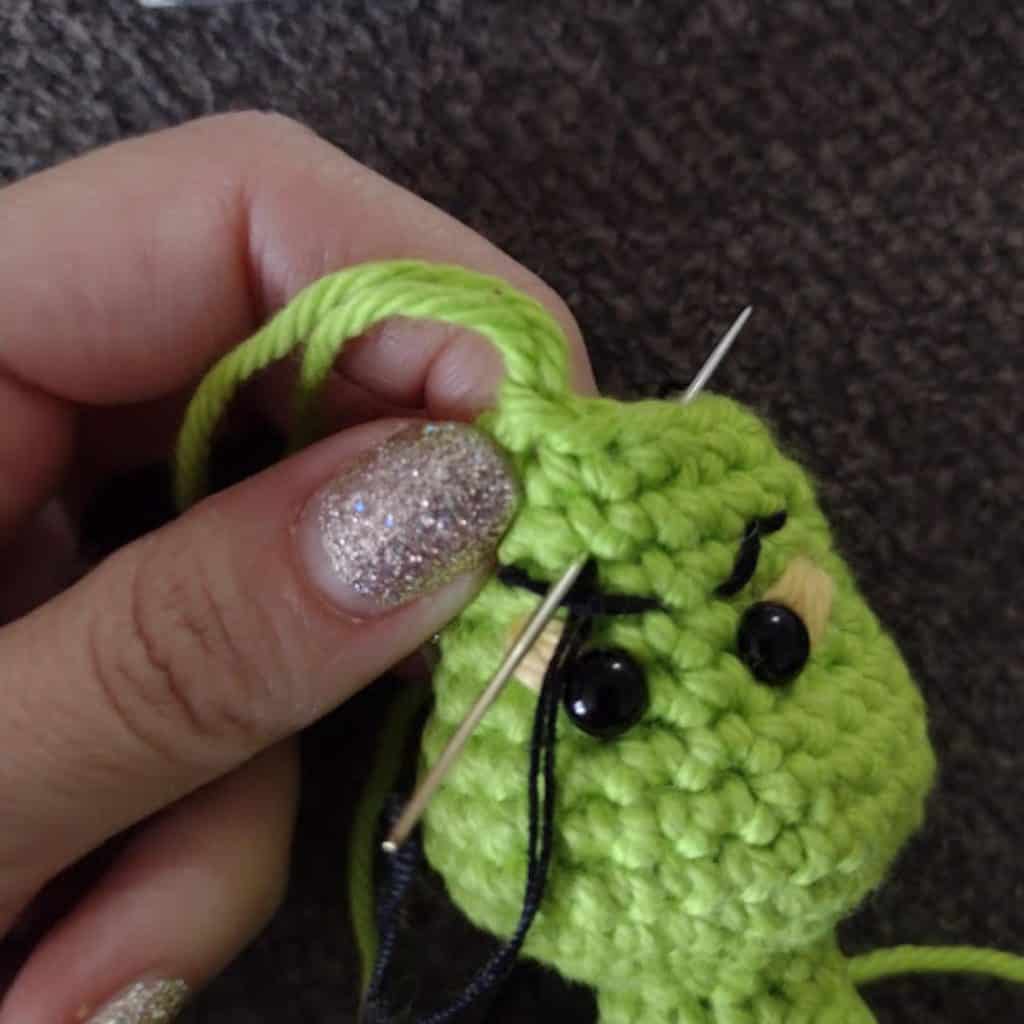
Mouth
Using black pearl cotton (2 strands), embroider the mouth:
-
Bottom of the mouth: between Rounds 30 and 31
-
Top curves: between Rounds 32 and 33 Anchor the stitches above and below to keep the mouth in place.


Nose
Using green yarn (2 strands), embroider a small nose between Rounds 33 and 34.

Finish the Head
- Round 38: [1 sc, 1 dec] x6. (12)
- Round 39: [1 sc, 1 dec] x3. (8)
Close the opening and fasten off.
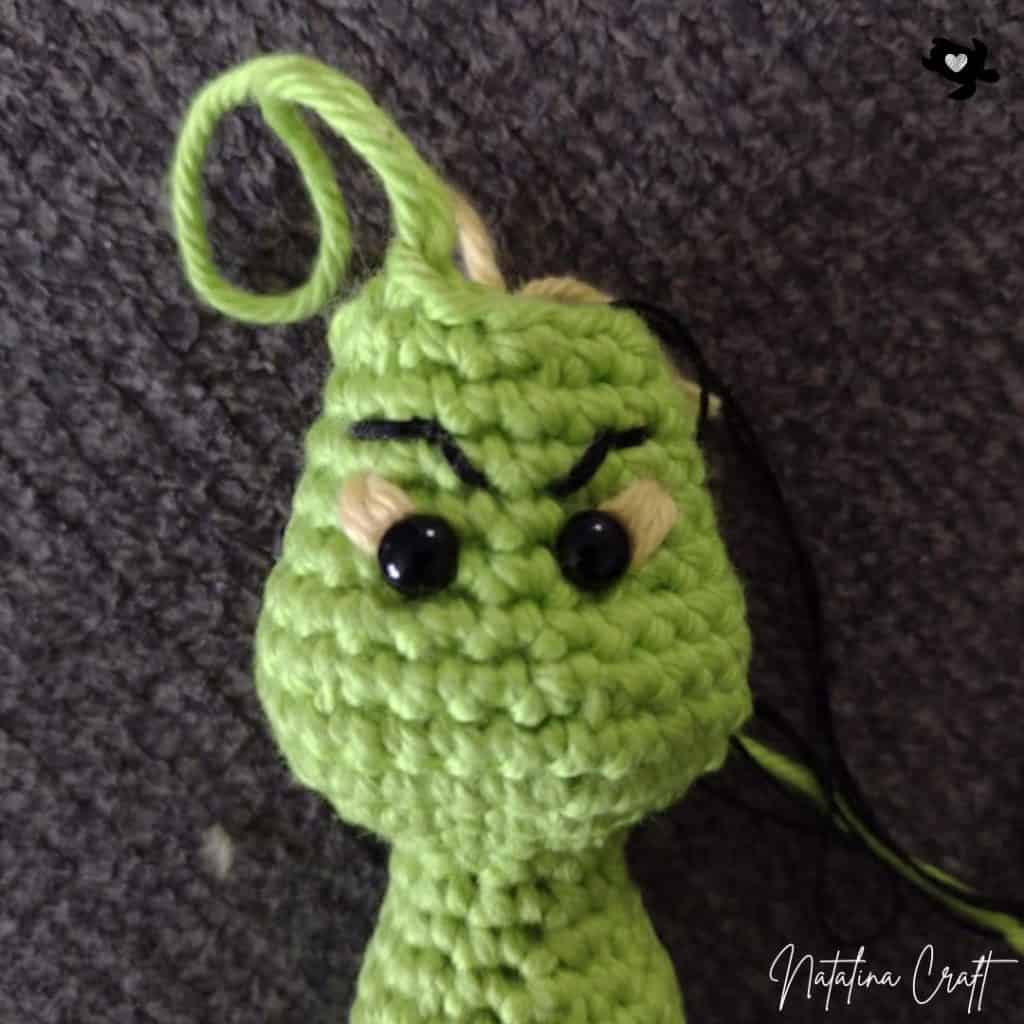
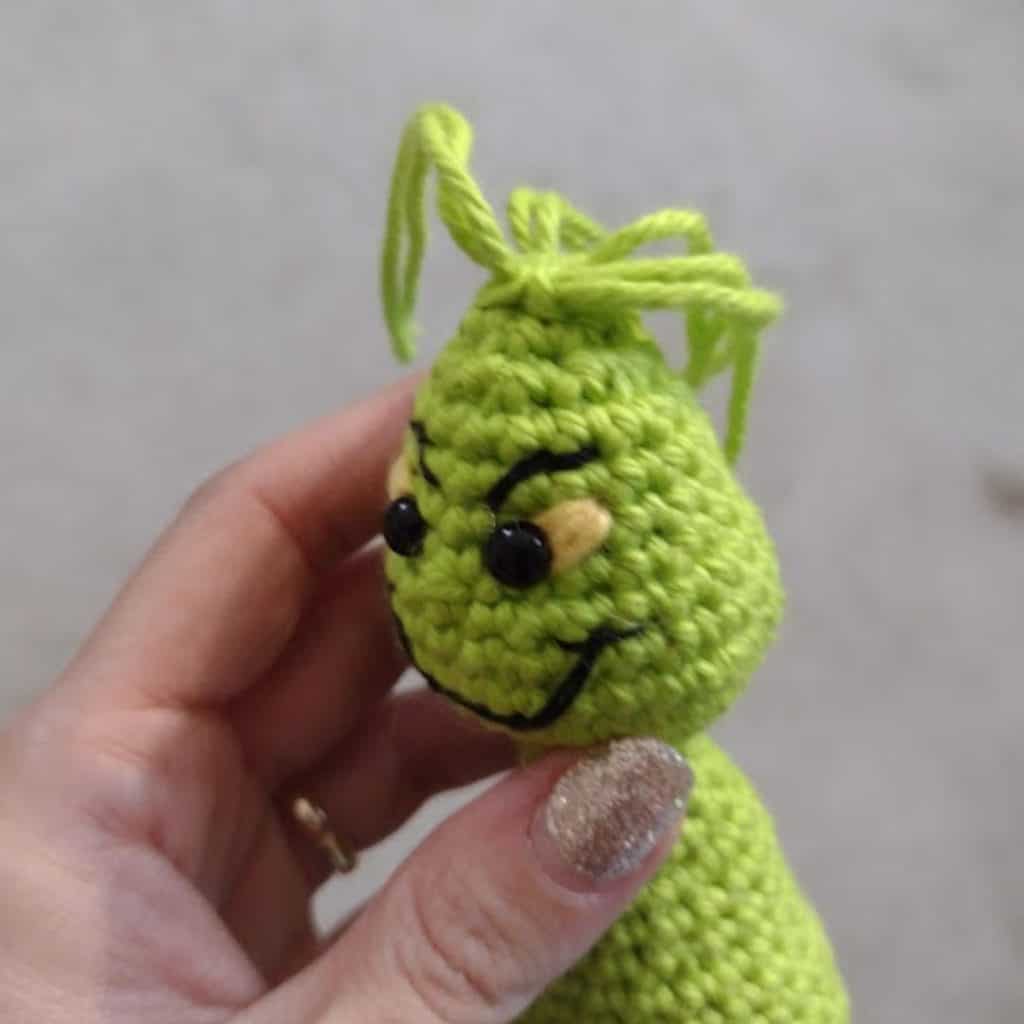
Hair
Separate the strands, brush them gently, trim as desired, and optionally use a small amount of hairspray to help them hold their shape.


Hat
- The hat is worked in the rounds. Use a stitch marker if needed.
- Round 1: 4 sc in a magic ring. (4)
- Round 2: [1 sc, 1 inc] x2. (6)
- Round 3: [1 sc in all st]. (6)
- Round 4: [1 sc, 1 inc] x3. (9)
- Round 5: [1 sc in all st]. (9)
- Round 6: [2 sc, 1 inc] x3. (12)
- Round 7: [1 sc in all st]. (12)
- Round 8: [3 sc, 1 inc] x3. (15)
- Round 9: [1 sc in all st]. (15)
- Round 10: [4 sc, 1 inc] x3. (18)
- Round 11: [1 sc in all st]. (18)
- Round 12: [5 sc, 1 inc] x3. (21)
- Round 13: [1 sc in all st]. (21)
- Round 14: [6 sc, 1 inc] x3. (24)
- Round 15: [1 sc in all st]. (24)
- Round 16: [7 sc, 1 inc] x3. (27)
- Round 17: [1 sc in all st]. (27)
- Round 18: [1 inc, 26 sc]. (28)
- Round 19: [28 dc]. (28)
- Round 20: [fpdc/bpdc all around]. (28)
Fasten off.
Attach a small white pompom to the top of the hat (sewn or glued).
Fold the hat slightly and secure the fold with a small stitch using red yarn.
Scarf
- The scarf is worked in rows.
- Row 1: ch 4. (4)
- Row 2: starting in the 2nd ch from the hook: [1 sc in all st]. (3)
- Row 3: [1 sc in all st]. (3)
- Row 4: [1 sc in all st]. (3)
- Row 5: [1 sc in all st]. (3)
- Rows 6-10: [1 sc in all st]. (3)
- Rows 11-15: [1 sc in all st]. (3)
- Rows 16-20: [1 sc in all st]. (3)
- Rows 21-25: [1 sc in all st]. (3)
- Rows 26-30: [1 sc in all st]. (3)
- Rows 31-35: [1 sc in all st]. (3)
- Rows 36-40: [1 sc in all st]. (3)
- Rows 41-45: [1 sc in all st]. (3)
- Rows 46-50: [1 sc in all st]. (3)


🎉 Finished!
Your Grinch-inspired amigurumi is complete!
Don’t forget to share your creation and tag me — I love seeing your work 💚🎄


Copyright Notice All rights reserved. This pattern and all accompanying photographs are the property of Natalina Craft and are protected by copyright law. This pattern is for personal use only. Any unauthorized reproduction, redistribution, or publication of this pattern, in whole or in part, is strictly prohibited. You are welcome to sell finished items made from this pattern in small quantities. While crediting Natalina Craft as the designer is not required, it is always greatly appreciated—especially when selling online—so others can find the original pattern. Thank you for respecting these guidelines.
Crochet Grinch
Crochet Grinch Pattern
Instructions
Crochet Grinch Pattern - Amigurumi
Start Here
Please read the entire pattern before starting.
- Pattern is written in US terms
- Work in continuous rounds (spiral) unless stated otherwise
- Use a stitch marker to mark the beginning of each round if needed
- Stuff firmly as you crochet
- Embroider facial features before closing the head
Parts
- 2 arms
- 2 legs (joined to form the body and head)
- Hair (yarn strands)
- Hat
- Scarf
Material:
- Worsted yarn 5.5 mm hook in green, yellow, red, and white
- Small amount of black pearl cotton (eyebrows and mouth)
- 3.5 mm crochet hook
- 2 black safety eyes (6 mm)
- Stitch marker
- Tapestry needle
- Small pompom maker or a small white pompom
- Polyfill stuffing
Abbreviations:
- ch = chain
- mr = magic ring
- sc = single crochet
- inc = increase
- dec = invisible decrease
- sl st = slip stitch
- hdc = half double crochet
- dc = double crochet
- fpdc / bpdc = front post / back post double crochet
How to crochet a Grinch?
Arms (make 2)
We begin with the hands.
With green yarn and a 3.5 mm hook:
- Round 1: 6 sc in a magic ring. (6)
- Round 2: [1 inc, 2 sc] x2. (8)
- Round 3-10: [1 sc in all st]. (8)
Flatten the opening, fasten off, and leave a long tail for sewing.Set aside.
Legs and body
The legs are worked first, then joined to continue the body and head.
Legs (Make 2)
With green yarn:
- Round 1: 9 sc in a magic ring. (9)
- Round 2: [2 sc, 1 inc] x3. (12)
- Round 3: [1 sc in all st]. (12)
- Round 4: [2 sc, 1 dec] x3. (9)
- Rounds 5-9: [1 sc in all st]. (9)
Fasten off both legs.
Joining the Legs
Place both legs next to each other, with the right leg facing you. (see pictures below to help you with this step - ignore the wrong color).Insert your hook through one stitch on the inside of the right leg and the corresponding stitch on the left leg.
Join green yarn and make:
- 1 sc through both legs
- 1 sc through the next stitch of both legs
The legs are now joined with 2 sc.
Continue the Body
- Round 10: [1 sc in the next 7 st of the left leg, 1 sc in the next 7 st of the right leg]. (14)
Stuff the legs, then continue stuffing the body as you go.
- Round 11: [1 sc in all st]. (14)
- Round 12: [1 sc, 1 inc] x7. (21)
- Round 13: [2 sc, 1 inc] x7. (28)
- Rounds 14-16: [1 sc in all st]. (28)
- Round 17: [5 sc, 1 dec] x4. (24)
- Round 18: [1 sc in all st]. (24)
- Round 19: [4 sc, 1 dec] x4. (20)
- Round 20: [1 sc in all st]. (20)
- Round 21: [8 sc, 1 dec] x2. (18)
- Rounds 22-23: [1 sc in all st]. (18)
- Round 24: [1 sc, 1 dec] x6. (12)
Head
- Round 25: [2 sc, 1 dec] x3. (9)
- Rounds 26-27: [1 sc in all st]. (9)
- Round 28: [1 inc in all st]. (18)
- Round 29: [2 sc, 1 inc] x6. (24)
- Round 30: [3 sc, 1 inc] x6. (30)
- Round 31: [1 sc in all st]. (30)
- Round 32: [3 sc, 1 dec] x6. (24)
- Round 33: [1 sc in all st]. (24)
- Round 34: [2 sc, 1 dec] x6. (18)
- Rounds 35-37: [1 sc in all st]. (18)
Attach Arms
- Sew the arms to the body with the top of the arms aligned with Round 23.
Face Details
Eyes
Place the safety eyes between Rounds 34 and 35, spaced by 2 stitches.Before securing them, remove one eye and embroider the yellow eyeball using yellow yarn (I used 3 strands). Repeat for the second eye, then secure both safety eyes.
Eyebrows
Using black pearl cotton (2 strands), embroider the eyebrows above the eyes.The inner edge of each eyebrow sits between Rounds 35 and 36, and the outer edge between Rounds 36 and 37. Secure the embroidery with small anchoring stitches.
Mouth
Using black pearl cotton (2 strands), embroider the mouth:
- Bottom of the mouth: between Rounds 30 and 31
- Top curves: between Rounds 32 and 33Anchor the stitches above and below to keep the mouth in place.
Nose
Using green yarn (2 strands), embroider a small nose between Rounds 33 and 34.
Finish the Head
- Round 38: [1 sc, 1 dec] x6. (12)
- Round 39: [1 sc, 1 dec] x3. (8)
Stuff the head firmly.Close the opening and fasten off.
Hair
Cut 4 strands of green yarn. Attach the hair to the head using a latch-knot: fold the yarn in half, pull the loop through the stitch with your crochet hook, pass the yarn ends through the loop, and tighten.Separate the strands, brush them gently, trim as desired, and optionally use a small amount of hairspray to help them hold their shape.
Hat
- The hat is worked in the rounds. Use a stitch marker if needed.
With red yarn and a 3.5 mm hook:
- Round 1: 4 sc in a magic ring. (4)
- Round 2: [1 sc, 1 inc] x2. (6)
- Round 3: [1 sc in all st]. (6)
- Round 4: [1 sc, 1 inc] x3. (9)
- Round 5: [1 sc in all st]. (9)
- Round 6: [2 sc, 1 inc] x3. (12)
- Round 7: [1 sc in all st]. (12)
- Round 8: [3 sc, 1 inc] x3. (15)
- Round 9: [1 sc in all st]. (15)
- Round 10: [4 sc, 1 inc] x3. (18)
- Round 11: [1 sc in all st]. (18)
- Round 12: [5 sc, 1 inc] x3. (21)
- Round 13: [1 sc in all st]. (21)
- Round 14: [6 sc, 1 inc] x3. (24)
- Round 15: [1 sc in all st]. (24)
- Round 16: [7 sc, 1 inc] x3. (27)
- Round 17: [1 sc in all st]. (27)
- Round 18: [1 inc, 26 sc]. (28)
Change to white yarn:
- Round 19: [28 dc]. (28)
- Round 20: [fpdc/bpdc all around]. (28)
Fasten off.
Attach a small white pompom to the top of the hat (sewn or glued).Fold the hat slightly and secure the fold with a small stitch using red yarn.
Scarf
- The scarf is worked in rows.
With red yarn and a 3.5 mm hook:
- Row 1: ch 4. (4)
- Row 2: starting in the 2nd ch from the hook: [1 sc in all st]. (3)
- Row 3: [1 sc in all st]. (3)
- Row 4: [1 sc in all st]. (3)
- Row 5: [1 sc in all st]. (3)
Change to white
- Rows 6-10: [1 sc in all st]. (3)
Change to red
- Rows 11-15: [1 sc in all st]. (3)
Change to white
- Rows 16-20: [1 sc in all st]. (3)
Change to red
- Rows 21-25: [1 sc in all st]. (3)
Change to white
- Rows 26-30: [1 sc in all st]. (3)
Change to red
- Rows 31-35: [1 sc in all st]. (3)
Change to white
- Rows 36-40: [1 sc in all st]. (3)
Change to red
- Rows 41-45: [1 sc in all st]. (3)
Change to white
- Rows 46-50: [1 sc in all st]. (3)
Fasten off and weave in ends.
🎉 Finished!
Your Grinch-inspired amigurumi is complete!Don’t forget to share your creation and tag me — I love seeing your work 💚🎄
Copyright Notice
All rights reserved. This pattern and all accompanying photographs are the property of Natalina Craft and are protected by copyright law. This pattern is for personal use only. Any unauthorized reproduction, redistribution, or publication of this pattern, in whole or in part, is strictly prohibited.
You are welcome to sell finished items made from this pattern in small quantities. While crediting Natalina Craft as the designer is not required, it is always greatly appreciated—especially when selling online—so others can find the original pattern.Thank you for respecting these guidelines.
hi there. I am loving the Grinch Pattern, however, row 19 for the hat states: 28dc bur the stitch count says (24).
I suspect that this may be an error in the pattern.
Regards, Lynn
Hi, yes 28 for the count stitch! Sorry about that. Thank you for letting me know! 🙂
I have to say, this is the most succinct set of directions I have ever encountered!
Kudos! I love the Grinch.
Best, Diane
Thank you very much!
I can’t wait to try this pattern. I’m a grinch lover. thank you for sharing.
You are very welcome!
You are the most detailed pattern writer I have come across and I have been looking at patterns for several years.
Thank you <3
Thank you for your nice words and your suggestions!
The size is about 6 inches (15 cm) without hair. And it is written in US terms.
Hi! Do you join and chain one or work in continuous rounds? I’m sorry if it is written somewhere, I can’t seem to find it. Thank you!
Hi, sorry for the confusion. You work in continuous rounds.
Thanks for sharing your pattern!
You are very welcome. Thank you for your message.
Love my grinch
I am so glad!
Do you have a video on this
I am sorry, I don’t have any videos at the moment.
I am going to make this for my Grinch loving daughter in law ❤️💚
Thank you! I hope she will love it!