
Have you seen the adorable bear cup that everyone’s talking about right now? It’s taking over social media — people are going absolutely crazy for it! I couldn’t resist joining the fun, so I crocheted my own little version: a sweet bear holding a coffee cup and wearing a green hat. 🐻💚
This tiny bear captures all the cozy, coffee-loving vibes of the trend, and it’s quick and easy to make. Whether you’re a fan of cute crochet projects or just want to join the coffee craze, this pattern is the perfect weekend make!
Don’t forget to join my Facebook group HERE, you can ask your questions, and share your finished projects. I will regularly ask you what pattern you would like to see next (or you can even suggest something even if I am not asking!).
I hope you will enjoy and understand the pattern. If you have any questions, please write to me, I will try my best to help you. And I would love to see your work! Don’t forget to share your finished projects using the hashtag #natalinacraft. I love seeing your beautiful work!


Coffee Bear – Free Crochet Pattern
Start Here:
Please read the whole pattern properly before starting.
The pattern is written using US terms.
This pattern is made of the following parts:
- 1 Body
- 2 ears
- 2 arms
- 2 legs
- 1 tail
- 1 hat with a pompom
- 1 cup
- 1 muzzle (made with felt)
- 1 logo (for the cup)
Size:
- 3.5 inches (9 cm) with light worsted yarn (I used I love this cotton from Hobby Lobby)
Material:
- Yarn calling for a US I-9 / 5.5 mm hook in brown, green, cream and white
- Size US C-2 / 2.75 mm crochet hook.
- Size US D-3/3.25 mm crochet hook
- 2 black safety eyes (6 mm)
- Cotton thread in black (for the mouth)
- Stitch markers (if needed)
- Tapestry needle/ Small needle
- Polyfill
- Felt in green, white, cream and black
- Fabric glue
- Hole puncher in 1/2″, 7/32″ and 3/16″ or scissors.
- A fork
Abbreviations:
- chain (ch)
- magic ring (mr)
- single crochet (sc)
- increase (inc)
- invisible decrease (dec)
- slip stitch (sl st)
- double crochet (DC)
- Half double crochet (HDC)
Pattern: How to crochet a Coffee Bear?
Let’s start – Coffee Bear – Free Crochet Pattern
The head and body – Coffee Bear – Free Crochet Pattern
- The head and body are worked in continuous rounds (as a spiral). Use a stitch marker if needed.
- We start at the top of the head.
- Remember to stuff as you crochet.
With a 2.75 mm crochet and yarn in brown.
-
- Round 1: Start 6 sc in a magic ring. (6)
- Round 2: [6 inc]. (12)
- Round 3: [1 inc in the next st, 1 sc]x6. (18)
- Rounds 4 to 6: 1 sc in all st. (18)
- Round 7: [1 inc in the next st, 2 sc]x6. (24)
- Round 8: 1 sc in all st. (24)
- Round 9: [1 dec in the next st, 2 sc]x6. (18)
Place the eyes between Rounds 6 and 7, spaced by 3 stitches.
-
- Round 10: [1 dec in the next st, 1 sc]x6. (12)
Fill the head.
-
- Round 11: [1 inc in the next st, 1 sc]x6. (18)
- Round 12: [3 sc, 1 inc in the next st, 4 sc, 1 inc in the next st, 3 sc, 1 inc in the next st, 4 sc, 1 inc in the next st]. (22)
- Rounds 13 to 20: 1 sc in all st. (22)
- Round 21: [3 sc, 1 dec in the next st, 4 sc, 1 dec in the next st, 3 sc, 1 dec in the next st, 4 sc, 1 dec in the next st]. (18)
- Round 22: [1 dec in the next st, 1 sc]x6. (12)
Fill the body.
Close the body: Using a tapestry needle, weave the yarn tail through the front loops of all 12 stitches and pull gently to close the opening. Secure the yarn and weave in the end.

To make the muzzle, cut one large white circle (about ½”) and one small black circle (about 3/16″) from felt sheets. You can use a hollow punch set or scissors. Glue the small black circle (nose) onto the white circle (muzzle). With a needle and black cotton thread, stitch a small mouth under the nose (see pictures), then glue the finished muzzle to the bear’s face.


The arms (make 2) – Coffee Bear – Free Crochet Pattern
- The arms are worked in continuous rounds (as a spiral). Use a stitch marker if needed.
With a 2.75 mm crochet and yarn in brown.
-
- Round 1: Start 6 sc in a magic ring. (6)
- Rounds 2 to 7 : 1 sc in all st. (6)
Cut the yarn but leave a long tail for sewing. Keep it for later.
The legs (make 2) – Coffee Bear – Free Crochet Pattern
- The legs are worked in continuous rounds (as a spiral). Use a stitch marker if needed.
With a 2.75 mm crochet and yarn in brown.
-
- Round 1: Start 6 sc in a magic ring. (6)
- Round 2 : [1 inc in the next st, 2 sc] x2. (8)
- Rounds 3-4 : 1 sc in all st. (8)
Cut the yarn but leave a long tail for sewing. Fill the legs. Keep it for later.
The tail – Coffee Bear – Free Crochet Pattern
- The tail is worked in continuous rounds (as a spiral). Use a stitch marker if needed.
With a 2.75 mm crochet and yarn in brown.
-
- Round 1: Start 4 sc in a magic ring. (4)
Cut the yarn but leave a long tail for sewing. Keep it for later.
The ears (make 2) – Coffee Bear – Free Crochet Pattern
- The ears are worked in continuous rounds (as a spiral). Use a stitch marker if needed.
With a 2.75 mm crochet and yarn in brown.
-
- Round 1: Start 7 sc in a magic ring. (7)
Cut the yarn but leave a long tail for sewing. Keep it for later.
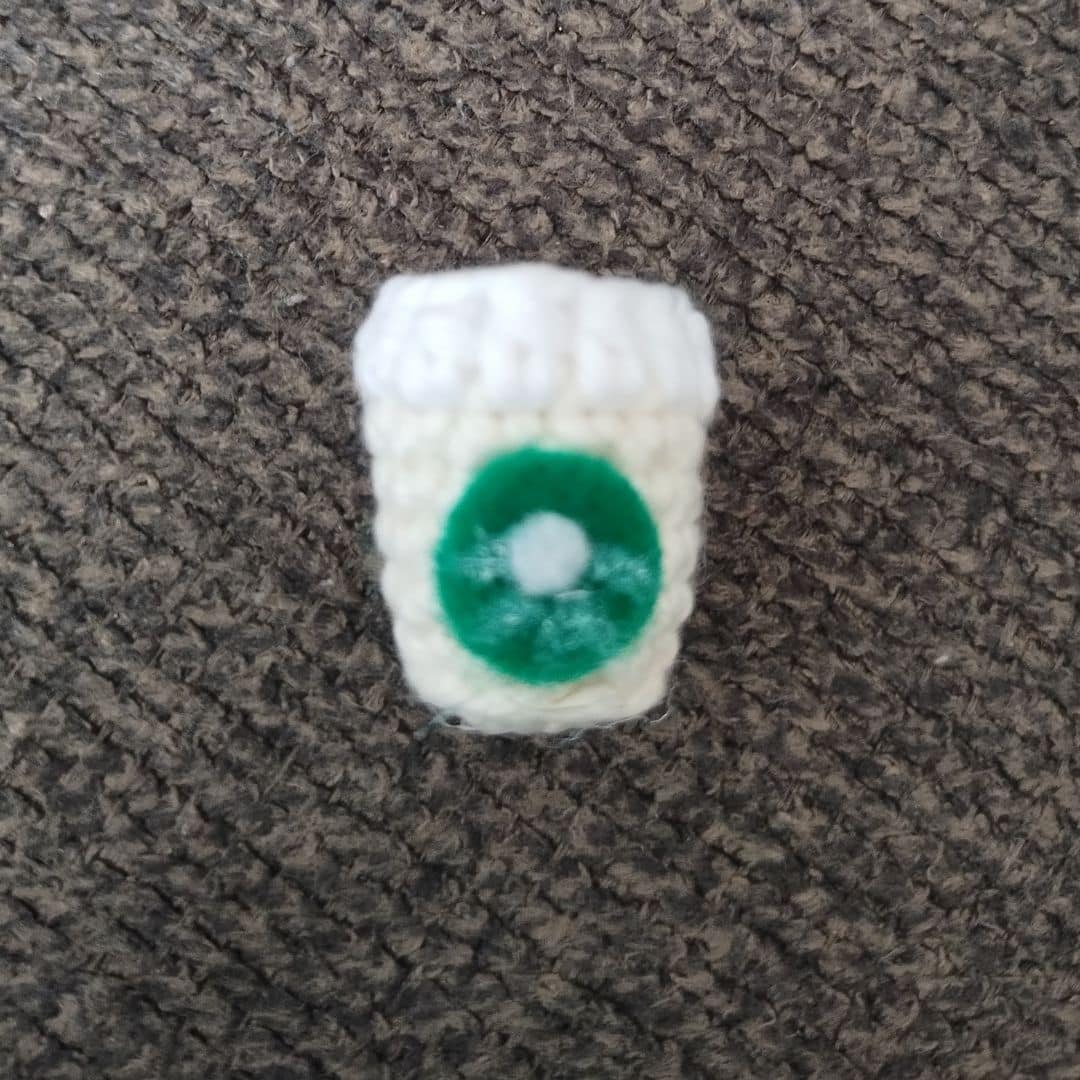
The Coffee cup – Coffee Bear – Free Crochet Pattern
- The coffee cup is worked in continuous rounds (as a spiral). Use a stitch marker if needed.
With a 2.75 mm crochet and yarn in cream.
-
- Round 1: Start 6 sc in a magic ring. (6)
- Round 2 : [1 inc in the next st, 1 sc] x3. (9)
- Round 3: Working in the back loop only: [1 inc in the next st, 2 sc] x3. (12)
- Rounds 4-7: 1 sc in all st. (12)
Change for the white yarn:
- Round 8: 1 hdc in all st. (12)
- Round 9: Working in the back loop only: [1 dec in the next st, 1 sc] x4. (8)
Fill the cup. Close the cup: Using a tapestry needle, weave the yarn tail through the front loops of all 8 stitches and pull gently to close the opening. Secure the yarn and weave in the end.
To make the logo on the coffee cup, cut one large green circle (about ½”) and one small white circle (about 7/32″) from felt sheets. You can use a hollow punch set or scissors. Glue the white circle on top of the green one, then attach the finished logo to the front of your coffee cup. I tried adding a little design on the logo with an acrylic pen, but it didn’t work well — you can use white cotton thread instead if you’d like to add a small detail.

The Hat – Coffee Bear – Free Crochet Pattern
- The hat is worked in continuous rounds (as a spiral). Use a stitch marker if needed.
- We will use a bigger crochet hook to make the hat
With a 3.25 mm crochet hook and yarn in green.
-
- Round 1: Start 6 sc in a magic ring. (6)
- Round 2 : [6 inc]. (12)
- Round 3 : [1 inc in the next st, 1 sc] x6. (18)
- Rounds 4-6: 1 sc in all st. (18)
- Round 7: 1 hdc in all st. (18)
When you finish the last round, cut the yarn and pull it through the last stitch to secure. Weave in the yarn tail with a tapestry needle and hide it inside the hat.
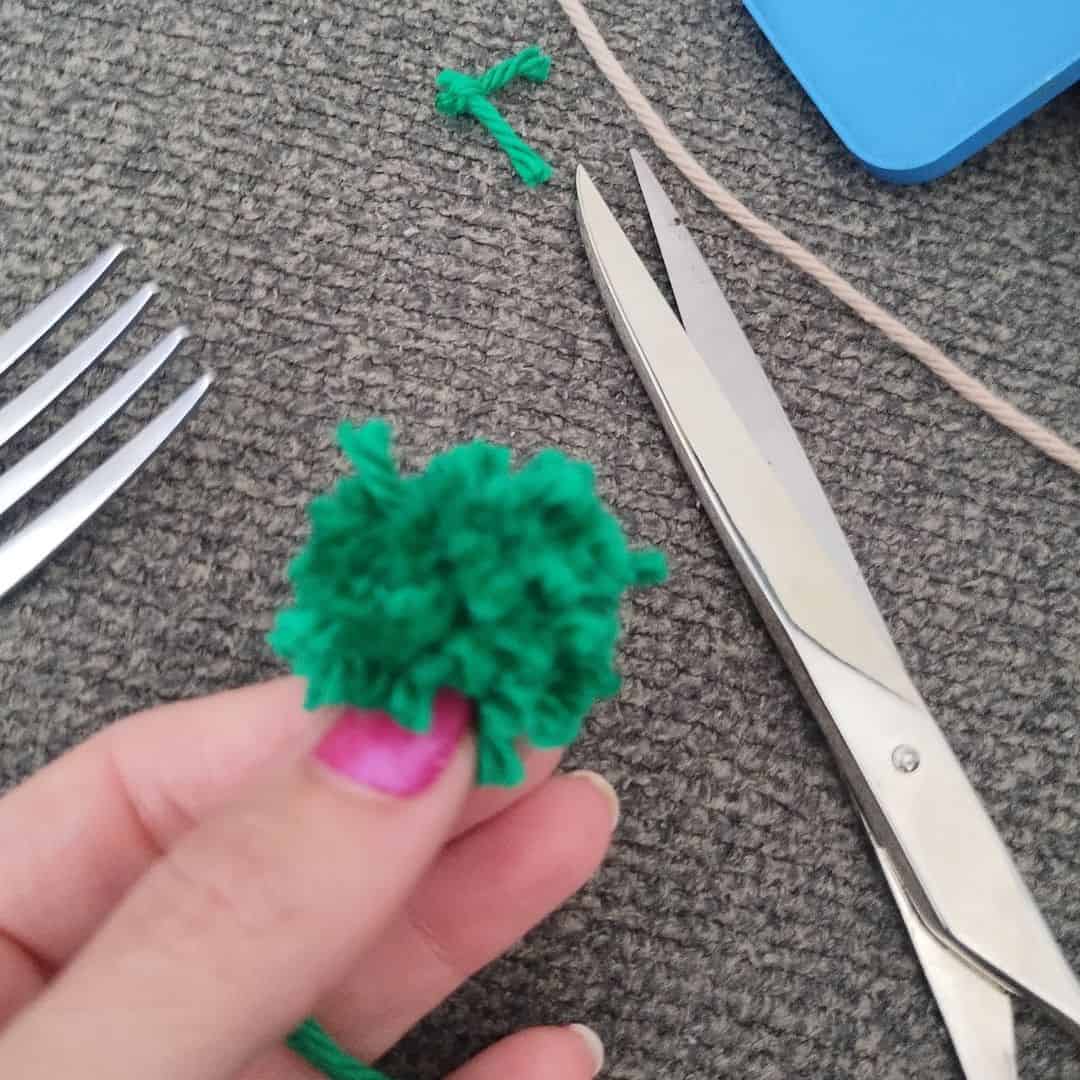
To make a small pompom, wrap the yarn around the prongs of a fork about 20 times. Knot the yarn on the side of the fork. Cut the yarn, then slide a piece of yarn between the middle prongs and tie it tightly around the wrapped yarn. Remove it from the fork, knot again to secure, and cut through all the loops. Trim the ends to shape your pompom (I made mine as small as possible), then glue or sew it on top of the hat.


Assembling – Coffee Bear – Free Crochet Pattern
Place the hat on the head and sew it securely in place. Then, attach the ears over the hat — make sure your stitches go through the head and not just the hat for a firm hold. There should be about 10 hdc from the last round of the hat between the ears. The ears are sewn over Rounds 5 and 6 of the hat.


Next, use pins to position the arms and legs before sewing. The arms should be close enough together to hold the coffee cup. Sew the top of each arm (shoulder) over Rounds 12–13, and sew the legs over Rounds 19–21.


Finally, using brown yarn, sew the coffee cup between the arms. Pass the needle back and forth through the inside of the coffee cup and the arms several times to secure it firmly in place.


Sew the tail at the back of the body, over Rounds 20-21.


Copyright Notice:
All rights reserved. The pattern and photographs presented in this document are the sole property of Natalina Craft and are protected under copyright law. This pattern is provided for personal use only. Any unauthorized reproduction, in whole or in part, or distribution of this pattern or its contents is strictly prohibited.
You are permitted to sell finished items created from this pattern in limited quantities. If you choose to sell your finished products online, it would be greatly appreciated if you include a statement attributing the pattern to Natalina Craft and provide a link back to the original post. Thank you for your understanding and adherence to these guidelines.
Coffee Bear – Free Crochet Pattern
Coffee Bear - Free Crochet Pattern
Instructions
Coffee Bear - Free Crochet Pattern
Start Here:
Please read the whole pattern properly before starting.
The pattern is written using US terms.
This pattern is made of the following parts:
- 1 Body
- 2 ears
- 2 arms
- 2 legs
- 1 tail
- 1 hat with a pompom
- 1 cup
- 1 muzzle (made with felt)
- 1 logo (for the cup)
Size:
- 3.5 inches (9 cm) with light worsted yarn (I used I love this cotton from Hobby Lobby)
Material:
- Yarn calling for a US I-9 / 5.5 mm hook in brown, green, cream and white
- Size US C-2 / 2.75 mm crochet hook.
- Size US D-3/3.25 mm crochet hook
- 2 black safety eyes (6 mm)
- Cotton thread in black (for the mouth)
- Stitch markers (if needed)
- Tapestry needle/ Small needle
- Polyfill
- Felt in green, white, cream and black
- Fabric glue
- Hole puncher in 1/2", 7/32" and 3/16" or scissors.
- A fork
Abbreviations:
- chain (ch)
- magic ring (mr)
- single crochet (sc)
- increase (inc)
- invisible decrease (dec)
- slip stitch (sl st)
- double crochet (DC)
- Half double crochet (HDC)
Pattern: How to crochet a Coffee Bear?
Let's start - Coffee Bear - Free Crochet Pattern
The head and body - Coffee Bear - Free Crochet Pattern
- The head and body are worked in continuous rounds (as a spiral). Use a stitch marker if needed.
- We start at the top of the head.
- Remember to stuff as you crochet.
With a 2.75 mm crochet and yarn in brown.
- Round 1: Start 6 sc in a magic ring. (6)
- Round 2: [6 inc]. (12)
- Round 3: [1 inc in the next st, 1 sc]x6. (18)
- Rounds 4 to 6: 1 sc in all st. (18)
- Round 7: [1 inc in the next st, 2 sc]x6. (24)
- Round 8: 1 sc in all st. (24)
- Round 9: [1 dec in the next st, 2 sc]x6. (18)
Place the eyes between Rounds 6 and 7, spaced by 3 stitches.
- Round 10: [1 dec in the next st, 1 sc]x6. (12)
Fill the head.
- Round 11: [1 inc in the next st, 1 sc]x6. (18)
- Round 12: [3 sc, 1 inc in the next st, 4 sc, 1 inc in the next st, 3 sc, 1 inc in the next st, 4 sc, 1 inc in the next st]. (22)
- Rounds 13 to 20: 1 sc in all st. (22)
- Round 21: [3 sc, 1 dec in the next st, 4 sc, 1 dec in the next st, 3 sc, 1 dec in the next st, 4 sc, 1 dec in the next st]. (18)
- Round 22: [1 dec in the next st, 1 sc]x6. (12)
Fill the body.
Close the body: Using a tapestry needle, weave the yarn tail through the front loops of all 12 stitches and pull gently to close the opening. Secure the yarn and weave in the end.
To make the muzzle, cut one large white circle (about ½") and one small black circle (about 3/16") from felt sheets. You can use a hollow punch set or scissors. Glue the small black circle (nose) onto the white circle (muzzle). With a needle and black cotton thread, stitch a small mouth under the nose (see pictures), then glue the finished muzzle to the bear’s face.
The arms (make 2) - Coffee Bear - Free Crochet Pattern
- The arms are worked in continuous rounds (as a spiral). Use a stitch marker if needed.
With a 2.75 mm crochet and yarn in brown.
- Round 1: Start 6 sc in a magic ring. (6)
- Rounds 2 to 7 : 1 sc in all st. (6)
Cut the yarn but leave a long tail for sewing. Keep it for later.
The legs (make 2) - Coffee Bear - Free Crochet Pattern
- The legs are worked in continuous rounds (as a spiral). Use a stitch marker if needed.
With a 2.75 mm crochet and yarn in brown.
- Round 1: Start 6 sc in a magic ring. (6)
- Round 2 : [1 inc in the next st, 2 sc] x2. (8)
- Rounds 3-4 : 1 sc in all st. (8)
Cut the yarn but leave a long tail for sewing. Fill the legs. Keep it for later.
The tail - Coffee Bear - Free Crochet Pattern
- The tail is worked in continuous rounds (as a spiral). Use a stitch marker if needed.
With a 2.75 mm crochet and yarn in brown.
- Round 1: Start 4 sc in a magic ring. (4)
Cut the yarn but leave a long tail for sewing. Keep it for later.
The ears (make 2) - Coffee Bear - Free Crochet Pattern
- The ears are worked in continuous rounds (as a spiral). Use a stitch marker if needed.
With a 2.75 mm crochet and yarn in brown.
- Round 1: Start 7 sc in a magic ring. (7)
Cut the yarn but leave a long tail for sewing. Keep it for later.
The Coffee cup - Coffee Bear - Free Crochet Pattern
- The coffee cup is worked in continuous rounds (as a spiral). Use a stitch marker if needed.
With a 2.75 mm crochet and yarn in cream.
- Round 1: Start 6 sc in a magic ring. (6)
- Round 2 : [1 inc in the next st, 1 sc] x3. (9)
- Round 3: Working in the back loop only: [1 inc in the next st, 2 sc] x3. (12)
- Rounds 4-5: 1 sc in all st. (12)
Change for the white yarn:
- Round 6: 1 hdc in all st. (12)
- Round 7: Working in the back loop only: [1 dec in the next st, 1 sc] x4. (8)
Fill the cup. Close the cup: Using a tapestry needle, weave the yarn tail through the front loops of all 8 stitches and pull gently to close the opening. Secure the yarn and weave in the end.
To make the logo on the coffee cup, cut one large green circle (about ½") and one small white circle (about 7/32") from felt sheets. You can use a hollow punch set or scissors. Glue the white circle on top of the green one, then attach the finished logo to the front of your coffee cup. I tried adding a little design on the logo with an acrylic pen, but it didn’t work well — you can use white cotton thread instead if you’d like to add a small detail.
The Hat - Coffee Bear - Free Crochet Pattern
- The hat is worked in continuous rounds (as a spiral). Use a stitch marker if needed.
- We will use a bigger crochet hook to make the hat
With a 3.25 mm crochet hook and yarn in green.
- Round 1: Start 6 sc in a magic ring. (6)
- Round 2 : [6 inc]. (12)
- Round 3 : [1 inc in the next st, 1 sc] x6. (18)
- Rounds 4-6: 1 sc in all st. (18)
- Round 7: 1 hdc in all st. (18)
When you finish the last round, cut the yarn and pull it through the last stitch to secure. Weave in the yarn tail with a tapestry needle and hide it inside the hat.
To make a small pompom, wrap the yarn around the prongs of a fork about 20 times. Knot the yarn on the side of the fork. Cut the yarn, then slide a piece of yarn between the middle prongs and tie it tightly around the wrapped yarn. Remove it from the fork, knot again to secure, and cut through all the loops. Trim the ends to shape your pompom (I made mine as small as possible), then glue or sew it on top of the hat.
Assembling - Coffee Bear - Free Crochet Pattern
Place the hat on the head and sew it securely in place. Then, attach the ears over the hat — make sure your stitches go through the head and not just the hat for a firm hold. There should be about 10 hdc from the last round of the hat between the ears. The ears are sewn over Rounds 5 and 6 of the hat.
Next, use pins to position the arms and legs before sewing. The arms should be close enough together to hold the coffee cup. Sew the top of each arm (shoulder) over Rounds 12–13, and sew the legs over Rounds 19–21.
Finally, using brown yarn, sew the coffee cup between the arms. Pass the needle back and forth through the inside of the coffee cup and the arms several times to secure it firmly in place.
Sew the tails at the back of the body, over Rounds 20-21.
Copyright Notice:
All rights reserved. The pattern and photographs presented in this document are the sole property of Natalina Craft and are protected under copyright law. This pattern is provided for personal use only. Any unauthorized reproduction, in whole or in part, or distribution of this pattern or its contents is strictly prohibited.
You are permitted to sell finished items created from this pattern in limited quantities. If you choose to sell your finished products online, it would be greatly appreciated if you include a statement attributing the pattern to Natalina Craft and provide a link back to the original post. Thank you for your understanding and adherence to these guidelines.