
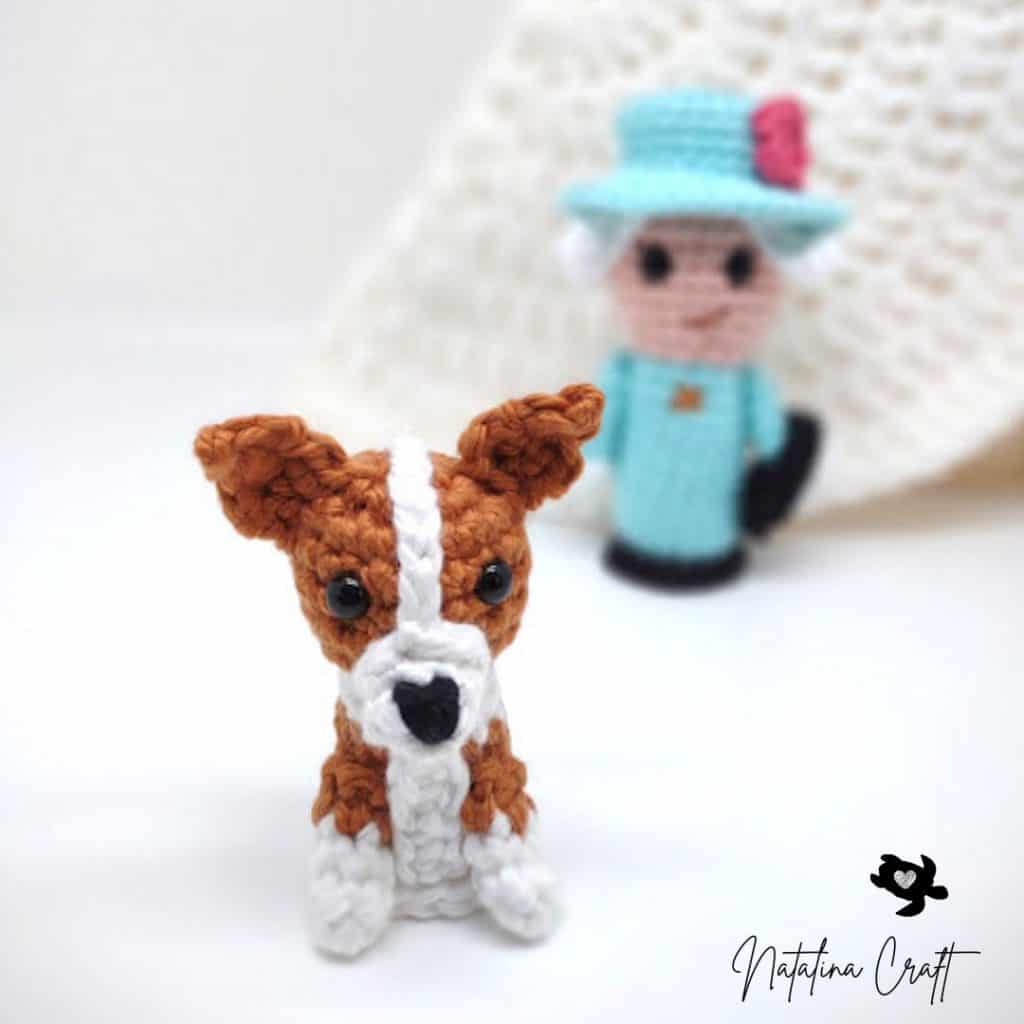
Hi everyone! Today I’m so happy to share this free Corgi Dog crochet pattern with you. This tiny amigurumi corgi is quick to make, full of personality, and absolutely irresistible with its little legs and sweet face. It’s the perfect small project when you’re short on time but still want something cute and satisfying to crochet.
Designed to work up fast, this crochet corgi is great for using up small yarn scraps and makes a lovely handmade gift, market item, or cheerful desk companion. You can also easily customize it by changing colors or yarn thickness to make your corgi a bit bigger or extra plush.
Join my Facebook group, where you can ask questions, share your finished projects, and help me choose future designs!
I hope you’ll enjoy making this little corgi as much as I enjoyed designing it. If you have any questions, feel free to reach out—and I’d absolutely love to see your finished creations! Don’t forget to tag @natalinacraft and use #natalinacraft on social media 💕


Corgi Dog Crochet Pattern – Amigurumi
Start Here
- Please read the entire pattern before starting.
- This pattern is written using US crochet terms.
Material:
- Worsted yarn in white, brown and black
- 3.5 mm crochet hook
- 2 black safety eyes (6 mm)
- Stitch markers
- Tapestry needle
- Polyfill stuffing
Abbreviations:
- chain (ch)
- magic ring (mr)
- single crochet (sc)
- increase (inc)
- invisible decrease (dec)
- slip stitch (sl st)
- half double crochet (HDC)
- double crochet (DC)
How to crochet a Corgi dog?
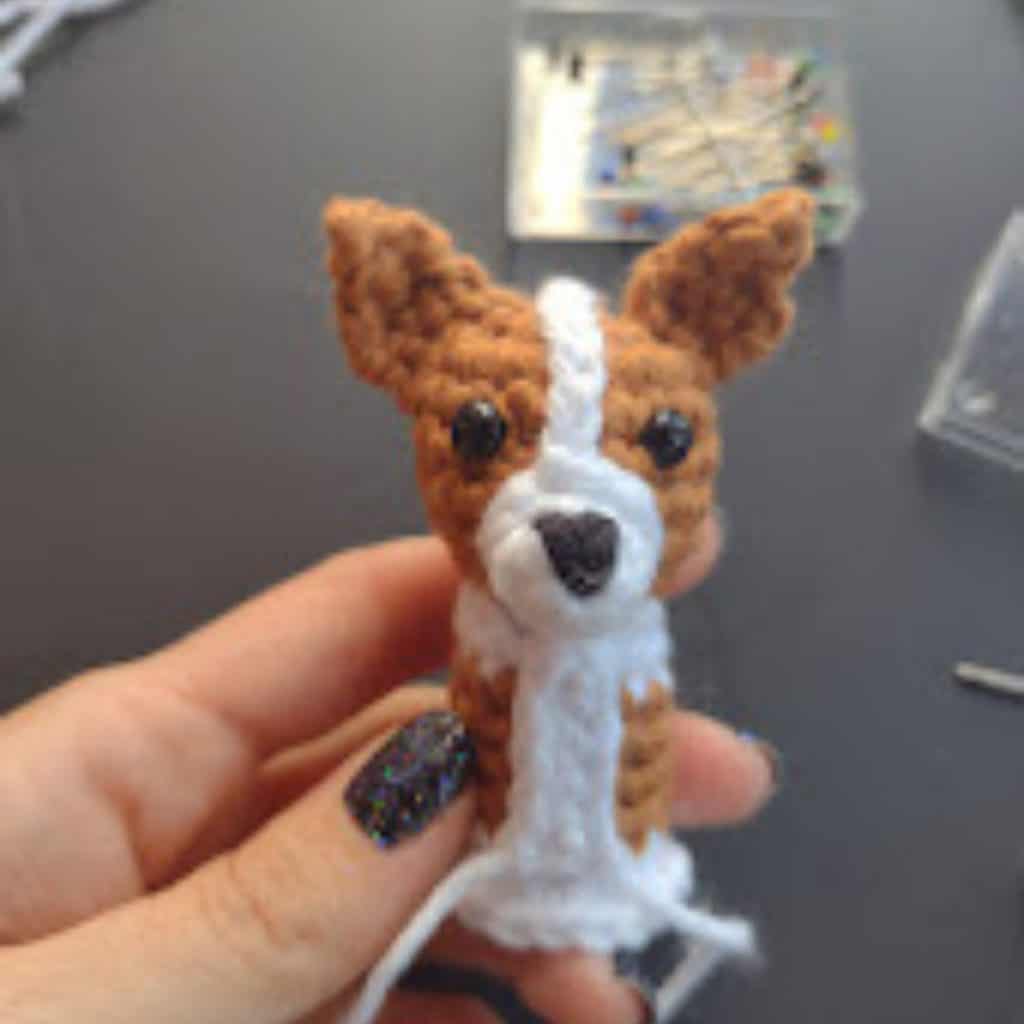
The head and body are worked in one piece, starting at the top of the head and finishing at the bottom of the body.
Head and Body
Head
With brown yarn:
- Round 1: 6 sc in a magic ring. (6)
- Round 2: [1 inc in all st]. (12)
- Round 3: [1 sc, 1 inc] x6. (18)
- Rounds 4-7: [1 sc in all st]. (18)
👉 Place the eyes between Rounds 4 and 5, spaced by 3 stitches.
👉 Begin stuffing the head.
- Round 8: [9 dec]. (9)
The head is now finished.

Body
Change to white yarn.
- Round 9: [2 sc, 1 inc] x3. (12)
- Round 10: [1 sc in all]. (12)
Change to brown yarn.
- Rounds 11-14: [1 sc in all]. (12)
Change to white yarn.
- Round 15: [1 sc in all]. (12)
👉 Stuff the body firmly before closing.
- Round 16: working in the back loop only (blo): [2 sc, 1 dec] x3. (9)
Fasten off and close the body.

Optional Standing Base (Recommended)
This extra round creates a flat base so your corgi can stand.
Join white yarn into any front loop of Round 15
(I recommend joining at the back so it’s less visible).
- Round 17: working in the front loop only (flo): [1 sc, 1 inc] x6. (18)
Sl st to the first stitch, fasten off.
Muzzle
With white yarn:
- Round 1: 6 sc in a magic ring. (6)
- Round 2: [1 sc in all st]. (6)
- Round 3: [2 sc, 1 inc] x2. (8)
- sl st in the next st, ch 8.
Fasten off, leaving a long tail.
With black yarn, embroider a small nose.
Sew the muzzle centered below the eyes — the chain should pass between the eyes, acting as a small strap.


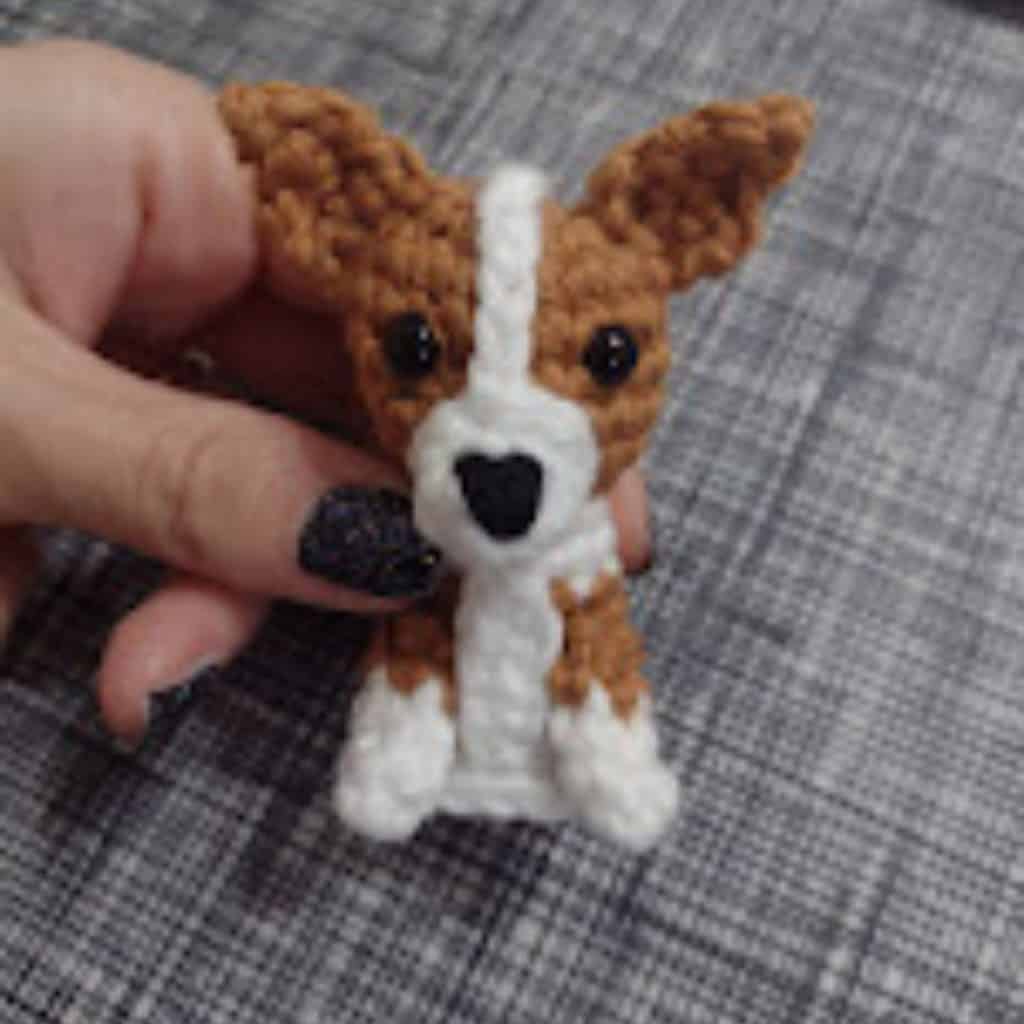
Ears (make 2)
Right Ear
With brown yarn:
- Row 1: ch 2. (2)
- Row 2: starting in the 2nd ch from the hook: [1 sc]. (1)
- Row 3: turn, ch1; [1 inc]. (2)
- Row 4: turn, ch1; [1 inc, 1 sc]. (3)
Fasten off, leave a long tail.
Left Ear
With brown yarn:
- Row 1: ch 2. (2)
- Row 2: starting in the 2nd ch from the hook: [1 sc]. (1)
- Row 3: turn, ch1; [1 inc]. (2)
- Row 4: turn, ch1; [1 sc, 1 inc]. (3)
Fasten off, leave a long tail.
Sew ears to the top of the head.


Belly Patch
With white yarn:
- Row 1: ch 6. (6)
- Row 2: starting in the 2nd ch from the hook: [1 sc in all st]. (5)
Fasten off, leave a long tail.
Sew centered on the belly.

Legs (make 2)
With white yarn:
- Round 1: 4 sc in a magic ring. (4)
- Rounds 2 to 3: [1 sc in all st]. (4)
Change to brown:
- Round 4: [1 sc in all st]. (4)
Fasten off, leave a long tail.
Sew legs on each side of the belly patch.

🎉 Congratulations!
Your crochet corgi is complete!
I’d love to see your finished pup — feel free to share photos in my Facebook group or tag @natalinacraft on Instagram 💛


Copyright Notice
All rights reserved. This pattern and all accompanying photographs are the property of Natalina Craft and are protected by copyright law. This pattern is for personal use only. Any unauthorized reproduction, redistribution, or publication of this pattern, in whole or in part, is strictly prohibited.
You are welcome to sell finished items made from this pattern in small quantities. While crediting Natalina Craft as the designer is not required, it is always greatly appreciated—especially when selling online—so others can find the original pattern.
Thank you for respecting these guidelines.
Corgi Dog Crochet Pattern
Corgi Dog Crochet Pattern
Instructions
Corgi Dog Crochet Pattern - Amigurumi
Start Here
- Please read the entire pattern before starting.
- This pattern is written using US crochet terms.
Material:
- Worsted yarn in white, brown and black
- 3.5 mm crochet hook
- 2 black safety eyes (6 mm)
- Stitch markers
- Tapestry needle
- Polyfill stuffing
Abbreviations:
- chain (ch)
- magic ring (mr)
- single crochet (sc)
- increase (inc)
- invisible decrease (dec)
- slip stitch (sl st)
- half double crochet (HDC)
- double crochet (DC)
How to crochet a Corgi dog?
The head and body are worked in one piece, starting at the top of the head and finishing at the bottom of the body.
Head and Body
Head
With brown yarn:
- Round 1: 6 sc in a magic ring. (6)
- Round 2: [1 inc in all st]. (12)
- Round 3: [1 sc, 1 inc] x6. (18)
- Rounds 4-7: [1 sc in all st]. (18)
👉 Place the eyes between Rounds 4 and 5, spaced by 3 stitches.👉 Begin stuffing the head.
- Round 8: [9 dec]. (9)
The head is now finished.
Body
Change to white yarn.
- Round 9: [2 sc, 1 inc] x3. (12)
- Round 10: [1 sc in all]. (12)
Change to brown yarn.
- Rounds 11-14: [1 sc in all]. (12)
Change to white yarn.
- Round 15: [1 sc in all]. (12)
👉 Stuff the body firmly before closing.
- Round 16: working in the back loop only (blo): [2 sc, 1 dec] x3. (9)
Fasten off and close the body.
Optional Standing Base (Recommended)
This extra round creates a flat base so your corgi can stand.
Join white yarn into any front loop of Round 15(I recommend joining at the back so it’s less visible).
- Round 17: working in the front loop only (flo): [1 sc, 1 inc] x6. (18)
Sl st to the first stitch, fasten off.
Muzzle
With white yarn:
- Round 1: 6 sc in a magic ring. (6)
- Round 2: [1 sc in all st]. (6)
- Round 3: [2 sc, 1 inc] x2. (8)
- sl st in the next st, ch 8.
Fasten off, leaving a long tail.
With black yarn, embroider a small nose.Sew the muzzle centered below the eyes — the chain should pass between the eyes, acting as a small strap.
Ears (make 2)
Right Ear
With brown yarn:
- Row 1: ch 2. (2)
- Row 2: starting in the 2nd ch from the hook: [1 sc]. (1)
- Row 3: turn, ch1; [1 inc]. (2)
- Row 4: turn, ch1; [1 inc, 1 sc]. (3)
Fasten off, leave a long tail.
Left Ear
With brown yarn:
- Row 1: ch 2. (2)
- Row 2: starting in the 2nd ch from the hook: [1 sc]. (1)
- Row 3: turn, ch1; [1 inc]. (2)
- Row 4: turn, ch1; [1 sc, 1 inc]. (3)
Fasten off, leave a long tail.
Sew ears to the top of the head.
Belly Patch
With white yarn:
- Row 1: ch 6. (6)
- Row 2: starting in the 2nd ch from the hook: [1 sc in all st]. (5)
Fasten off, leave a long tail.Sew centered on the belly.
Legs (make 2)
With white yarn:
- Round 1: 4 sc in a magic ring. (4)
- Rounds 2 to 3: [1 sc in all st]. (4)
Change to brown:
- Round 4: [1 sc in all st]. (4)
Fasten off, leave a long tail.
Sew legs on each side of the belly patch.
🎉 Congratulations!
Your crochet corgi is complete!I’d love to see your finished pup — feel free to share photos in my Facebook group or tag @natalinacraft on Instagram 💛
Copyright Notice
All rights reserved. This pattern and all accompanying photographs are the property of Natalina Craft and are protected by copyright law. This pattern is for personal use only. Any unauthorized reproduction, redistribution, or publication of this pattern, in whole or in part, is strictly prohibited.
You are welcome to sell finished items made from this pattern in small quantities. While crediting Natalina Craft as the designer is not required, it is always greatly appreciated—especially when selling online—so others can find the original pattern.Thank you for respecting these guidelines.
This corgi pattern is too cute! Ive been asked by a friend to crochet them a corgi basket similar to an Easter basket I made. I believe I can use your p astern as a guide for doing this and am very excited to get started. I will definitely share what i create once completed. I do want to thank you for this beautiful free corgi pattern!
Thank you for your kind words! I would love to see your corgi basket!
Hola me encantó
Gracias!
thank you for the pattern. I’ll be trying it
You’re so welcome! I’m excited to hear you’ll be trying it out. Feel free to share how it turns out—I’d love to see your version!