
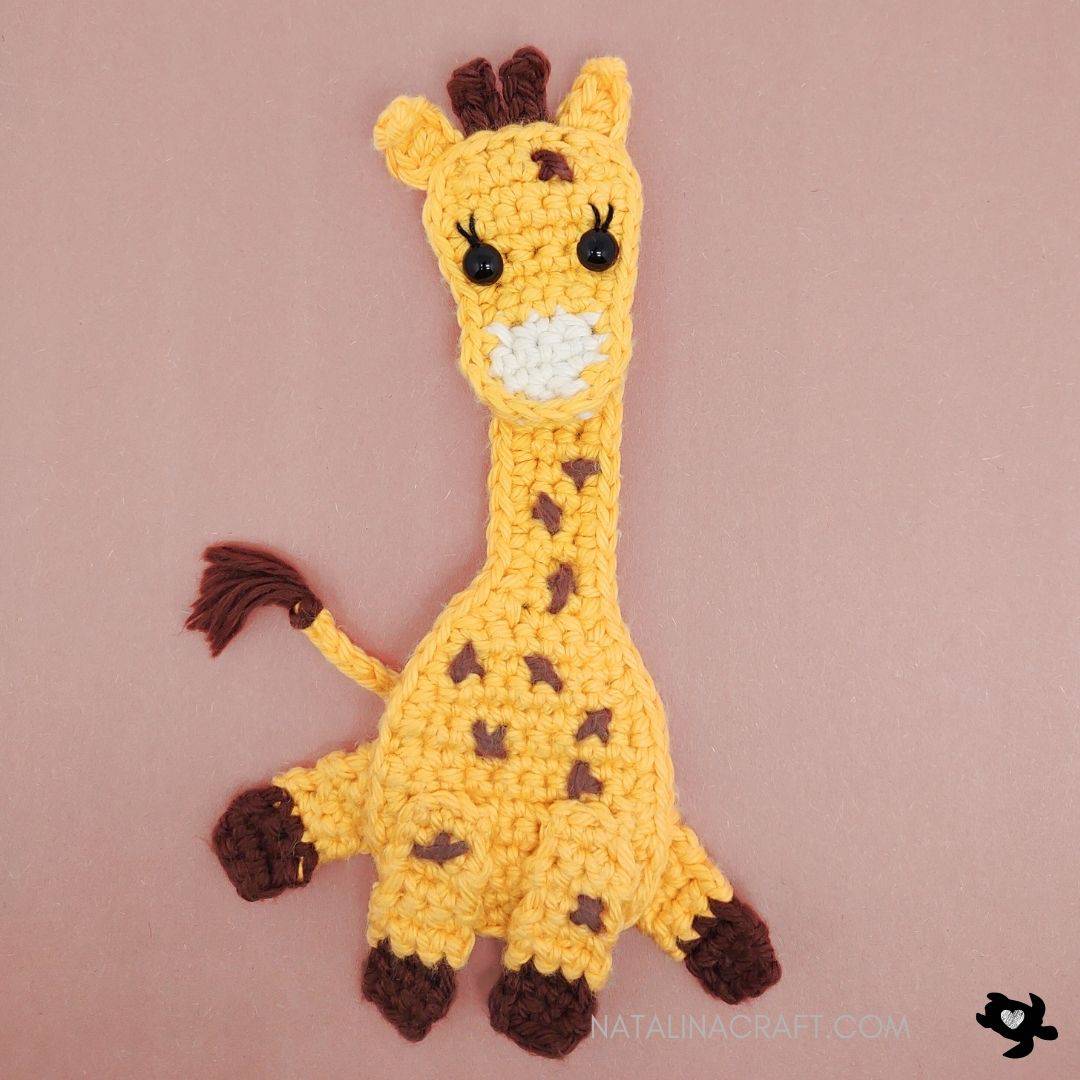
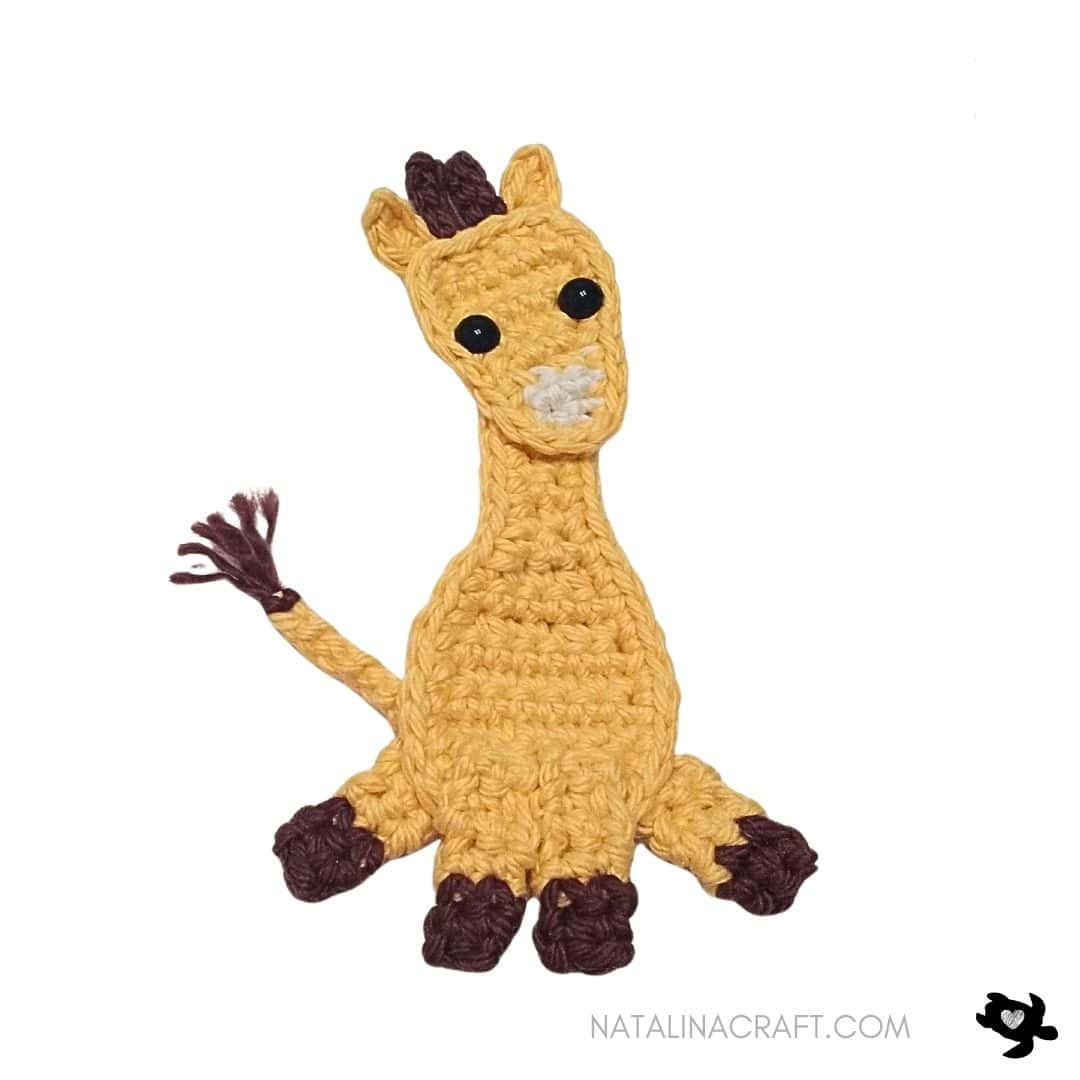
Create an adorable giraffe appliqué in two sizes! This pattern is perfect for blankets, bags, wall décor, or nursery projects. Both the large and small giraffes use the same construction method, making it easy to adjust size while keeping a consistent look.
Join my Facebook group, where you can ask questions, share your finished projects, and help me choose future designs!
I hope you enjoy this pattern and find it easy to follow. If you have any questions, feel free to reach out, and please tag me if you share your giraffes—I love seeing your work!


Crochet Giraffe Appliques
Start Here:
Please read the whole pattern properly before starting. The pattern is written using US terms.
Materials
- Worsted yarn in cream, yellow, and brown
- Small amount of black pearl cotton (for eyelashes – optional)
- 3.5 mm (US E) crochet hook
- 2 black safety eyes (7.5 mm)
- Stitch marker
- Tapestry needle
Abbreviations
- ch = chain
- mr = magic ring
- sc = single crochet
- inc = increase
- dec = invisible decrease
- sl st = slip stitch
- hdc = half double crochet
- dc = double crochet
Yarn Used
Light worsted cotton yarn
I used I Love This Cotton from Hobby Lobby.
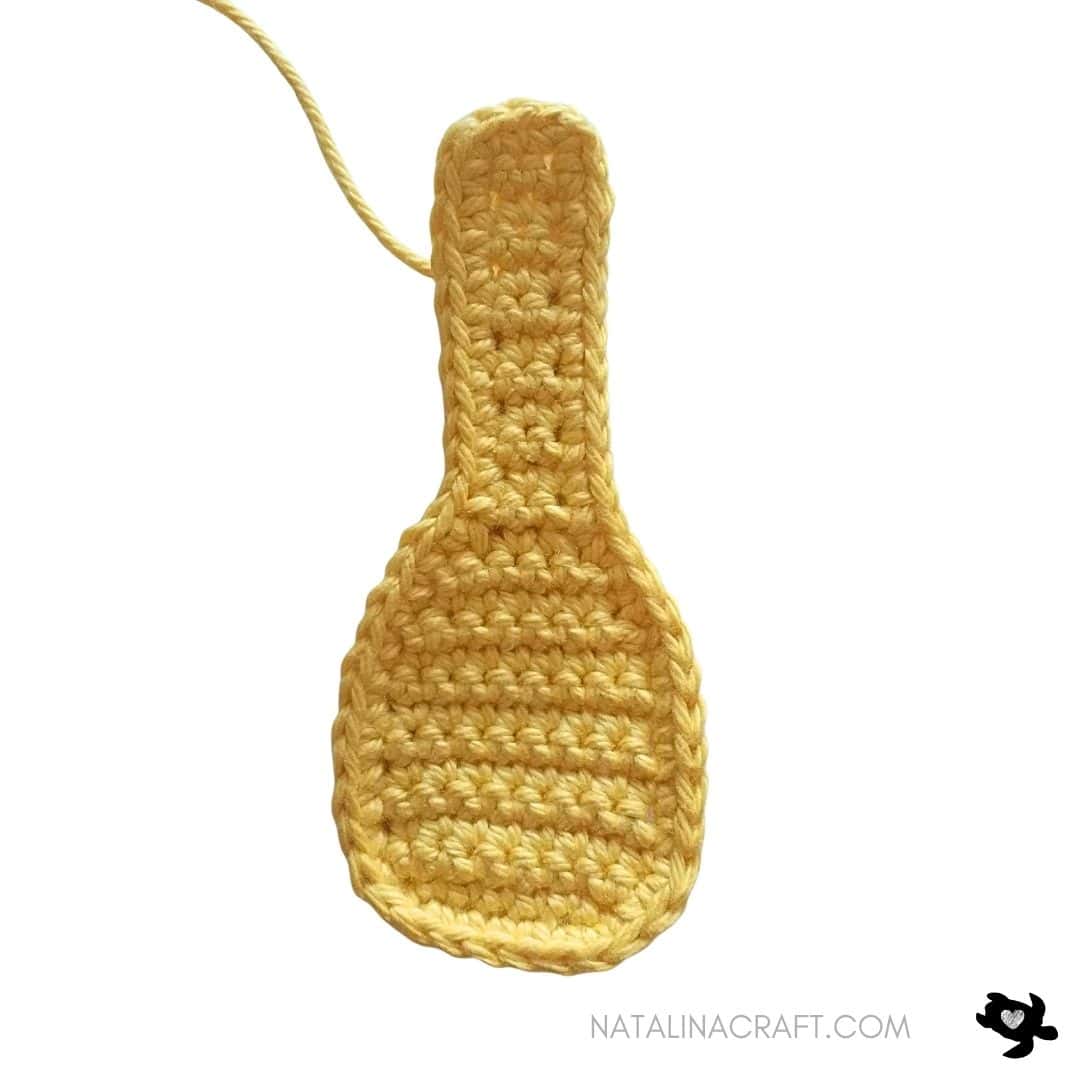
Large Giraffe Applique (approx. 7 in / 18 cm)
Body
- Worked in rows, then finished with a single crochet border.
With yellow yarn and a 3.5 mm hook:
- ch 8. (8)
- Row 1: starting from the 2nd ch from the hook: 1 sc in the next 7 ch. (7)
- Row 2: ch1, turn; 1 inc, 1 sc in the next 5 st, 1 inc. (9)
- Rows 3 to 9: ch1, turn; 1 sc in all st. (9)
- Row 10: ch1, turn; 1 dec, 1 sc in the next 5 st, 1 dec. (7)
- Row 11: ch1, turn; 1 sc in all st. (7)
- Row 12: ch1, turn; 1 dec, 1 sc in the next 3 st, 1 dec. (5)
- Row 13: ch1, turn; 1 dec, 1 sc in the next 1 st, 1 dec. (3)
- Rows 14 to 25: ch1, turn; 1 sc in all st. (3)
Do not turn. Work sc evenly around the entire body.
Do not crochet too tightly; you may use a larger hook if needed.
Approx. 54 sts (stitch count may vary slightly depending on tension).
Fasten off, leaving a long tail to sew the head.
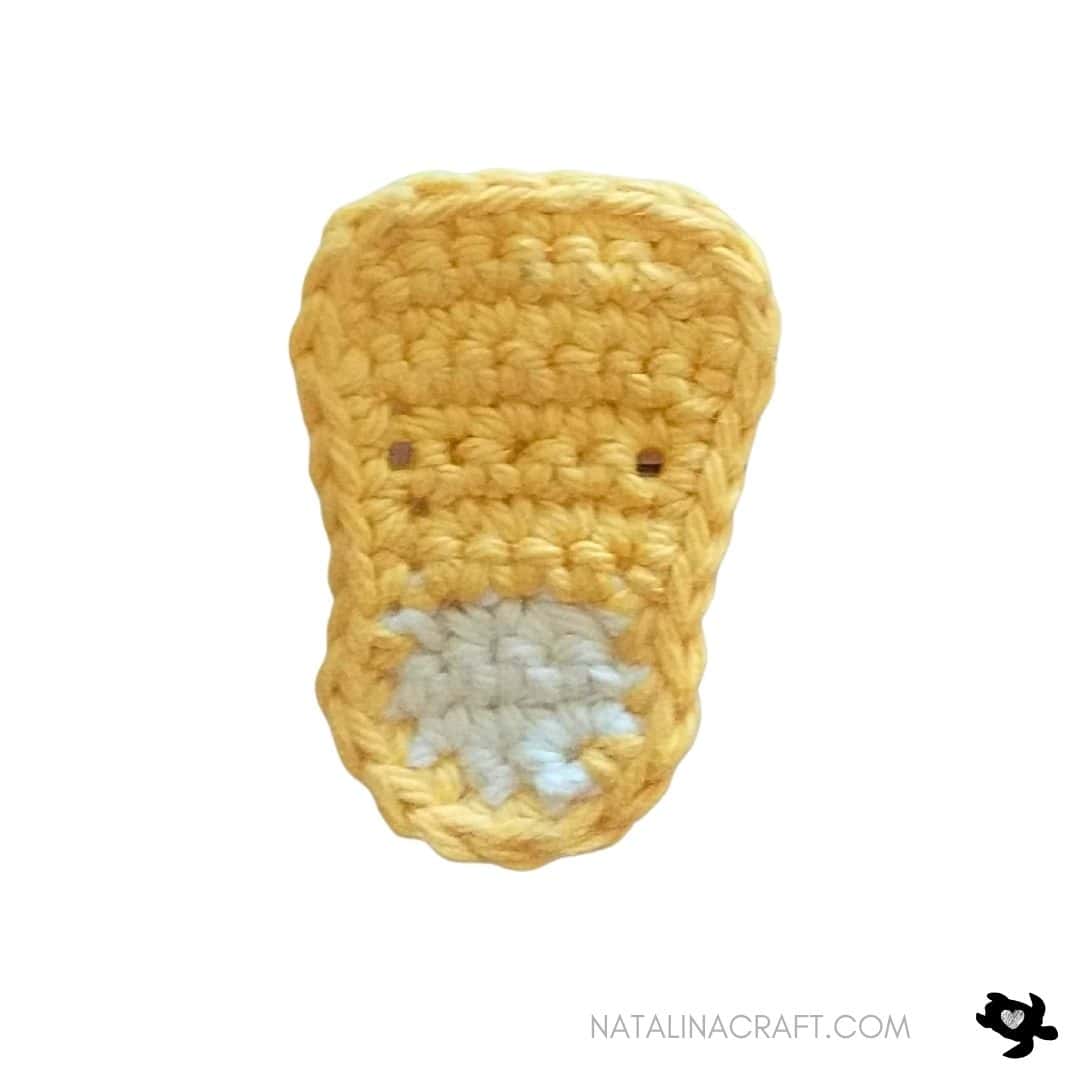
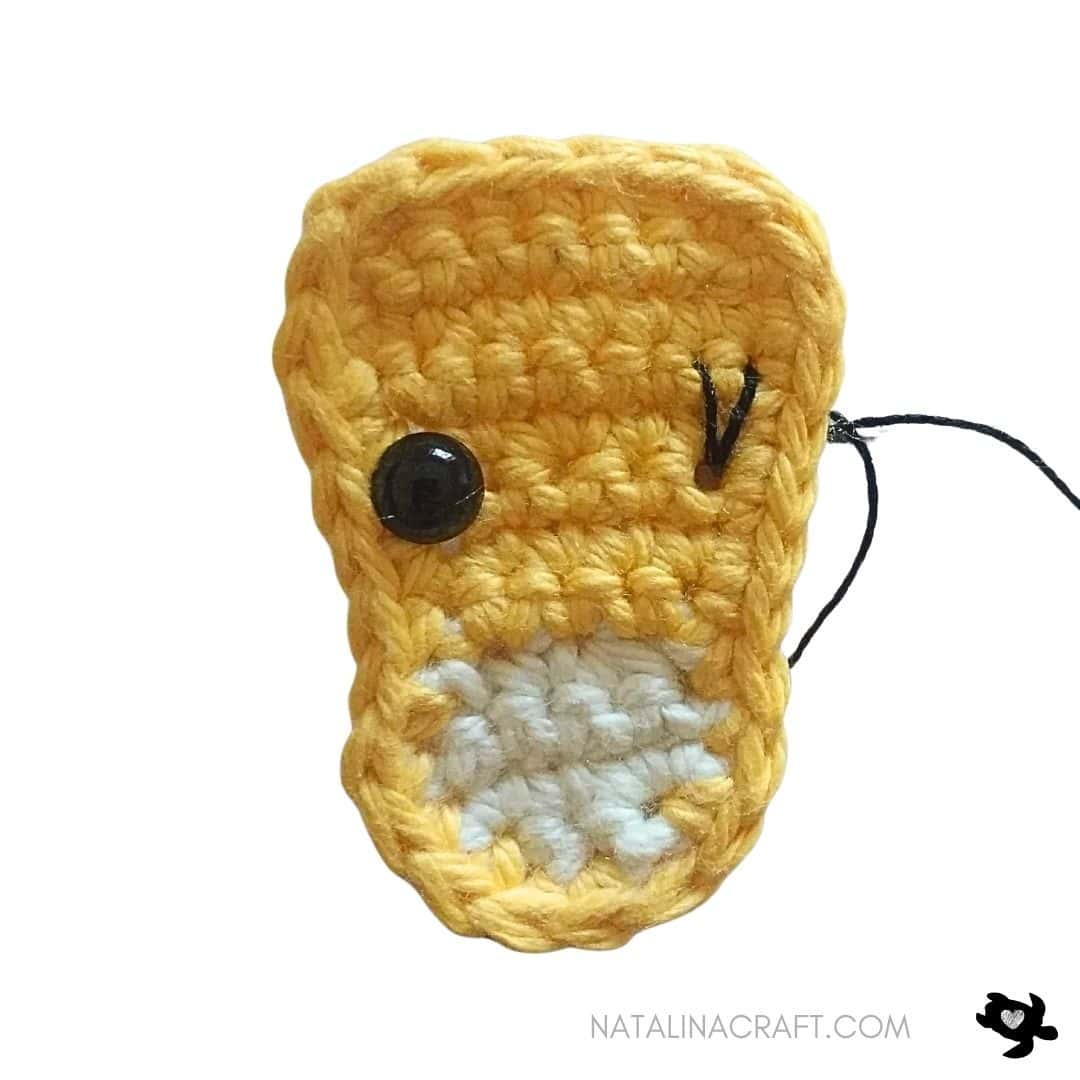
Head
- Worked in rows, then finished with a single crochet border.
With cream yarn and a 3.5 mm hook:
- ch 4. (4)
- Row 1: starting from the 2nd ch from the hook: 1 sc in the next 3 ch. (3)
- Row 2: ch1, turn; 1 inc, 1 sc in the next st, 1 inc. (5)
- Row 3: ch1, turn; 1 sc in all st. (5)
- Row 4: ch1, turn; 1 dec, 1 sc in the next st, 1 dec. (3)
Change to yellow yarn:
- Row 5: ch1, turn; 1 inc, 1 sc in the next st, 1 inc. (5)
- Rows 6 to 7: ch1, turn; 1 sc in all st. (5)
- Row 8: ch1, turn; 1 sc in the next 2 st, 1 inc, 1 sc in the next 2 st. (6)
- Row 9: ch1, turn; 1 inc, 1 sc in the next 4 st, 1 inc. (8)
- Row 10: ch1, turn; 1 sc in all st. (8)
- Row 11: ch1, turn; 1 dec, 1 sc in the next 4 st, 1 dec. (6)
Do not turn. Sc evenly around the head (do not crochet too tightly). ≈ 25 sts
Fasten off.
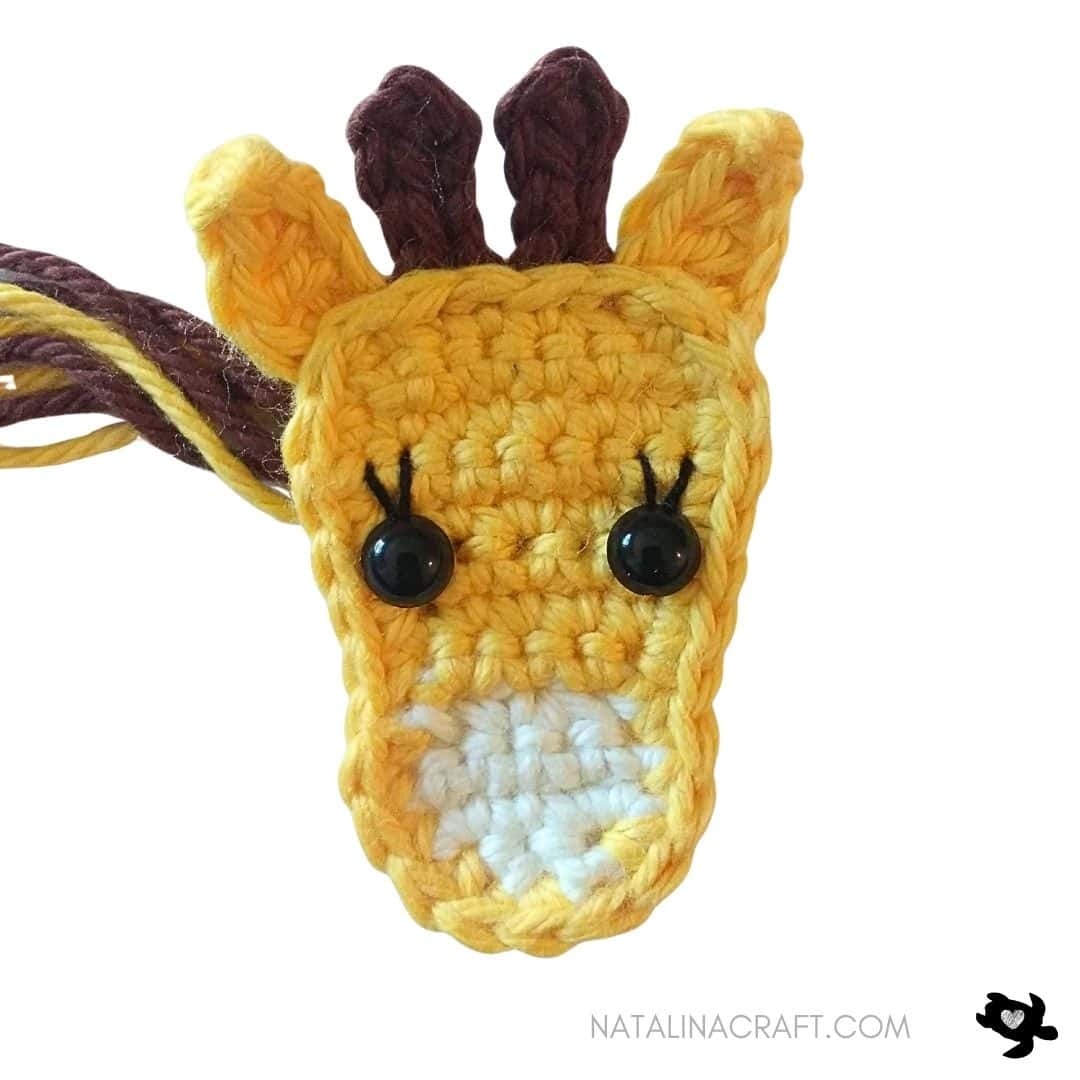
Eyes & Eyelashes
Decide eye placement.
Remove the safety eyes, embroider eyelashes with black pearl cotton, then reinsert and secure the eyes.


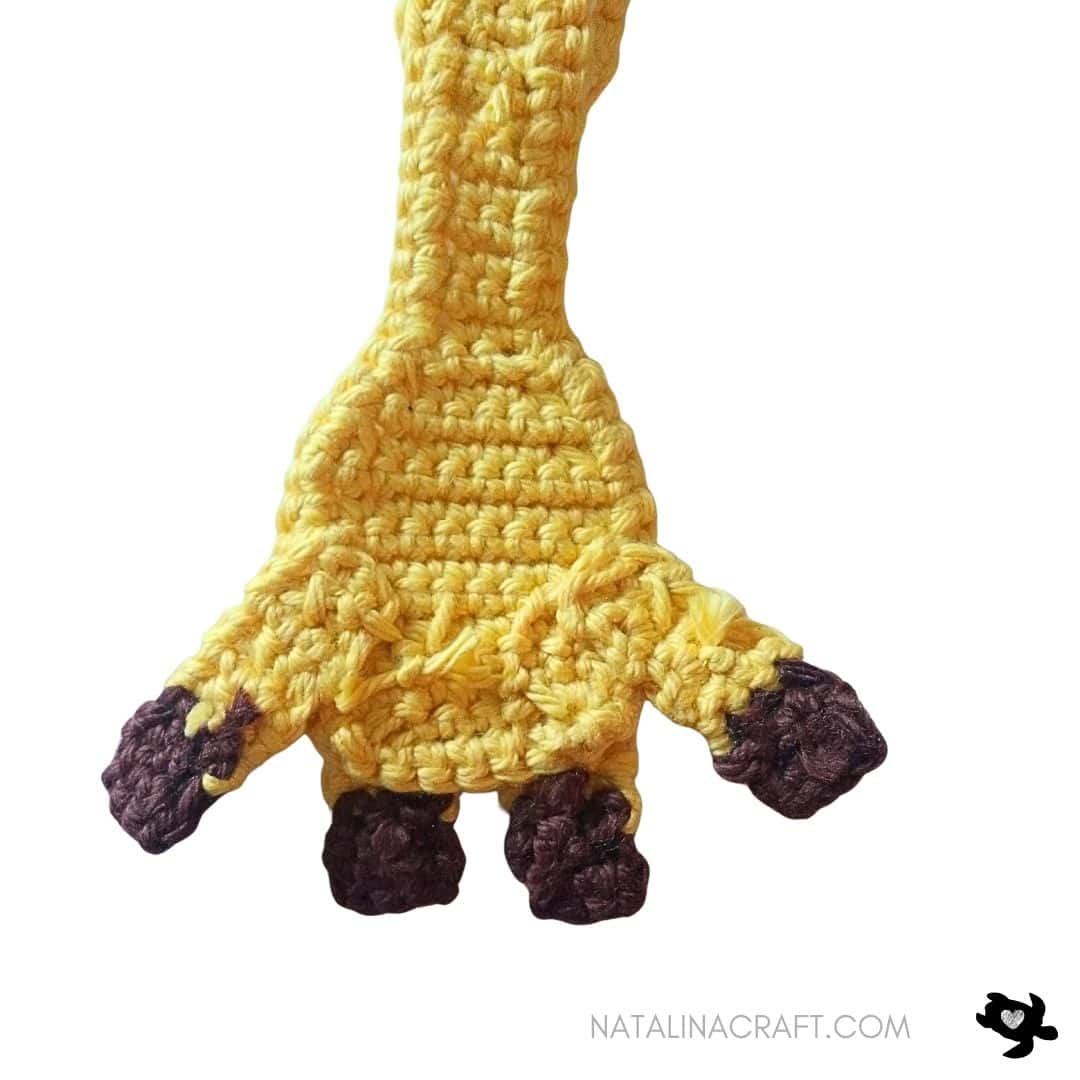
Legs (make 4)
- Worked in rows.
With yellow yarn and a 3.5 mm hook:
- ch 4. (4)
- Row 1: starting from the 2nd ch from the hook: 1 sc in the next 3 ch. (3)
- Rows 2 to 6: ch1, turn; 1 sc in all st. (3)
Change to brown yarn:
- Rows 7 to 9: ch1, turn; 1 sc in all st. (3)
Fasten off, leaving a long tail for sewing.
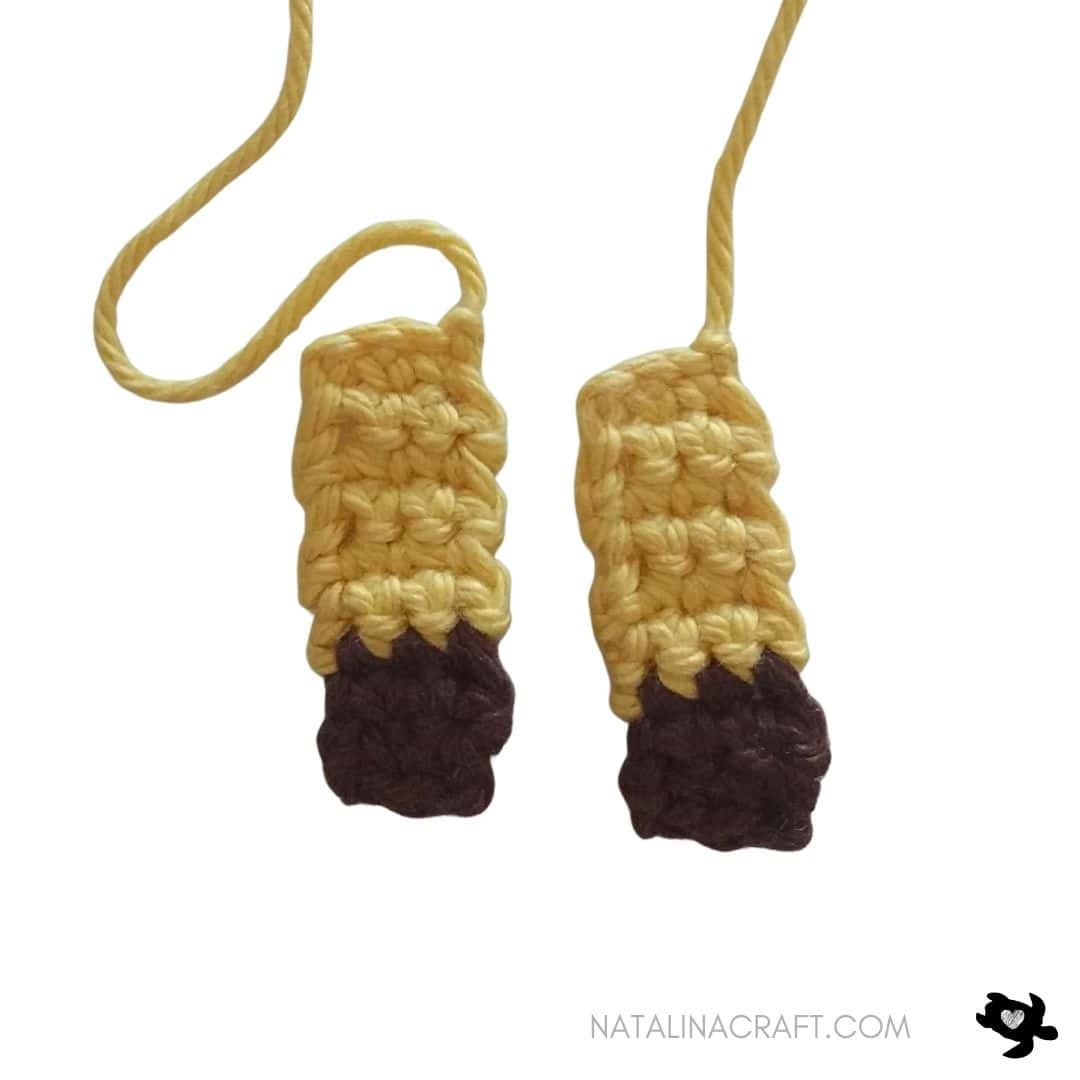
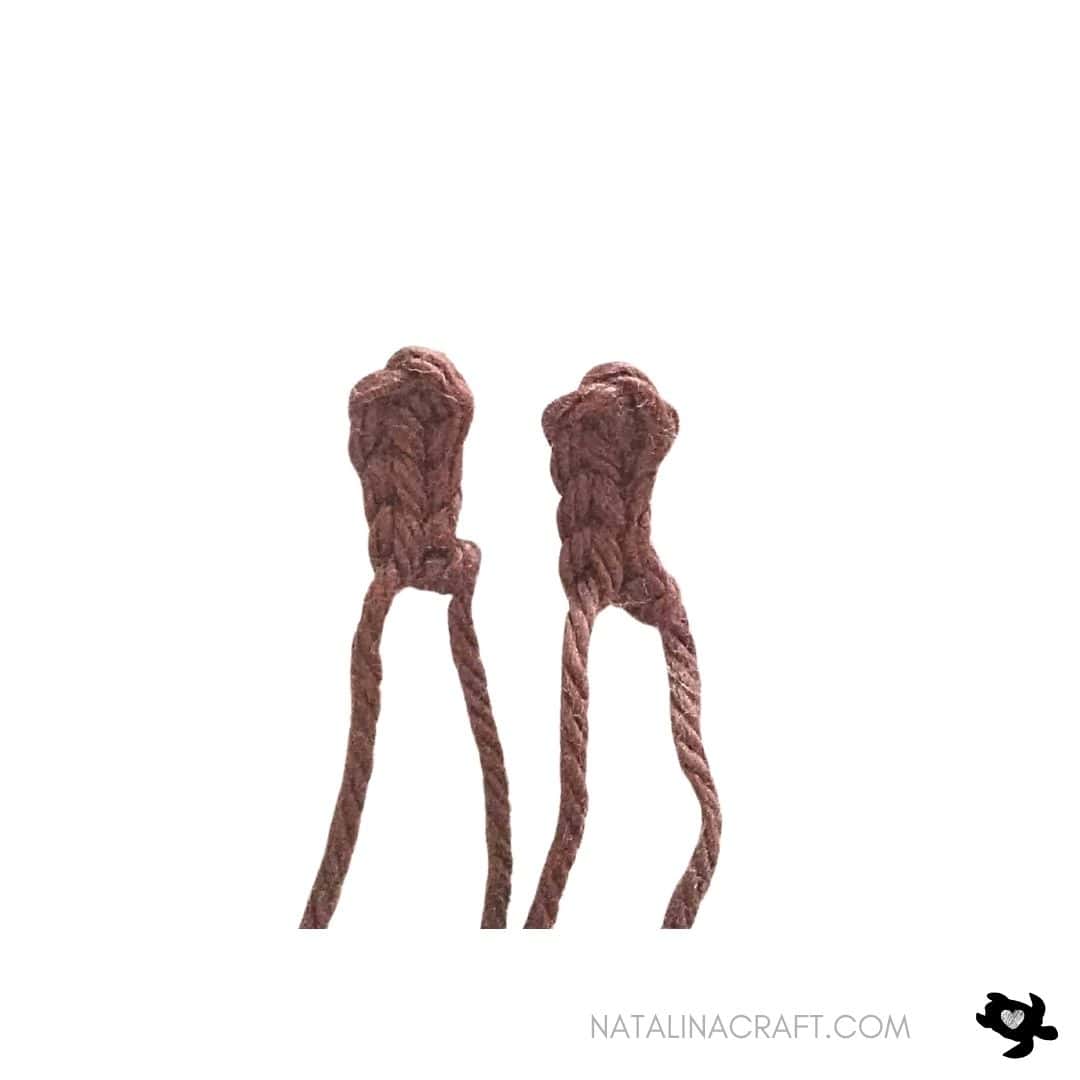
Horns (make 2)
With brown yarn and a 3.5 mm hook:
- Ch 6
- Row 1: Starting in the 4th ch from the hook, 1 sl st in next 3 ch. (3)
Fasten off, leaving a long tail.
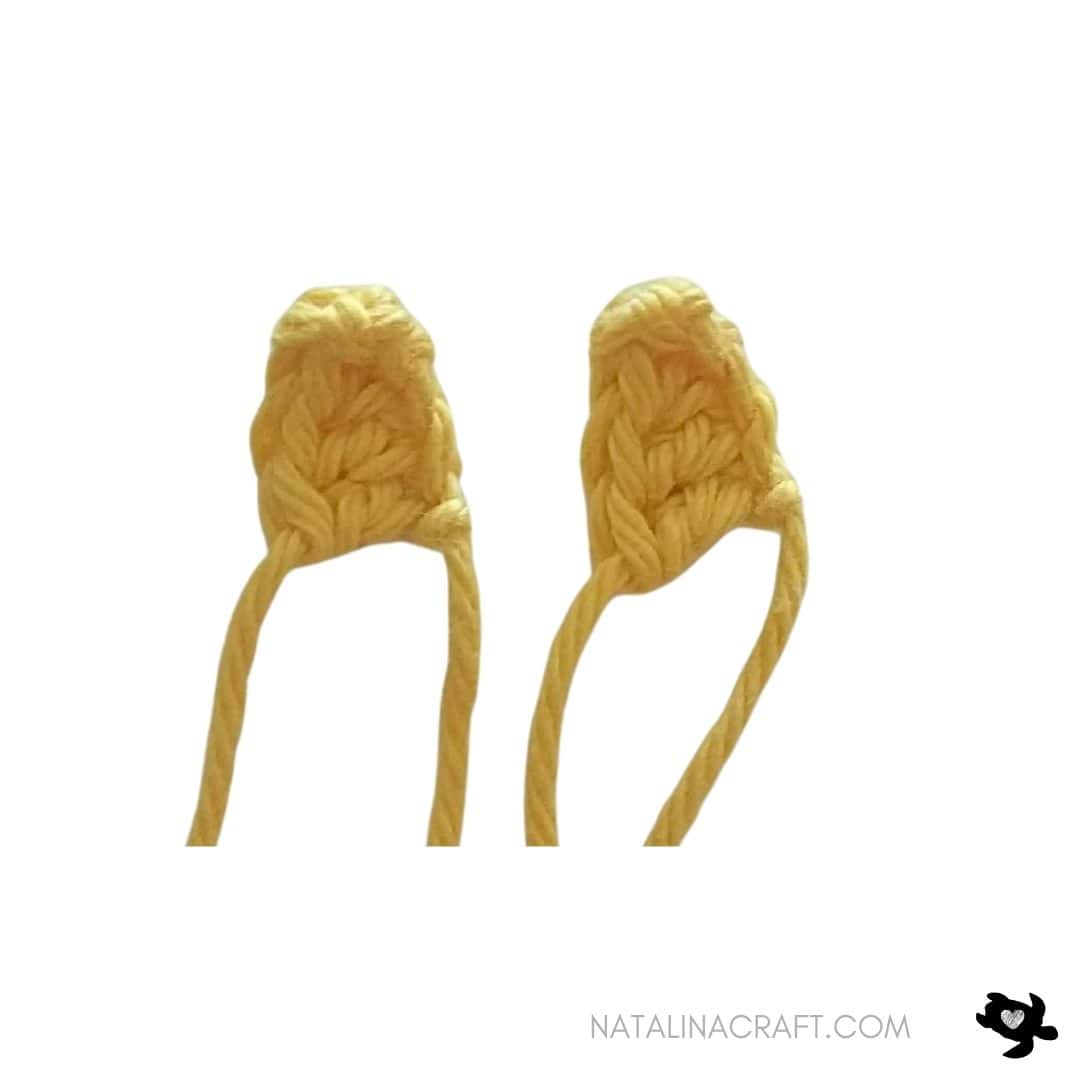
Ears (make 2)
With yellow yarn and a 3.5 mm hook:
- Ch 5
- Row 1: Starting in the 2nd ch from the hook: 1 sc, 1 hdc, 1 dc in next 2 ch. (4)
Fasten off, leaving a long tail.
Tail
With yellow yarn and a 3.5 mm hook:
ch 10.
Cut two strands of brown yarn, fold in half, and attach to the last chain with a lark’s head knot (Insert your hook into the last chain, fold the two brown strands in half, and pull the folded loop through the chain. Using your fingers, pass all the yarn ends through the loop and gently tighten to secure). Trim and separate strands for a natural look.


Assembly
- Sew one ear to the head
- Using the same yarn, attach both horns and the second ear
- Sew the head to the body (adjust height and tilt as desired)
- Sew two legs to the front and two to the back of the body
- Attach the tail just above one back leg
- Embroider brown spots using small cross stitches in varying sizes
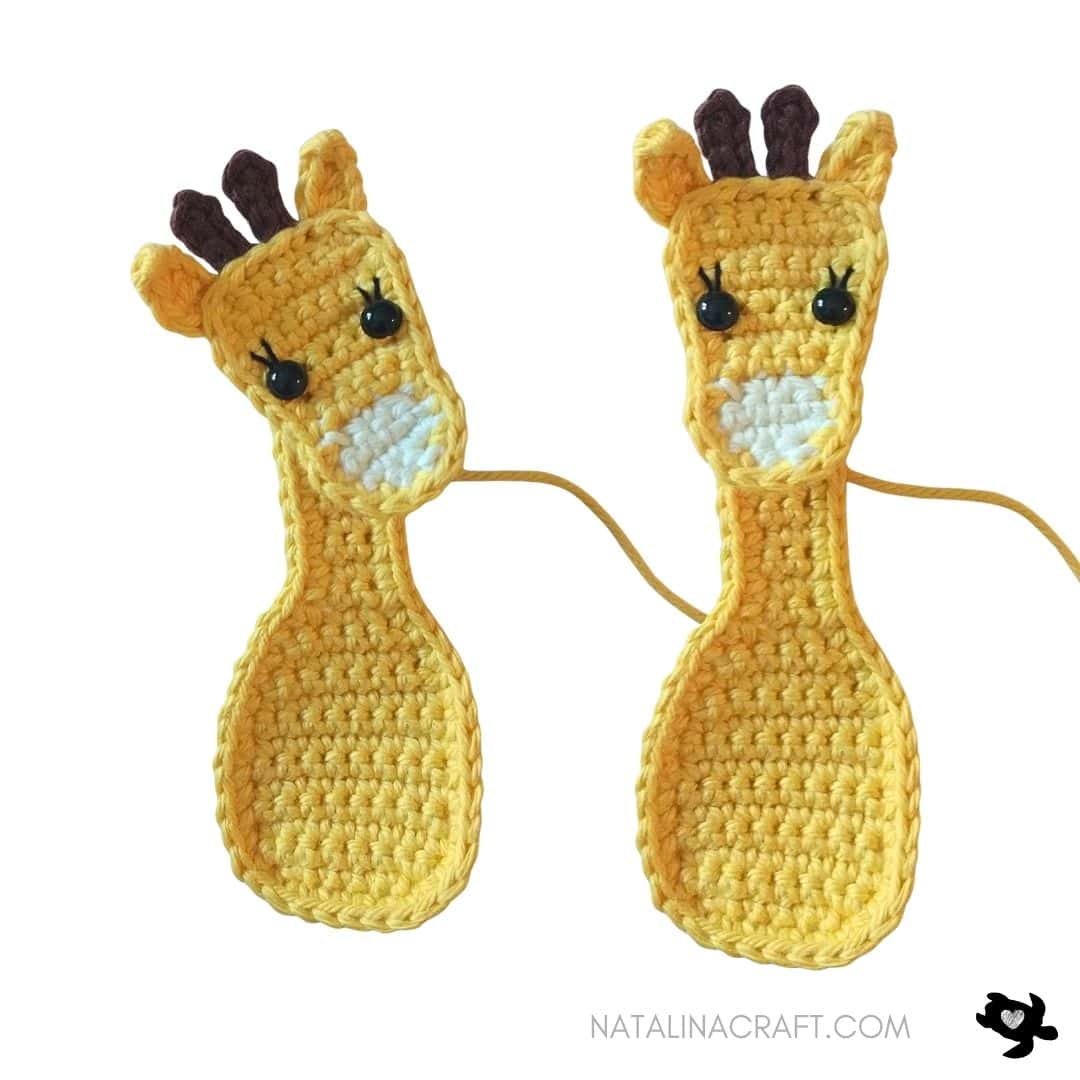


Small Giraffe Applique (approx. 5.5 in / 14 cm)
The small giraffe is made using the same construction as the large version, with adjusted stitch counts for a smaller size.
Body
- Worked in rows, then finished with a single crochet border.
With yellow yarn and a 3.5 mm hook:
- ch 6. (6)
- Row 1: starting from the 2nd ch from the hook: 1 sc in the next 5 ch. (5)
- Row 2: ch1, turn; 1 inc, 1 sc in the next 3 st, 1 inc. (7)
- Rows 3 to 6: ch1, turn; 1 sc in all st. (7)
- Row 7: ch1, turn; 1 dec, 1 sc in the next 3 st, 1 dec. (5)
- Row 8: ch1, turn; 1 sc in all st. (5)
- Row 9: ch1, turn; 1 dec, 1 sc in the next st, 1 dec. (3)
- Row 10: ch1, turn; 1 sc in the next 1 st, 1 dec. (2) (NB: this step will make the head slightly asymmetric but it won’t really be visible)
- Rows 11 to 17: ch1, turn; 1 sc in all st. (2)
Do not turn. Work sc evenly around the entire body, being careful not to crochet too tightly (you may use a larger hook if needed). ≈ 37 sts
Fasten off, leaving a long tail to sew the head.
Head
- Worked in rows, then finished with a single crochet border.
With cream yarn and a 3.5 mm hook:
- ch 3. (3)
- Row 1: starting from the 2nd ch from the hook: 1 sc in the next 2 ch. (2)
- Row 2: ch1, turn; 2 inc. (4)
Change to yellow yarn:
- Row 3: ch1, turn; 2 dec. (2)
- Row 4: ch1, turn; 2 inc. (4)
- Row 5: ch1, turn; 1 inc, 1 sc in the next 2 st, 1 inc. (6)
- Rows 6 to 8: ch1, turn; 1 sc in all st. (6)
- Row 9: ch1, turn; 1 dec, 1 sc in the next 2 st, 1 dec. (4)
Do not turn. Sc evenly around the head (do not crochet too tightly). ≈ 18 sts
Fasten off.
Eyes
Decide eye placement and secure the safety eyes.
Legs (make 4)
- Worked in rows.
With yellow yarn and a 3.5 mm hook:
- ch 3. (3)
- Row 1: starting from the 2nd ch from the hook: 1 sc in the next 2 ch. (2)
- Rows 2 to 4: ch1, turn; 1 sc in all st. (2)
Change to brown yarn:
- Rows 5 to 6: ch1, turn; 1 sc in all st. (2)
Fasten off, leaving a long tail for sewing.
Horns (make 2)
With brown yarn and a 3.5 mm hook:
- ch 5. (5)
- Row 1: starting from the 3rd ch from the hook: 1 sl st in the next 2 ch. (2)
Fasten off, leaving a long tail.
Ears (make 2)
With yellow yarn and a 3.5 mm hook:
- ch 4. (4)
- Row 1: starting from the 2nd ch from the hook: 1 sc in the next ch, 1 hdc in the next ch, 1 dc in the next ch. (3)
Fasten off, leaving a long tail.
Tail
With yellow yarn and a 3.5 mm hook:
ch 7.
Cut one strand of brown yarn, fold in half, and attach to the last chain with a lark’s head knot (Insert your hook into the last chain, fold the two brown strands in half, and pull the folded loop through the chain. Using your fingers, pass all the yarn ends through the loop and gently tighten to secure). Trim and separate strands for a natural look.
Assembly
- Sew one ear to the head
- Using the same yarn, attach both horns and the second ear
- Sew the head to the body (adjust height and tilt as desired)
- Sew two legs to the front and two to the back of the body
- Attach the tail just above one back leg
- Embroider brown spots using small cross stitches in varying sizes
Your crochet giraffe applique is finished! I hope you enjoyed making it. If you share your project, don’t forget to tag @natalinacraft—your support truly encourages me to design more free patterns.
Copyright Notice
All rights reserved. This pattern and all accompanying photographs are the property of Natalina Craft and are protected by copyright law. This pattern is for personal use only. Any unauthorized reproduction, redistribution, or publication of this pattern, in whole or in part, is strictly prohibited.
You are welcome to sell finished items made from this pattern in small quantities. While crediting Natalina Craft as the designer is not required, it is always greatly appreciated—especially when selling online—so others can find the original pattern.
Thank you for respecting these guidelines.
Crochet Giraffe Applique
Crochet Appliques - Giraffe
Instructions
Start Here:
Please read the whole pattern properly before starting. The pattern is written using US terms.
Materials
- Worsted yarn in cream, yellow, and brown
- Small amount of black pearl cotton (for eyelashes – optional)
- 3.5 mm (US E) crochet hook
- 2 black safety eyes (7.5 mm)
- Stitch marker
- Tapestry needle
Abbreviations
- ch = chain
- mr = magic ring
- sc = single crochet
- inc = increase
- dec = invisible decrease
- sl st = slip stitch
- hdc = half double crochet
- dc = double crochet
Yarn Used
Light worsted cotton yarnI used I Love This Cotton from Hobby Lobby.
Large Giraffe Applique (approx. 7 in / 18 cm)
Body
- Worked in rows, then finished with a single crochet border.
With yellow yarn and a 3.5 mm hook:
- ch 8. (8)
- Row 1: starting from the 2nd ch from the hook: 1 sc in the next 7 ch. (7)
- Row 2: ch1, turn; 1 inc, 1 sc in the next 5 st, 1 inc. (9)
- Rows 3 to 9: ch1, turn; 1 sc in all st. (9)
- Row 10: ch1, turn; 1 dec, 1 sc in the next 5 st, 1 dec. (7)
- Row 11: ch1, turn; 1 sc in all st. (7)
- Row 12: ch1, turn; 1 dec, 1 sc in the next 3 st, 1 dec. (5)
- Row 13: ch1, turn; 1 dec, 1 sc in the next 1 st, 1 dec. (3)
- Rows 14 to 25: ch1, turn; 1 sc in all st. (3)
Do not turn. Work sc evenly around the entire body.Do not crochet too tightly; you may use a larger hook if needed.Approx. 54 sts (stitch count may vary slightly depending on tension).
Fasten off, leaving a long tail to sew the head.
Head
- Worked in rows, then finished with a single crochet border.
With cream yarn and a 3.5 mm hook:
- ch 4. (4)
- Row 1: starting from the 2nd ch from the hook: 1 sc in the next 3 ch. (3)
- Row 2: ch1, turn; 1 inc, 1 sc in the next st, 1 inc. (5)
- Row 3: ch1, turn; 1 sc in all st. (5)
- Row 4: ch1, turn; 1 dec, 1 sc in the next st, 1 dec. (3)
Change to yellow yarn:
- Row 5: ch1, turn; 1 inc, 1 sc in the next st, 1 inc. (5)
- Rows 6 to 7: ch1, turn; 1 sc in all st. (5)
- Row 8: ch1, turn; 1 sc in the next 2 st, 1 inc, 1 sc in the next 2 st. (6)
- Row 9: ch1, turn; 1 inc, 1 sc in the next 4 st, 1 inc. (8)
- Row 10: ch1, turn; 1 sc in all st. (8)
- Row 11: ch1, turn; 1 dec, 1 sc in the next 4 st, 1 dec. (6)
Do not turn. Sc evenly around the head (do not crochet too tightly). ≈ 25 sts
Fasten off.
Eyes & Eyelashes
Decide eye placement.Remove the safety eyes, embroider eyelashes with black pearl cotton, then reinsert and secure the eyes.
Legs (make 4)
- Worked in rows.
With yellow yarn and a 3.5 mm hook:
- ch 4. (4)
- Row 1: starting from the 2nd ch from the hook: 1 sc in the next 3 ch. (3)
- Rows 2 to 6: ch1, turn; 1 sc in all st. (3)
Change to brown yarn:
- Rows 7 to 9: ch1, turn; 1 sc in all st. (3)
Fasten off, leaving a long tail for sewing.
Horns (make 2)
With brown yarn and a 3.5 mm hook:
- Ch 6
- Row 1: Starting in the 4th ch from the hook, 1 sl st in next 3 ch. (3)
Fasten off, leaving a long tail.
Ears (make 2)
With yellow yarn and a 3.5 mm hook:
- Ch 5
- Row 1: Starting in the 2nd ch from the hook: 1 sc, 1 hdc, 1 dc in next 2 ch. (4)
Fasten off, leaving a long tail.
Tail
With yellow yarn and a 3.5 mm hook:
ch 10.Cut two strands of brown yarn, fold in half, and attach to the last chain with a lark’s head knot (Insert your hook into the last chain, fold the two brown strands in half, and pull the folded loop through the chain. Using your fingers, pass all the yarn ends through the loop and gently tighten to secure). Trim and separate strands for a natural look.
Assembly
- Sew one ear to the head
- Using the same yarn, attach both horns and the second ear
- Sew the head to the body (adjust height and tilt as desired)
- Sew two legs to the front and two to the back of the body
- Attach the tail just above one back leg
- Embroider brown spots using small cross stitches in varying sizes
Small Giraffe Applique (approx. 5.5 in / 14 cm)
The small giraffe is made using the same construction as the large version, with adjusted stitch counts for a smaller size.
Body
- Worked in rows, then finished with a single crochet border.
With yellow yarn and a 3.5 mm hook:
- ch 6. (6)
- Row 1: starting from the 2nd ch from the hook: 1 sc in the next 5 ch. (5)
- Row 2: ch1, turn; 1 inc, 1 sc in the next 3 st, 1 inc. (7)
- Rows 3 to 6: ch1, turn; 1 sc in all st. (7)
- Row 7: ch1, turn; 1 dec, 1 sc in the next 3 st, 1 dec. (5)
- Row 8: ch1, turn; 1 sc in all st. (5)
- Row 9: ch1, turn; 1 dec, 1 sc in the next st, 1 dec. (3)
- Row 10: ch1, turn; 1 sc in the next 1 st, 1 dec. (2) (NB: this step will make the head slightly asymmetric but it won't really be visible)
- Rows 11 to 17: ch1, turn; 1 sc in all st. (2)
Do not turn. Work sc evenly around the entire body, being careful not to crochet too tightly (you may use a larger hook if needed). ≈ 37 sts
Fasten off, leaving a long tail to sew the head.
Head
- Worked in rows, then finished with a single crochet border.
With cream yarn and a 3.5 mm hook:
- ch 3. (3)
- Row 1: starting from the 2nd ch from the hook: 1 sc in the next 2 ch. (2)
- Row 2: ch1, turn; 2 inc. (4)
Change to yellow yarn:
- Row 3: ch1, turn; 2 dec. (2)
- Row 4: ch1, turn; 2 inc. (4)
- Row 5: ch1, turn; 1 inc, 1 sc in the next 2 st, 1 inc. (6)
- Rows 6 to 8: ch1, turn; 1 sc in all st. (6)
- Row 9: ch1, turn; 1 dec, 1 sc in the next 2 st, 1 dec. (4)
Do not turn. Sc evenly around the head (do not crochet too tightly). ≈ 18 sts
Fasten off.
Eyes
Decide eye placement and secure the safety eyes.
Legs (make 4)
- Worked in rows.
With yellow yarn and a 3.5 mm hook:
- ch 3. (3)
- Row 1: starting from the 2nd ch from the hook: 1 sc in the next 2 ch. (2)
- Rows 2 to 4: ch1, turn; 1 sc in all st. (2)
Change to brown yarn:
- Rows 5 to 6: ch1, turn; 1 sc in all st. (2)
Fasten off, leaving a long tail for sewing.
Horns (make 2)
With brown yarn and a 3.5 mm hook:
- ch 5. (5)
- Row 1: starting from the 3rd ch from the hook: 1 sl st in the next 2 ch. (2)
Fasten off, leaving a long tail.
Ears (make 2)
With yellow yarn and a 3.5 mm hook:
- ch 4. (4)
- Row 1: starting from the 2nd ch from the hook: 1 sc in the next ch, 1 hdc in the next ch, 1 dc in the next ch. (3)
Fasten off, leaving a long tail.
Tail
With yellow yarn and a 3.5 mm hook:
ch 7.Cut one strand of brown yarn, fold in half, and attach to the last chain with a lark’s head knot (Insert your hook into the last chain, fold the two brown strands in half, and pull the folded loop through the chain. Using your fingers, pass all the yarn ends through the loop and gently tighten to secure). Trim and separate strands for a natural look.
Assembly
- Sew one ear to the head
- Using the same yarn, attach both horns and the second ear
- Sew the head to the body (adjust height and tilt as desired)
- Sew two legs to the front and two to the back of the body
- Attach the tail just above one back leg
- Embroider brown spots using small cross stitches in varying sizes
Your crochet giraffe applique is finished! I hope you enjoyed making it. If you share your project, don’t forget to tag @natalinacraft—your support truly encourages me to design more free patterns.
Copyright Notice
All rights reserved. This pattern and all accompanying photographs are the property of Natalina Craft and are protected by copyright law. This pattern is for personal use only. Any unauthorized reproduction, redistribution, or publication of this pattern, in whole or in part, is strictly prohibited.
You are welcome to sell finished items made from this pattern in small quantities. While crediting Natalina Craft as the designer is not required, it is always greatly appreciated—especially when selling online—so others can find the original pattern.Thank you for respecting these guidelines.
I love your designs
Do you have one for a golden doodle?
I own one and doodle owners are crazy about their fury friends.
Thank you! I don’t have one unfortunately but I can add it to my to-do list!
Very cute, do you by chance have a pattern for an elephant? These would be cute to go with a Japanese lesson.
Thank you. I do have an elephant. here it is https://www.natalinacraft.com/crochet-applique-elephant/
some of the patterns give you a print option,some don’t.Please include those.I’m doing a Noah’s Ark and I wanted to make several crocheted animals and have had to piece the patterns.
Thank you,
Marsha
Hi, sorry for my late reply. I had to take a little break from my blog. I will try to add this option to all my patterns soon.
I just found your appliques and want to thank you much for all that you have! Very easy to follow for a beginner and this is going to save a lot on my embroidery machine-a lot less thread. Please keep adding to your list and one thing people do a lot is make a lot for girls and I have a new grandson Kayden and I would love to find firetruck- cars- train and the like. I havent checked you may have some already but thank you for this pattern and all I will soon find as I browse <3
Thank you so much for your nice words! I have not done any vehicles appliques yet but it is a wonderful idea and I will try to make some as soon as possible. Congratulations on your new Grandson!
Love all of the pieces you create.
I made the giraffe and the only question I have is, what can I use to keep the neck stiff so it doesn’t bend?
Thank you
Linda
Thank you Linda.
For instance, if attached to a blanket, I sew all around including the neck. You can also stick the appliqué to a piece a felt.
I hope this helps!
Thank you for your lovely patterns. I have so much wool to use up so am going to make blankets for the refugee kiddies. I used to do aid work and teach crochet in Timor Leste for many years but post covid has changed everything so these inspired me so thank you.
Thank you so much. That makes me really happy!
This is awesome! I made the big one for a friend (aged around 5), and he loved it so much! The instructions are very easy to use, and I really appreciate it.. I wanted to make a 2D giraffe for him, and there weren’t that many, but this one is perfect! Thanks so much!! 🙂
I will be using this website again…. 😛
Thank you so much for your nice words! That means a lot to me. I am working on new appliques so more new patterns should come soon!
Thank you so much for the pattern, mine looks a little drunk.. but still cute I think!
Haha, a drunk giraffe must be cute!Thank you!