
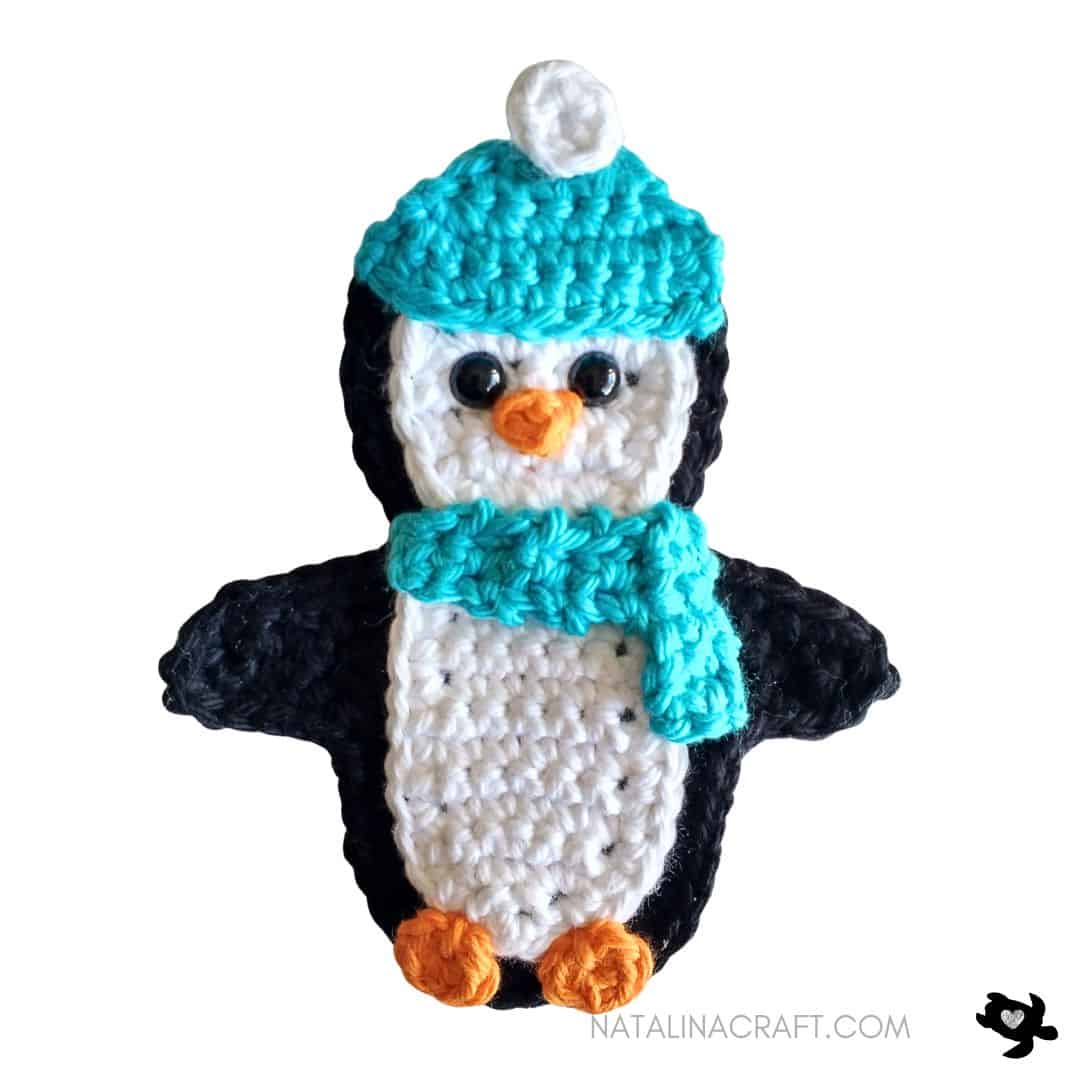
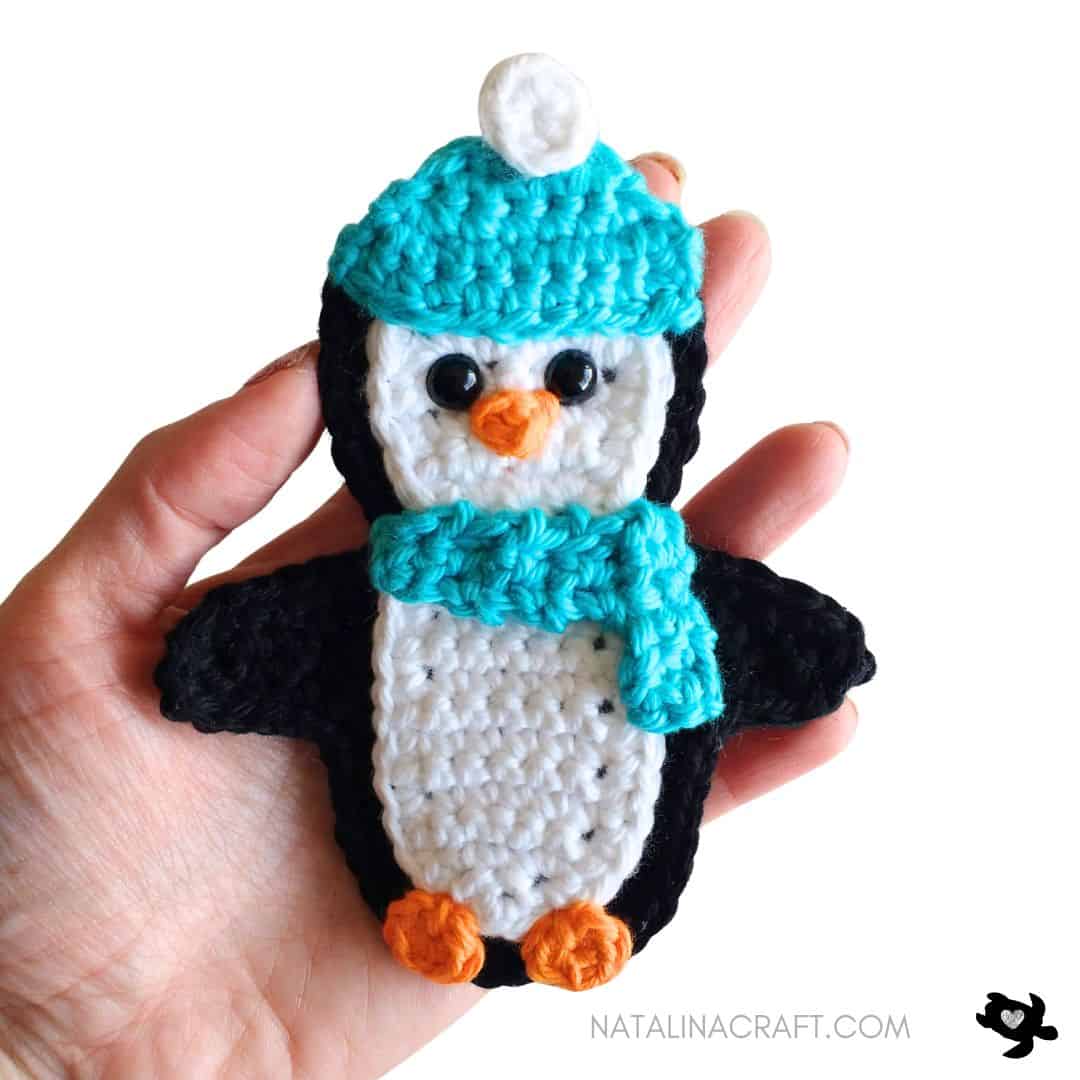
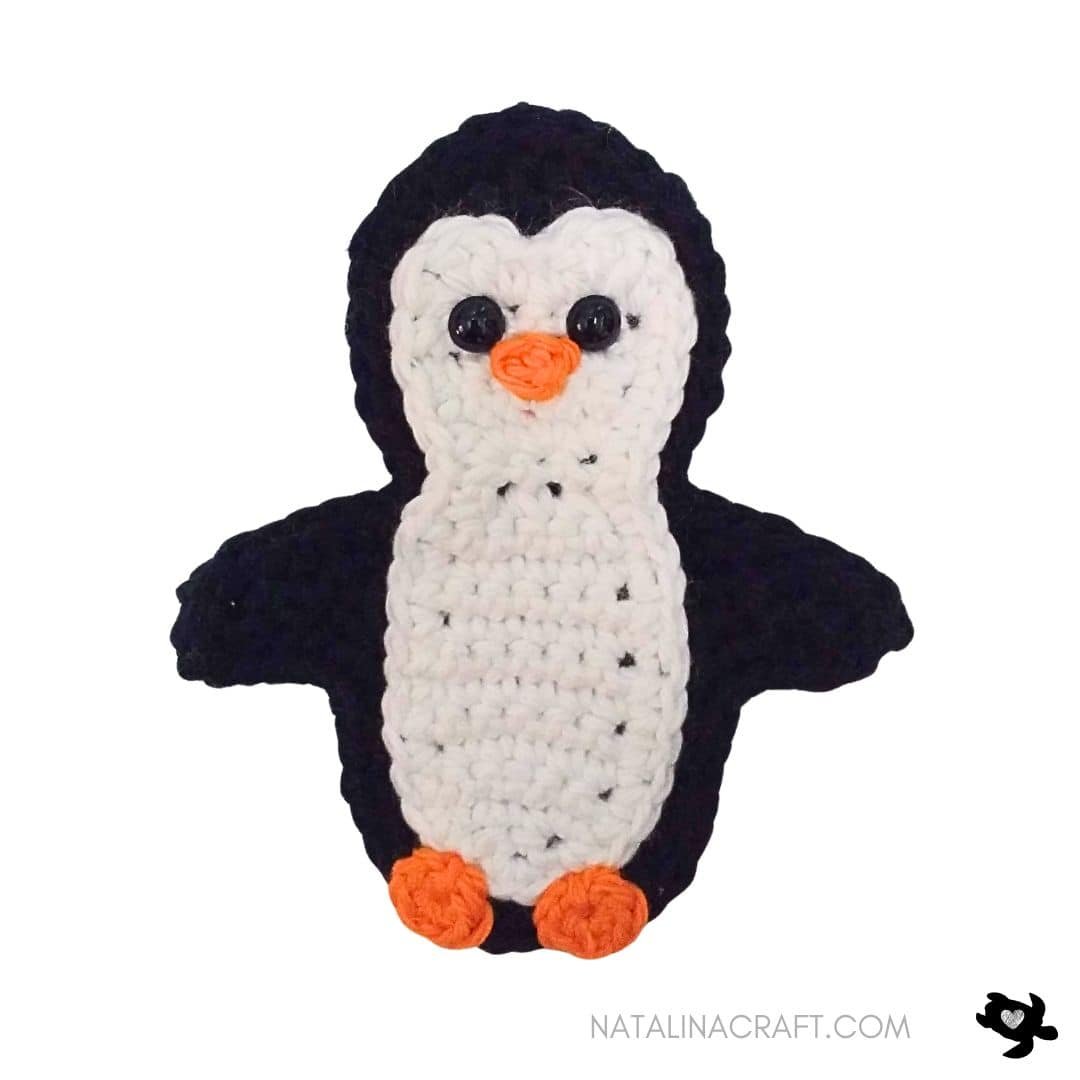
Looking for a cute and playful crochet appliqué? This Penguin Crochet Appliqué is the perfect little project! With its round shape, tiny wings, and sweet face, this penguin is quick to make and full of personality. It’s a fun, beginner-friendly pattern that works up fast and is great for using small amounts of yarn.
This crochet penguin appliqué is perfect for adding a whimsical touch to hats, scarves, blankets, bags, or children’s accessories. You can keep it simple or dress it up with a hat and scarf for a cozy winter look. Whether you’re crocheting for winter, Christmas, or just because you love cute animals, this little penguin is sure to make you smile.
Join my Facebook group, where you can ask questions, share your finished projects, and help me choose future designs!
I hope you enjoy this pattern and find it easy to follow. If you have any questions, feel free to reach out—I’m always happy to help. And I would love to see your creations! Don’t forget to share your finished work using #natalinacraft.
Crochet Penguin Applique
Start Here
- Please read the entire pattern before starting.
- This pattern is written using US crochet terms.
Material:
- Worsted yarn in orange, white and black (optional: blue or any other color for the hat and scarf)
- 3.5 mm crochet hook
- 2 black safety eyes (7.5 mm)
- Stitch markers
- Tapestry needle
Abbreviations:
- chain (ch)
- magic ring (mr)
- single crochet (sc)
- increase (inc)
- invisible decrease (dec)
- slip stitch (sl st)
- half double crochet (HDC)
- double crochet (DC)
What Did I Use?
Light worsted yarn
I used I Love This Cotton from Hobby Lobby.
How to crochet a penguin applique?
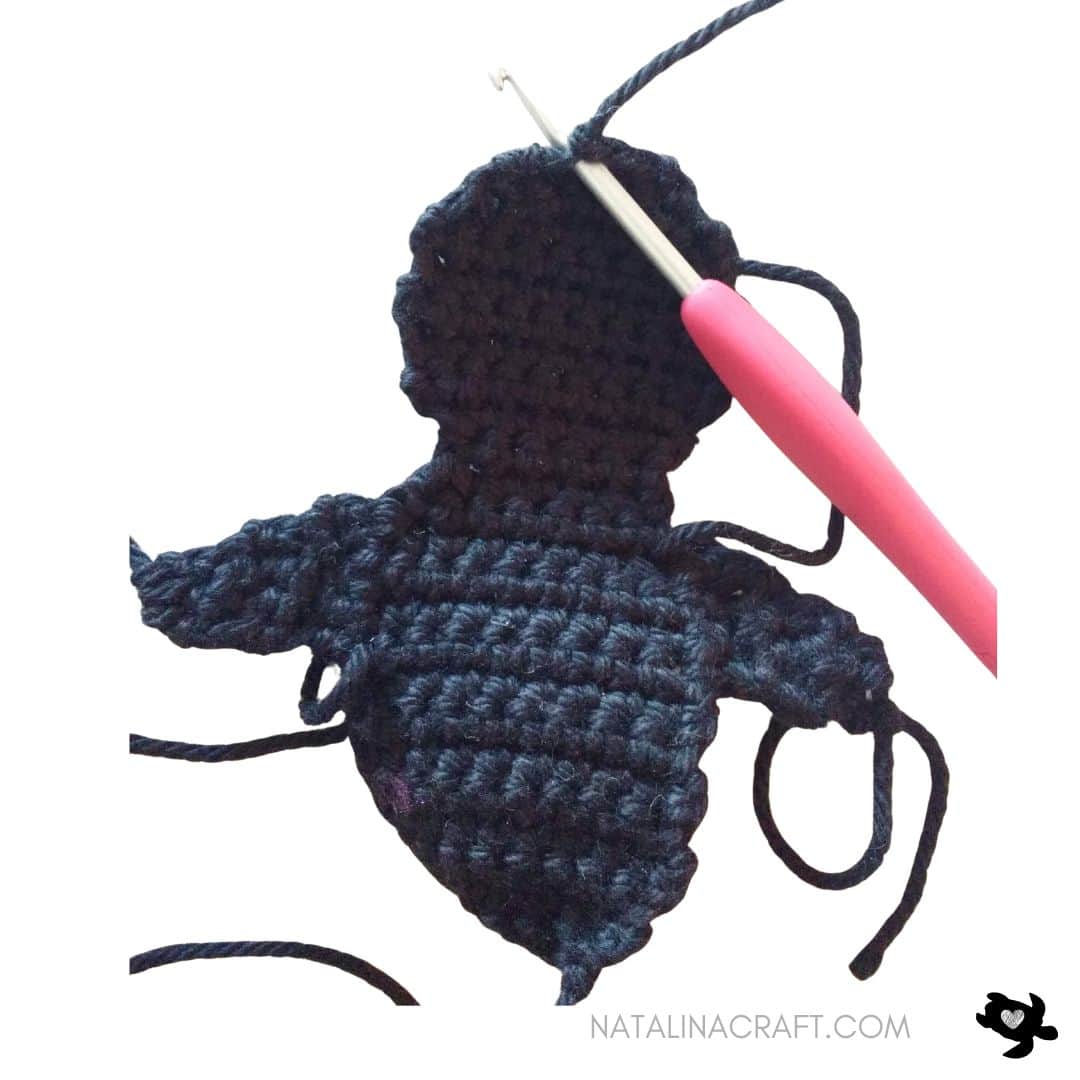
Body and head
- Worked in rows, starting at the bottom of the body and finishing at the top of the head.
- The wings will be added later.
With a 3.5 mm hook and black yarn:
- ch 6
- Row 1: turn, working in the 2nd ch from the hook: 1 sc in the next 5 st. (5 st)
- Row 2: ch1, turn: 1 inc, 1 sc in the next 3 st, 1 inc. (7 st)
- Row 3: ch1, turn: 1 inc, 1 sc in the next 5 st, 1 inc. (9 st)
- Rows 4 to 9: ch1, turn: 1 sc in all st. (9 st)
- Row 10: ch1, turn: 1 dec, 1 sc in the next 5 st, 1 dec. (7 st)
- Row 11: ch1, turn: 1 sc in all st. (7 st)
- Row 12: ch1, turn: 1 dec, 1 sc in the next 3 st, 1 dec. (5 st)
- Row 13: ch1, turn: 1 sc in all st. (5 st)
- Row 14: ch1, turn: 1 inc, 1 sc in the next 3 st, 1 inc. (7 st)
- Row 15: ch1, turn: 1 inc, 1 sc in the next 5 st, 1 inc. (9 st)
- Rows 16 to 19: ch1, turn: 1 sc in all st. (9 st)
- Row 20: ch1, turn: 1 dec, 1 sc in the next 5 st, 1 dec. (7 st)
- Row 21: ch1, turn: 1 dec, 1 sc in the next 3 st, 1 dec. (5 st)
- Row 22: ch1, turn: 1 dec, 1 sc in the next st, 1 dec. (3 st)
Fasten off.
Wings
- The wings are worked directly onto the body, in rows.
Left Wing
Join black yarn to a stitch just below the neck on the left side of the body.
- Row 1: 1 sc in the same st where you join, make 3 sc in the 3 following st. (4 st)
- Row 2: ch1, turn: 2 sc, 1 dec. (3 st)
- Row 3: ch1, turn: 1 dec, 1 inc. (3 st)
- Row 4: ch1, turn: 1 inc, 1 dec. (3 st)
- Row 5: ch1, turn: 1 dec, 1 sc. (2 st)
- Row 6: ch1, turn: 1 dec. (1 st)
Fasten off.
Right Wing
Join black yarn to the stitch located 4 st below the neck on the right side of the body.
- Row 1: make 1 sc in the same st where you join, make 3 sc in the 3 following st. (4 st)
- Row 2: ch1, turn: 1 dec, 2 sc. (3 st)
- Row 3: ch1, turn: 1 inc, 1 dec. (3 st)
- Row 4: ch1, turn: 1 dec, 1 inc. (3 st)
- Row 5: ch1, turn: 1 sc, 1 dec. (2 st)
- Row 6: ch1, turn: 1 dec. (1 st)
Fasten off.
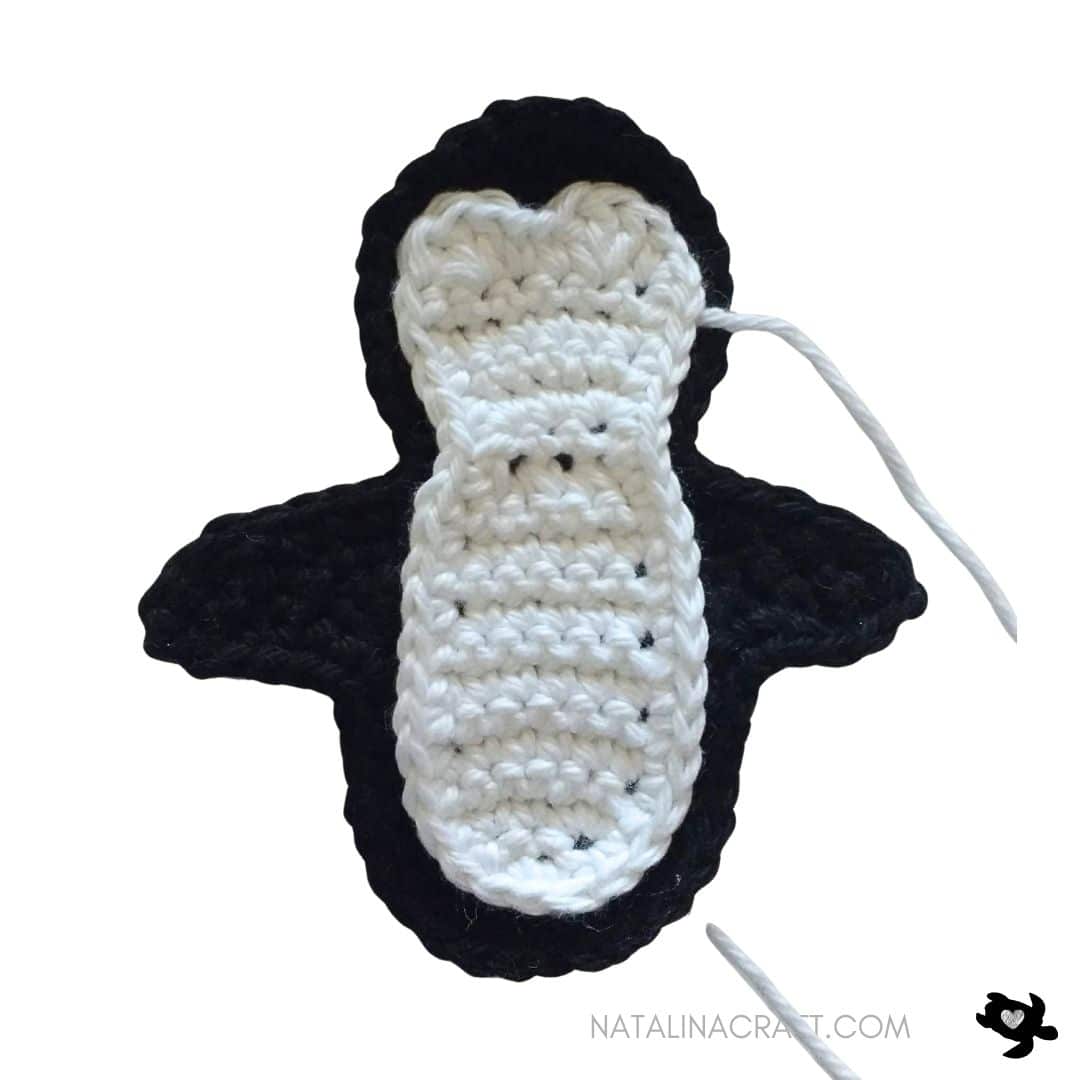
Finishing the Body
Join black yarn at any stitch at the top of the head and crochet 1 sc evenly all around the body and head.
Do not crochet too tightly—use a larger hook if needed.
Fasten off.
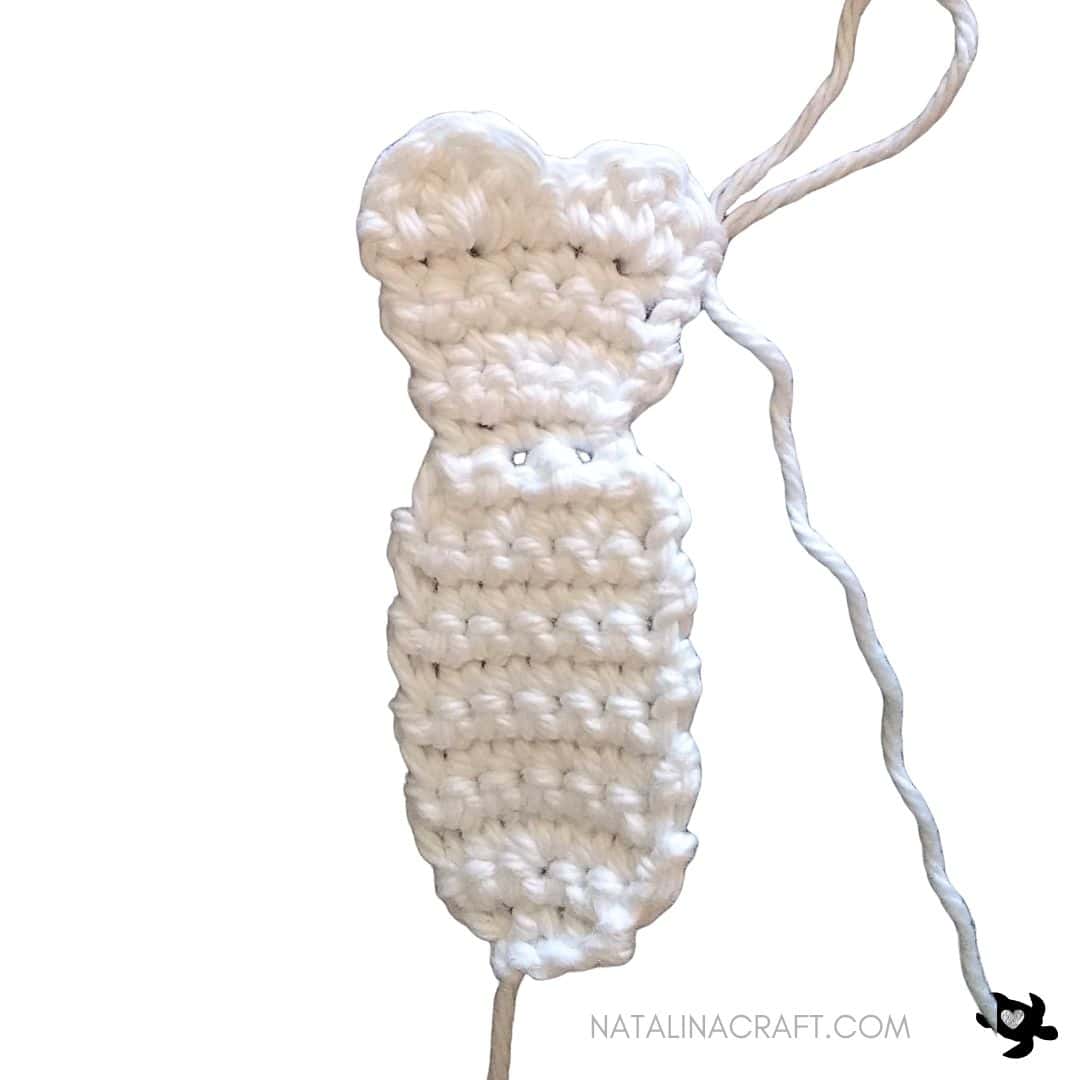
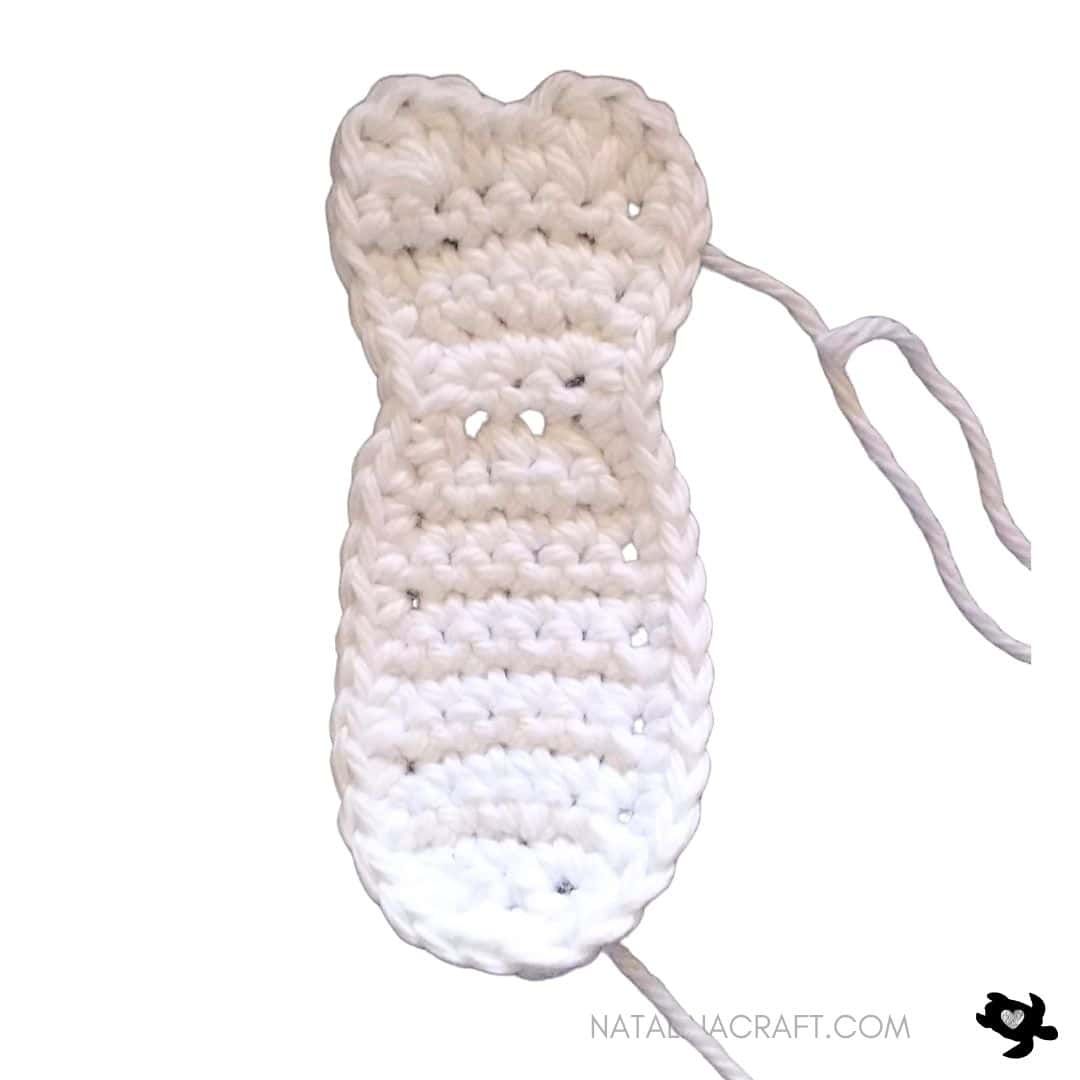
White Belly
- Worked in rows, starting at the bottom.
With a 3.5 mm hook and white yarn:
- ch 4
- Row 1: turn, working in the 2nd ch from the hook: 1 sc in the next 3 st. (3 st)
- Row 2: ch1, turn: 1 inc, 1 sc in the next 1 st, 1 inc. (5 st)
- Row 3: ch1, turn: 1 sc in the next 2 st, 1 inc, 1 sc in the next 2 st. (6 st)
- Rows 4 to 9: ch1, turn: 1 sc in all st. (6 st)
- Row 10: ch1, turn: 3 dec. (3 st)
- Row 11: ch1, turn: 1 sc in all st. (3 st)
- Row 12: ch1, turn: 3 inc. (6 st)
- Rows 13 to 15: ch1, turn: 1 sc in all st. (6 st)
- Row 16: ch1, turn: 1 sc, 3 dc in the next st, 1 sc in the next 2 st, 3 dc in the next st, 1 sc. (10 st)
Do not turn. Crochet evenly around the belly shape, stopping before the stitches of Row 16.
Fasten off, leaving a long tail.
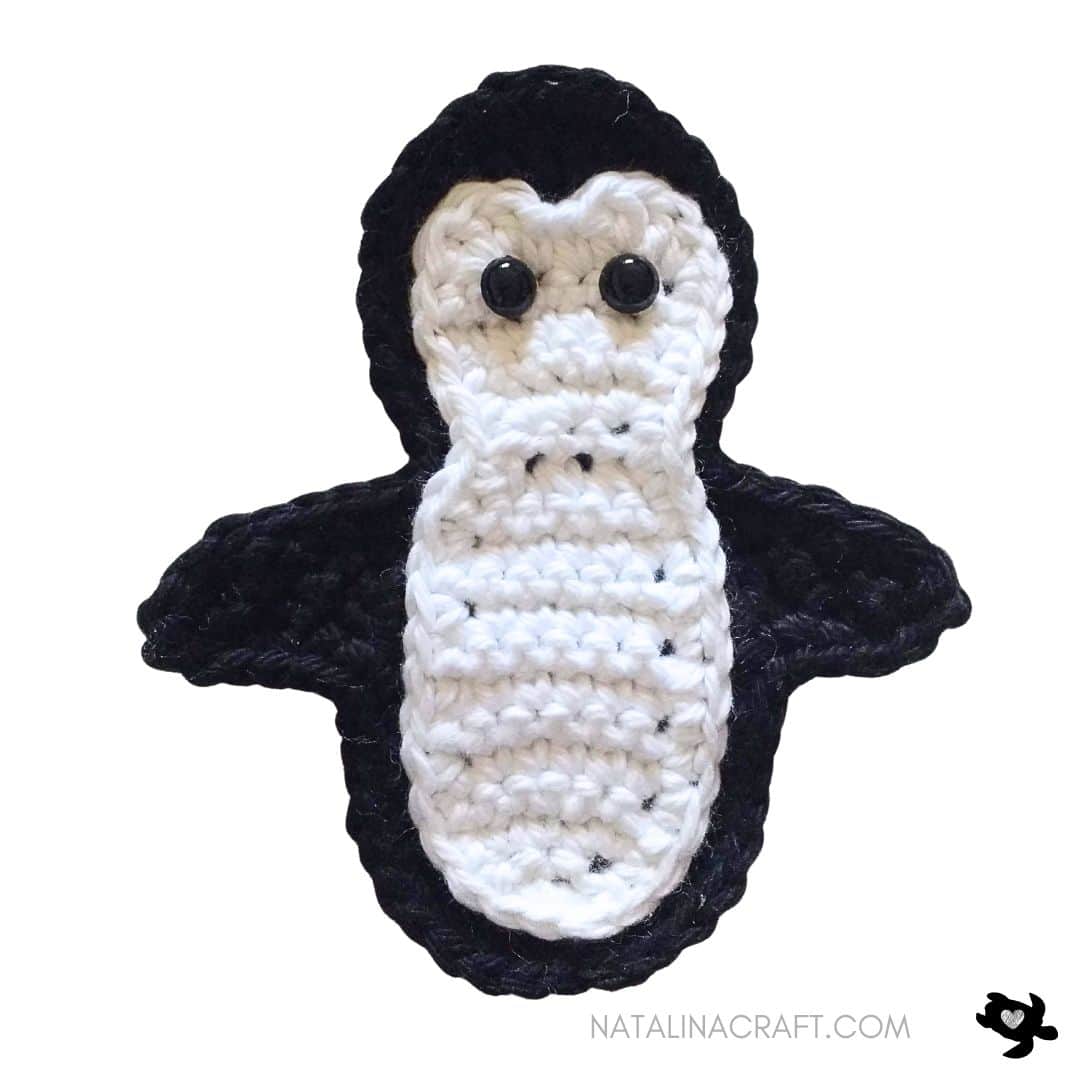
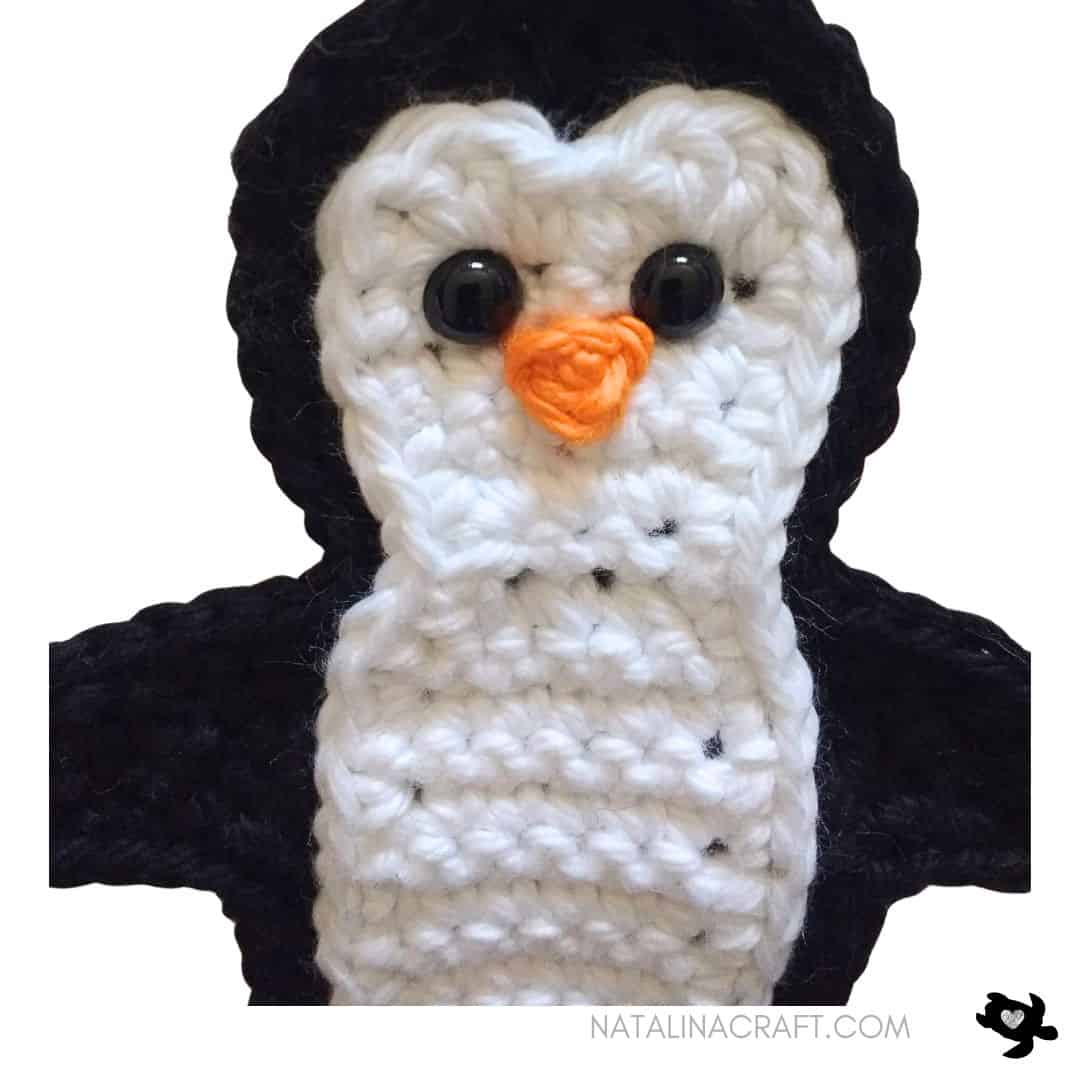
Sew the belly to the body.
Place the safety eyes as shown in your reference photos.
Feet (make 2)
With a 3.5 mm hook and orange yarn:
- Round 1: 6 sc in a magic ring. (6)
Fasten off, leaving a long tail.
Sew the feet to the bottom of the body.
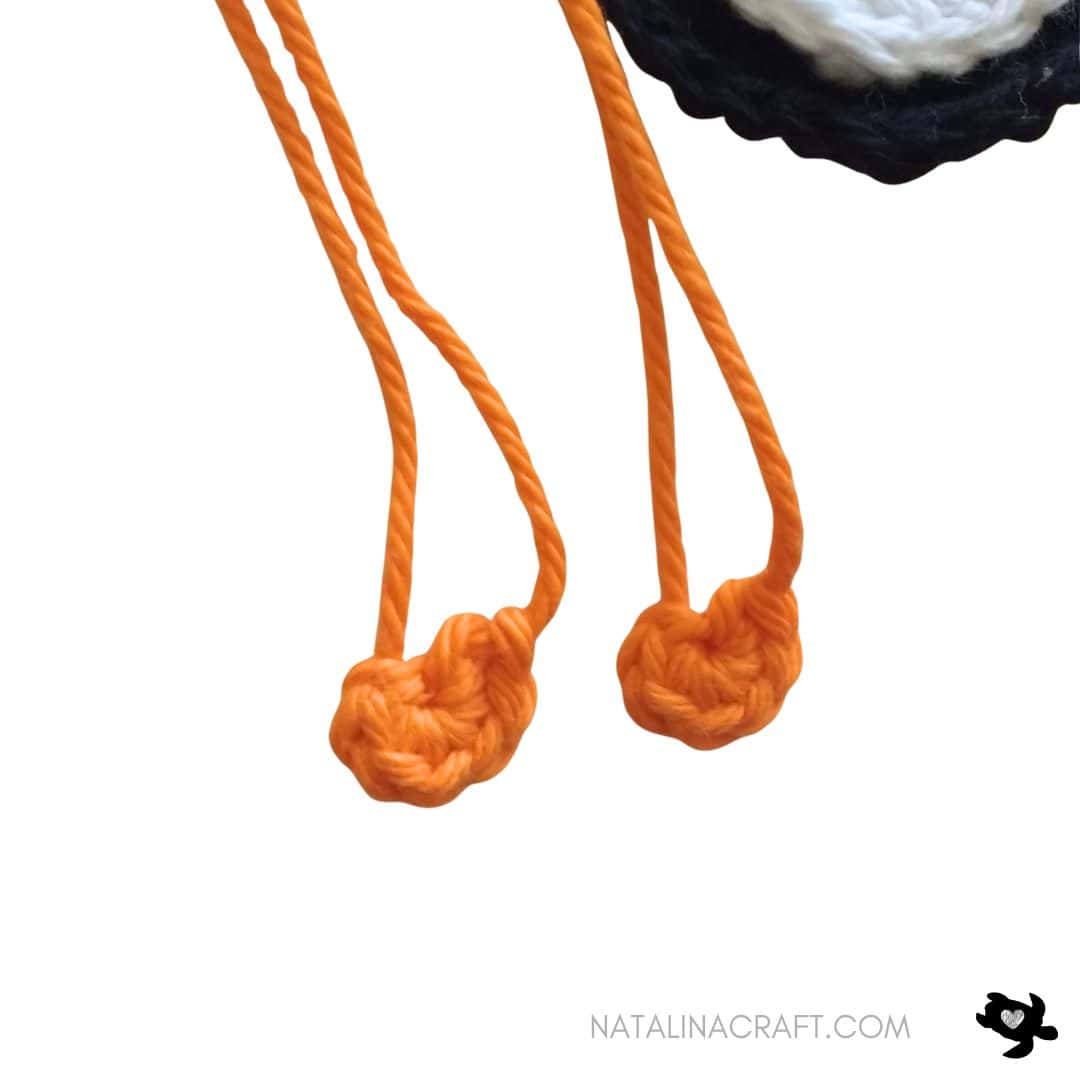
Beak
With a 3.5 mm hook and orange yarn:
- Ch 3
- Row 1: turn, starting in the 2nd ch from the hook: sc 2 together. (2 sts)
Fasten off, leaving a long tail.
Sew the beak below the eyes.
Hat
With a 3.5 mm hook and blue yarn:
- Ch 5
- Row 1: turn, starting in the 2nd ch from the hook: 1 sc in the next 4 st. (4 st)
- Row 2: ch 1, turn: 1 inc, 1 sc in the next 2 st, 1 inc. (6 st)
- Row 3: ch 1, turn: 1 inc, 1 sc in the next 4 st, 1 inc. (8 st)
- Row 4: ch 1, turn: 1 inc, 1 sc in the next 6 st, 1 inc. (10 st)
Fasten off, leaving a long tail.
Pompom
With white yarn:
- Round 1: 6 sc in a magic ring. (6)
Sl st to first st.
Fasten off, leaving a long tail.
Sew the pompom to the top of the hat, then sew the hat to the penguin’s head.
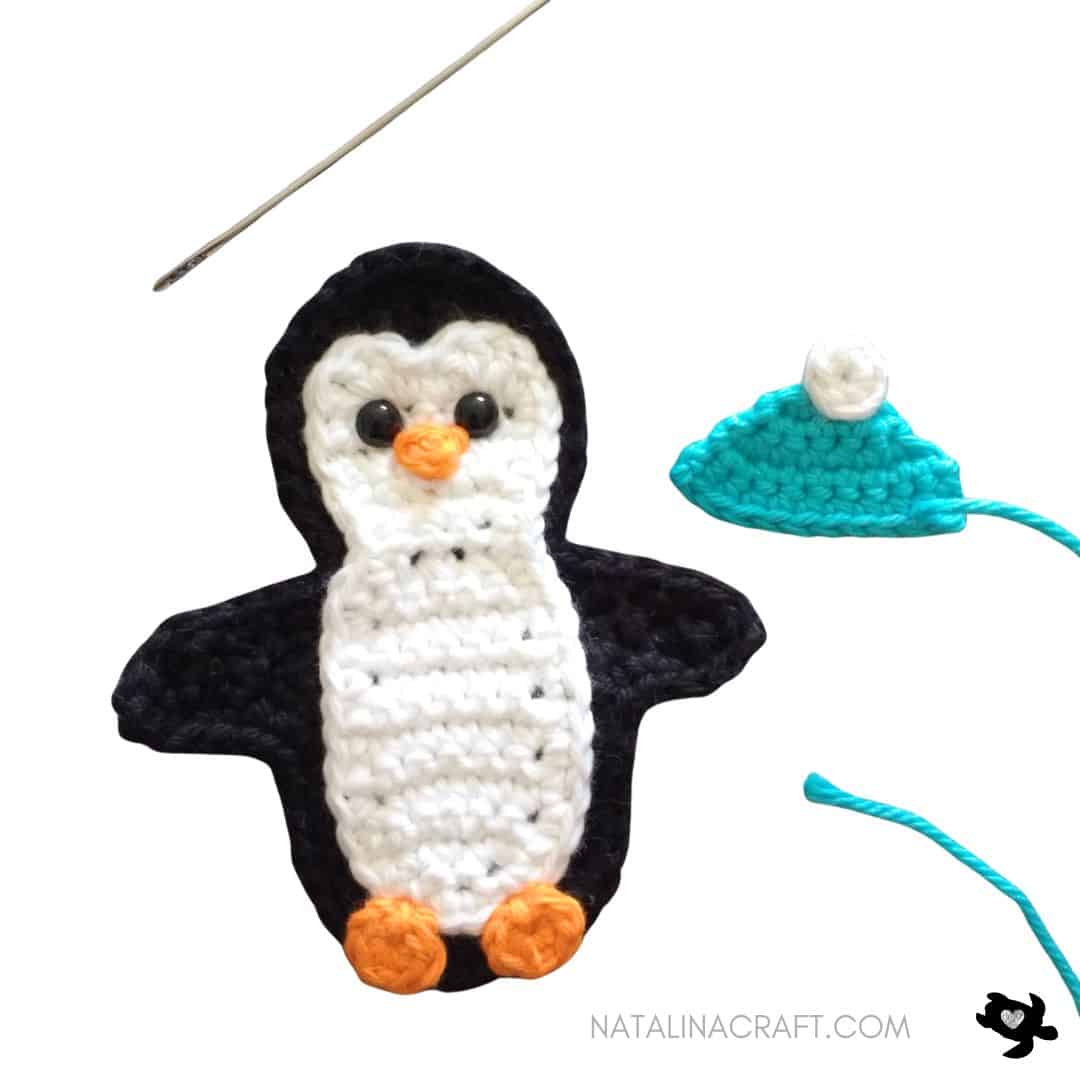
Scarf
- Worked in rows.
With a 3.5 mm hook and blue yarn:
- ch 3.
- Row 1: turn, starting in the 2nd ch from the hook: 1 sc in the next 2 st. (2 st)
- Rows 2 to 9: ch 1, turn: 1 sc in all st. (2 st)
Fasten off, leaving a long tail.
Bottom Part of the Scarf
Join yarn at the top left corner of the scarf.
Row 1: 1 sc in the same st where you joined, and in the next st. (2 sts)
Rows 2–4: ch 1, turn: 1 sc in all sts. (2 sts)
Fasten off, leaving a long tail.
Sew the scarf around the penguin’s neck.

Congratulations 🎉
Congratulations! Your crochet penguin appliqué is finished.
I hope you enjoyed making this cute little penguin!
Copyright Notice
All rights reserved. This pattern and all accompanying photographs are the property of Natalina Craft and are protected by copyright law. This pattern is for personal use only. Any unauthorized reproduction, redistribution, or publication of this pattern, in whole or in part, is strictly prohibited.
You are welcome to sell finished items made from this pattern in small quantities. While crediting Natalina Craft as the designer is not required, it is always greatly appreciated—especially when selling online—so others can find the original pattern. Thank you for respecting these guidelines.
Crochet Applique Penguin
Crochet Applique - Penguin
Instructions
Crochet Penguin Applique
Start Here
- Please read the entire pattern before starting.
- This pattern is written using US crochet terms.
Material:
- Worsted yarn in orange, white and black (optional: blue or any other color for the hat and scarf)
- 3.5 mm crochet hook
- 2 black safety eyes (7.5 mm)
- Stitch markers
- Tapestry needle
Abbreviations:
- chain (ch)
- magic ring (mr)
- single crochet (sc)
- increase (inc)
- invisible decrease (dec)
- slip stitch (sl st)
- half double crochet (HDC)
- double crochet (DC)
What Did I Use?
Light worsted yarnI used I Love This Cotton from Hobby Lobby.
How to crochet a penguin applique?
Body and head
- Worked in rows, starting at the bottom of the body and finishing at the top of the head.
- The wings will be added later.
With a 3.5 mm hook and black yarn:
- ch 6
- Row 1: turn, working in the 2nd ch from the hook: 1 sc in the next 5 st. (5 st)
- Row 2: ch1, turn: 1 inc, 1 sc in the next 3 st, 1 inc. (7 st)
- Row 3: ch1, turn: 1 inc, 1 sc in the next 5 st, 1 inc. (9 st)
- Rows 4 to 9: ch1, turn: 1 sc in all st. (9 st)
- Row 10: ch1, turn: 1 dec, 1 sc in the next 5 st, 1 dec. (7 st)
- Row 11: ch1, turn: 1 sc in all st. (7 st)
- Row 12: ch1, turn: 1 dec, 1 sc in the next 3 st, 1 dec. (5 st)
- Row 13: ch1, turn: 1 sc in all st. (5 st)
- Row 14: ch1, turn: 1 inc, 1 sc in the next 3 st, 1 inc. (7 st)
- Row 15: ch1, turn: 1 inc, 1 sc in the next 5 st, 1 inc. (9 st)
- Rows 16 to 19: ch1, turn: 1 sc in all st. (9 st)
- Row 20: ch1, turn: 1 dec, 1 sc in the next 5 st, 1 dec. (7 st)
- Row 21: ch1, turn: 1 dec, 1 sc in the next 3 st, 1 dec. (5 st)
- Row 22: ch1, turn: 1 dec, 1 sc in the next st, 1 dec. (3 st)
Fasten off.
Wings
- The wings are worked directly onto the body, in rows.
Left Wing
Join black yarn to a stitch just below the neck on the left side of the body.
- Row 1: 1 sc in the same st where you join, make 3 sc in the 3 following st. (4 st)
- Row 2: ch1, turn: 2 sc, 1 dec. (3 st)
- Row 3: ch1, turn: 1 dec, 1 inc. (3 st)
- Row 4: ch1, turn: 1 inc, 1 dec. (3 st)
- Row 5: ch1, turn: 1 dec, 1 sc. (2 st)
- Row 6: ch1, turn: 1 dec. (1 st)
Fasten off.
Right Wing
Join black yarn to the stitch located 4 st below the neck on the right side of the body.
- Row 1: make 1 sc in the same st where you join, make 3 sc in the 3 following st. (4 st)
- Row 2: ch1, turn: 1 dec, 2 sc. (3 st)
- Row 3: ch1, turn: 1 inc, 1 dec. (3 st)
- Row 4: ch1, turn: 1 dec, 1 inc. (3 st)
- Row 5: ch1, turn: 1 sc, 1 dec. (2 st)
- Row 6: ch1, turn: 1 dec. (1 st)
Fasten off.
Finishing the Body
Join black yarn at any stitch at the top of the head and crochet 1 sc evenly all around the body and head.Do not crochet too tightly—use a larger hook if needed.
Fasten off.
White Belly
- Worked in rows, starting at the bottom.
With a 3.5 mm hook and white yarn:
- ch 4
- Row 1: turn, working in the 2nd ch from the hook: 1 sc in the next 3 st. (3 st)
- Row 2: ch1, turn: 1 inc, 1 sc in the next 1 st, 1 inc. (5 st)
- Row 3: ch1, turn: 1 sc in the next 2 st, 1 inc, 1 sc in the next 2 st. (6 st)
- Rows 4 to 9: ch1, turn: 1 sc in all st. (6 st)
- Row 10: ch1, turn: 3 dec. (3 st)
- Row 11: ch1, turn: 1 sc in all st. (3 st)
- Row 12: ch1, turn: 3 inc. (6 st)
- Rows 13 to 15: ch1, turn: 1 sc in all st. (6 st)
- Row 16: ch1, turn: 1 sc, 3 dc in the next st, 1 sc in the next 2 st, 3 dc in the next st, 1 sc. (10 st)
Do not turn. Crochet evenly around the belly shape, stopping before the stitches of Row 16.
Fasten off, leaving a long tail.
Sew the belly to the body.
Place the safety eyes as shown in your reference photos.
Feet (make 2)
With a 3.5 mm hook and orange yarn:
- Round 1: 6 sc in a magic ring. (6)
Fasten off, leaving a long tail.
Sew the feet to the bottom of the body.
Beak
With a 3.5 mm hook and orange yarn:
- Ch 3
- Row 1: turn, starting in the 2nd ch from the hook: sc 2 together. (2 sts)
Fasten off, leaving a long tail.
Sew the beak below the eyes.
Hat
With a 3.5 mm hook and blue yarn:
- Ch 5
- Row 1: turn, starting in the 2nd ch from the hook: 1 sc in the next 4 st. (4 st)
- Row 2: ch 1, turn: 1 inc, 1 sc in the next 2 st, 1 inc. (6 st)
- Row 3: ch 1, turn: 1 inc, 1 sc in the next 4 st, 1 inc. (8 st)
- Row 4: ch 1, turn: 1 inc, 1 sc in the next 6 st, 1 inc. (10 st)
Fasten off, leaving a long tail.
Pompom
With white yarn:
- Round 1: 6 sc in a magic ring. (6)Sl st to first st.
Fasten off, leaving a long tail.
Sew the pompom to the top of the hat, then sew the hat to the penguin’s head.
Scarf
- Worked in rows.
With a 3.5 mm hook and blue yarn:
- ch 3.
- Row 1: turn, starting in the 2nd ch from the hook: 1 sc in the next 2 st. (2 st)
- Rows 2 to 9: ch 1, turn: 1 sc in all st. (2 st)
Fasten off, leaving a long tail.
Bottom Part of the Scarf
Join yarn at the top left corner of the scarf.
Row 1: 1 sc in the same st where you joined, and in the next st. (2 sts)Rows 2–4: ch 1, turn: 1 sc in all sts. (2 sts)
Fasten off, leaving a long tail.
Sew the scarf around the penguin’s neck.
Congratulations 🎉
Congratulations! Your crochet penguin appliqué is finished.I hope you enjoyed making this cute little penguin!
Copyright Notice
All rights reserved. This pattern and all accompanying photographs are the property of Natalina Craft and are protected by copyright law. This pattern is for personal use only. Any unauthorized reproduction, redistribution, or publication of this pattern, in whole or in part, is strictly prohibited.
You are welcome to sell finished items made from this pattern in small quantities. While crediting Natalina Craft as the designer is not required, it is always greatly appreciated—especially when selling online—so others can find the original pattern. Thank you for respecting these guidelines.
Je vous remerci ne pas publié. j’aimerais savoir ou puis-je trouver les patrons de ces appliqués sur papier imprimable en francais vos patrons sont tres beau Merci de votre compréhension.
mes enfants seront bien content de recevoire de leur mamie cet appliquer.
bien a vous. Merci
suzannedesfosses2@gmail.com
Je suis désolée d’avoir accepté votre commentaire avec du retard. J’ai été très occupée ces dernières semaines. Je n’ai malheureusement pas encore de version pdf à imprimer de mes patrons.
Hi
Love your paterns but do not understand what you mean by saying increase. Is it a increase of a single crochet along with the next 3 stitches. Confused. Row 2.
Thank you
Hi, thank you. Sorry for the confusion. Row 2 should be as:
ch1, turn: 1 inc in the next st, 1 sc in the next 3 st, 1 inc in the last st. (7 st)
I hope it helps!
Hi!
Love yr little penguin. Hv a question: when u state “sew belly to body” – how did u do that? Did u whip stitch it to body – did u use thread to tack it down? Not sure what u mean by that statement – u do not show how it was done – cud u pls help me out? Many tks. He is so cute!
Hello, sorry for my late reply. I did use a thread and a tapestry needle to sew them both together.
Thank you!
Hi!
Me again – just thought of something about “sew belly to body” – cud u glue this on instead of sewing?
Hi! Sorry again. Yes, I guess that would work well too! Let me know if you do/did it.
Namaste Natalina. I just wanted to thank you for your lovely patterns. Thank you for making them free for us to use. God bless you. Love and Light from India.
Thank you very much for your nice words.
I had the chance to visit India 10 years ago. You live in a beautiful country!
many thanks for the tutorial, found it very easy to follow.
can’t wait to make this penguin, putting it on my baby blanket with a few other zoo animals, thanks again for all your hard work x
Thank you very much for your kind words. x
Loved the pattern and found it extremely easy to follow.
Thank you so much! I’m so happy to hear you loved the pattern and found it easy to follow. That means a lot to me.