
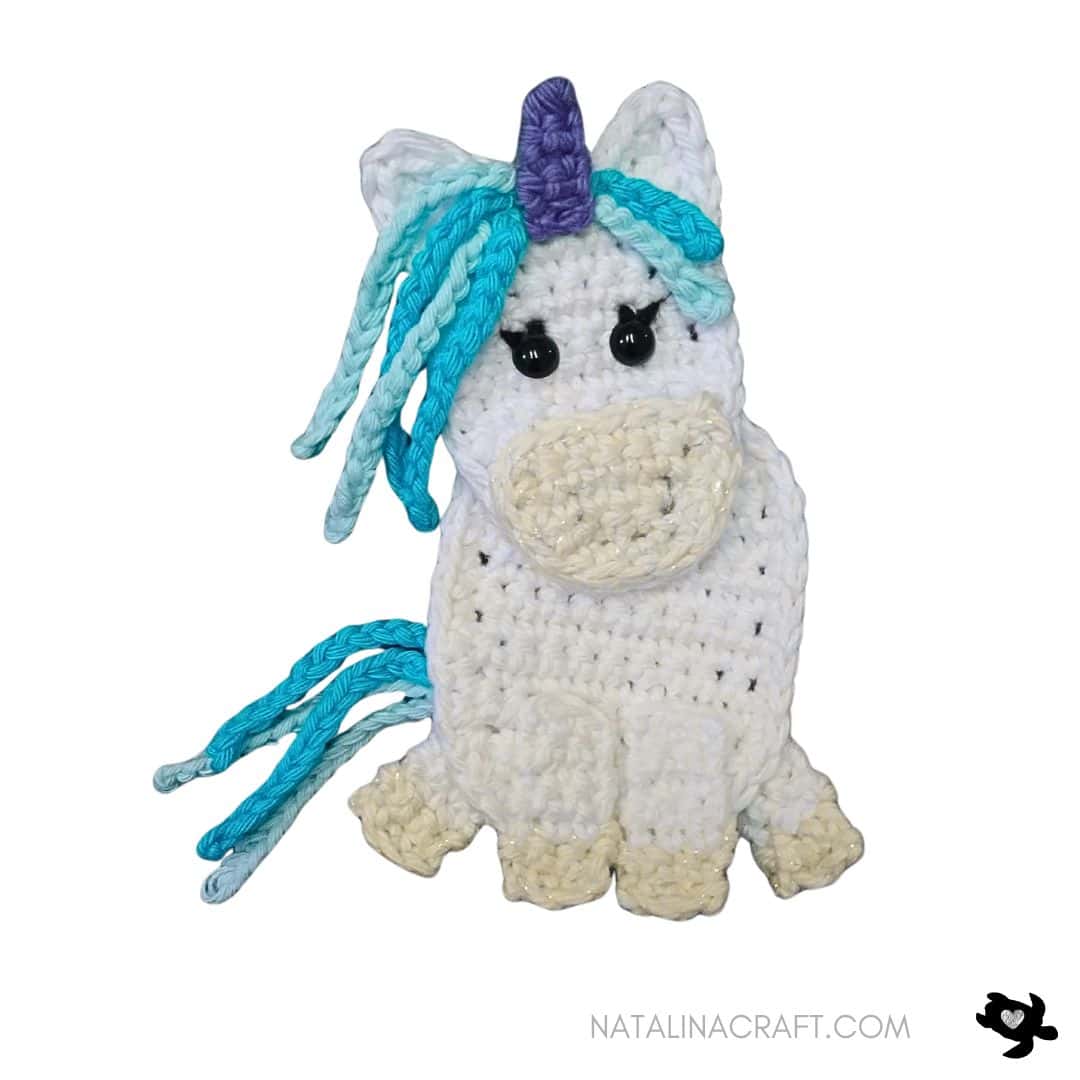
Find here a free crochet pattern for this cute unicorn applique! 🦄
This applique is quick and fun to make, and it’s perfect to decorate a blanket, bag, sweater, or nursery project.
Join my Facebook group, where you can ask questions, share your finished projects, and help me choose future designs!
I hope you enjoy the pattern and find it easy to follow. If you have questions, feel free to reach out—I’ll do my best to help. I’d love to see your unicorn! Share your finished projects using #natalinacraft.


Size
Approx. 4.5” / 12 cm tall with the indicated yarn and hooks.
Use a smaller hook to make a smaller applique.
Materials
- Light worsted yarn calling for a 5.5 mm (US I-9) hook in 5 colors: White, Sparkly white (for the nose + legs details), Purple (horn), Light pink + dark pink (hair/tail)
- 3.5 mm crochet hook
- 3 mm crochet hook
- Tapestry needle
-
Black safety eyes (7.5 mm)
Yarn Used
Light worsted cotton yarn (Hobby Lobby I Love This Cotton!) in:
White (06), White Sparkle (06), Purple (252), Pink (74), Rosey (99)
Abbreviations
- ch = chain
- mr = magic ring
- sc = single crochet
- inc = increase
- dec = invisible decrease
- sl st = slip stitch
- hdc = half double crochet
- dc = double crochet
How to crochet a unicorn applique?
Part 1: Head
With a 3.5 mm hook and white yarn:
- Row 1: ch 5. (5)
- Row 2: turn; 1 sc in 2nd ch from hook, 1 sc in next 3. (4)
- Row 3: ch1, turn; Work 2 sc in 1st st, 1 sc in each of the next 2 st, work 2 sc in last st. (6)
- Row 4: ch1, turn; 1 sc in all. (6)
- Row 5: ch1, turn; 1 sc in all. (6)
- Row 6: ch1, turn; Work 2 sc in 1st st, 1 sc in each of the next 4 st, Work 2 sc in last st. (8)
- Row 7: ch1, turn; 1 sc in all. (8)
- Row 8: ch1, turn; 1 sc in all. (8)
- Row 9: ch1, turn; 1 dec, 1 sc in each of the next 4 st, 1 dec. (6)
- Row 10: ch1, turn; 1 sc in all. (6)
- Row 11: ch1, turn; 1 sc in all. (6)
- Row 12: ch 1, turn;
In first st: (1 sc, place stitch marker; 1 hdc, 1 dc, 1 hdc, 1 sc),
sc in next 4 sts,
in last st: (1 sc, 1 hdc, 1 dc, 1 hdc, 1 sc). (14)
Do not turn. Now work an edging of single crochet evenly around the head:
1 sc evenly all around and stop just before the first stitch of Row 12 (the one with the stitch marker). (20)
- Row 13 (ears): Starting in the stitch with the stitch marker:
1 sc in next 2 sts,
(1 sc, 1 dc) in next st, ch 2, (1 dc, 1 sc) in next st,
sl st in next 6 sts,
repeat the ear: (1 sc, 1 dc) in next st, ch 2, (1 dc, 1 sc) in next st,
sc in next 2 sts. (22)
sl st in next st. Fasten off and weave in the end.
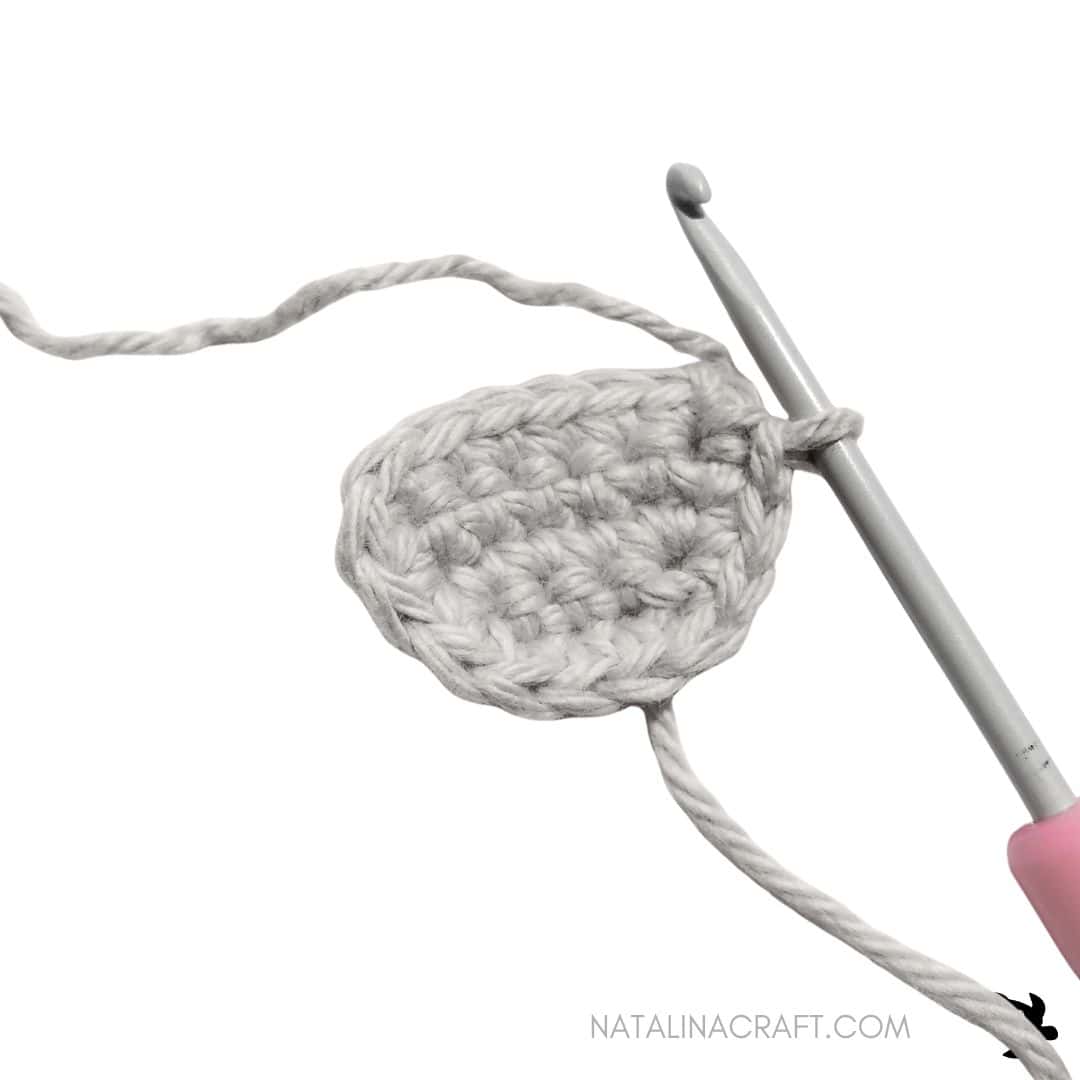
Part 2: Nose
With a 3.5 mm hook and sparkly white yarn:
- Row 1: ch 5. (5)
- Row 2: turn; 1 sc in 2nd ch from hook, 1 sc in next 3. (4)
- Row 3: ch1, turn; Work 2 sc in 1st st, 1 sc in each of the next 2 st, work 2 sc in last st. (6)
- Row 4: ch1, turn; 1 sc in all. (6)
- Row 5: ch1, turn; 1 sc in all. (6)
Do not turn. sc evenly around the nose. (10)
sl st to the first stitch of Row 5. Fasten off, leaving a long tail.
Sew the nose onto the head.

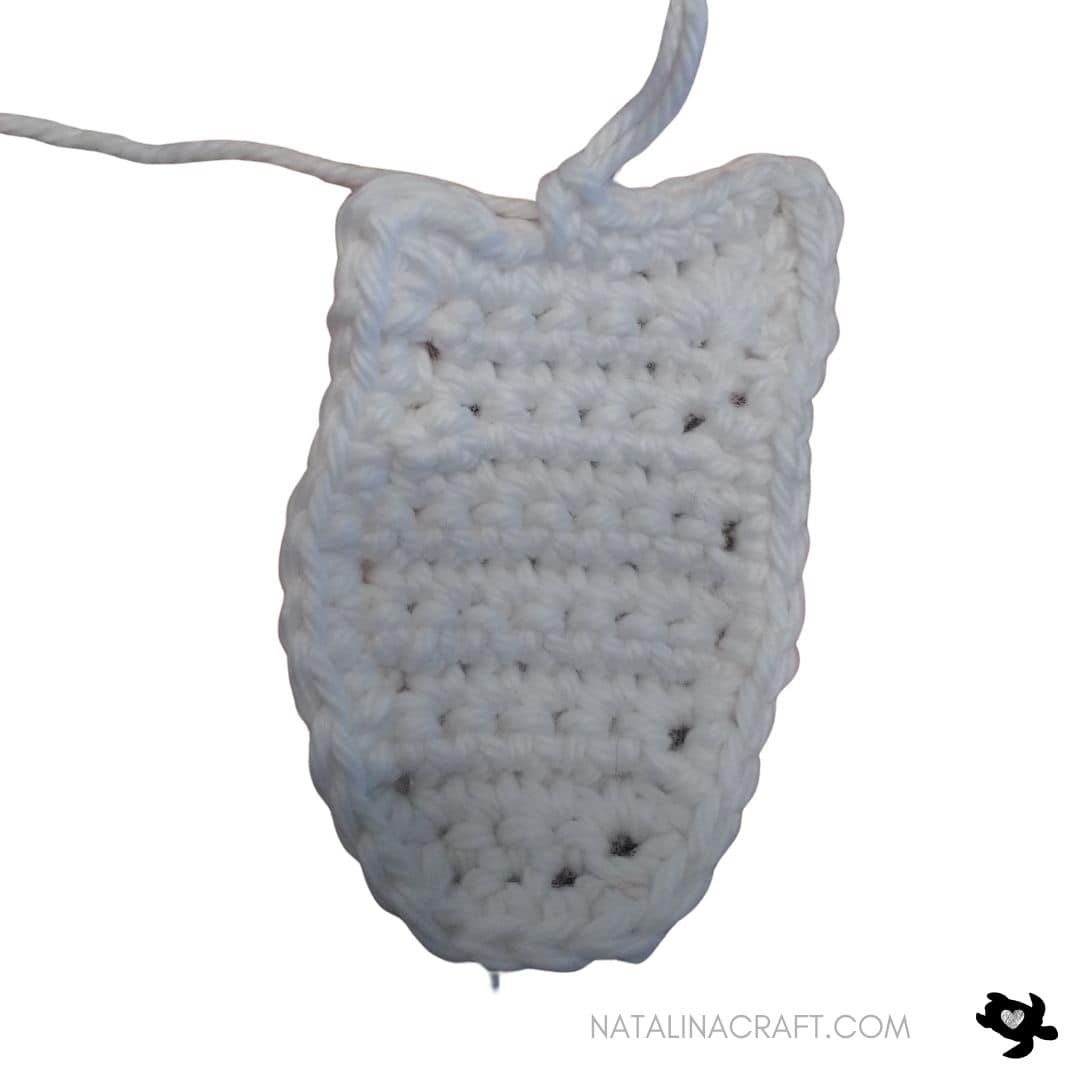
Part 3: Body
With a 3.5 mm hook and white yarn:
- Row 1: ch 6. (6)
- Row 2: turn; 1 sc in 2nd ch from hook, 1 sc in next 5. (5)
- Row 3: ch1, turn; Work 2 sc in 1st st, 1 sc in each of the next 3 st, work 2 sc in last st. (7)
- Row 4: ch1, turn; Work 2 sc in 1st st, 1 sc in each of the next 5 st, Work 2 sc in last st.(9)
- Rows 5 to 15: ch1, turn; 1 sc in all. (9)
- Row 16: ch1, turn; 1 dec, 1 sc in each of the next 5 st, 1 dec. (7)
- Row 17: ch1, turn; 1 dec (place stitch marker), 1 sc in each of the next 3 st, 1 dec. (5)
Do not turn. sc evenly around the body. (34)
sl st in the first stitch of Row 17 (the one with the stitch marker).
Fasten off, leaving a long tail.
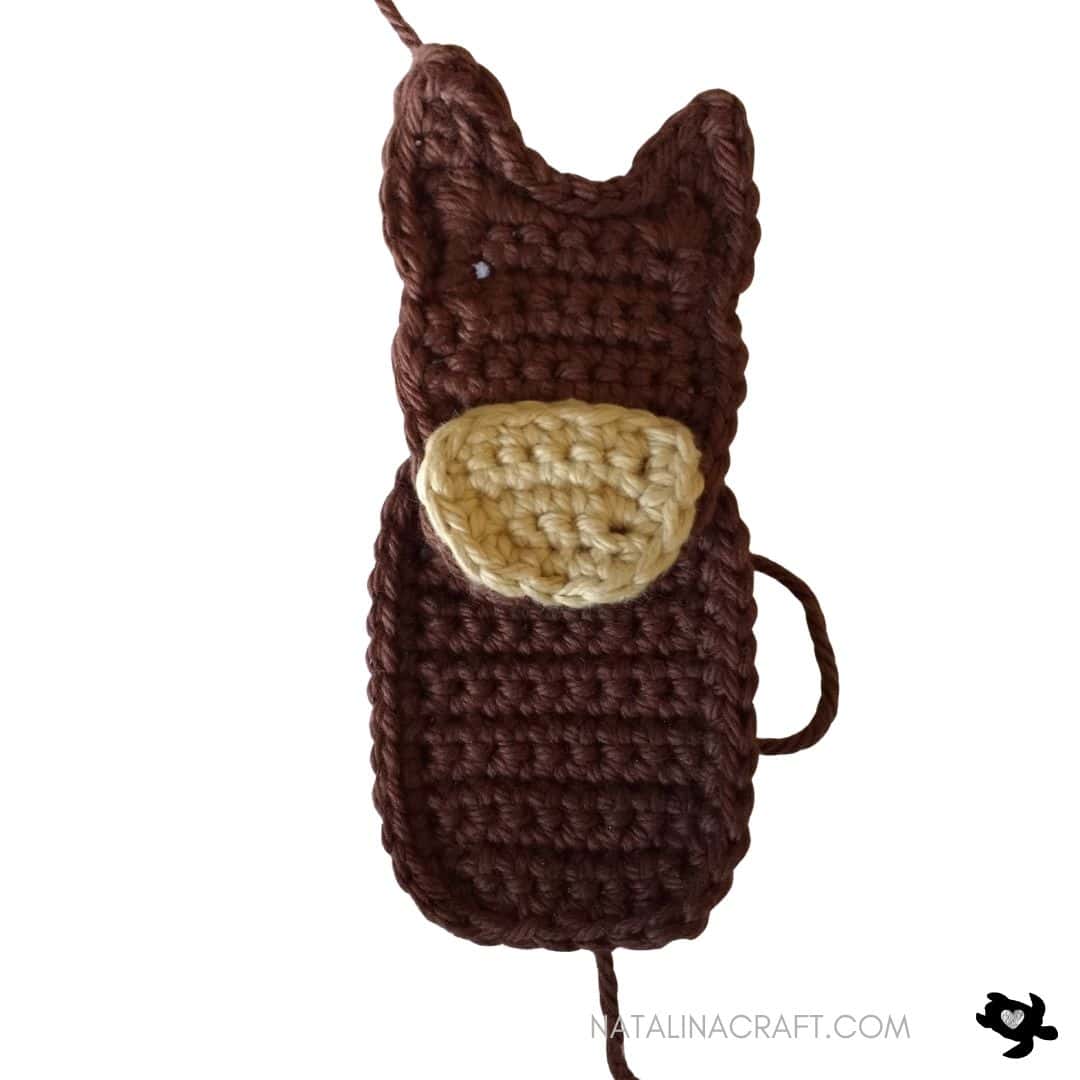
Sew the head to the body. (The bottom of the body is the flat side—see your photos.)
You can place the head centered or slightly tilted.

Part 4: Legs (Make 4)
With a 3.5 mm hook, start with sparkly white yarn.
(Tip: I did not ch 1 before turning to keep the sides straighter.)
- Row 1: ch 4. (4)
- Row 2: turn; 1 sc in 2nd ch from hook, 1 sc in next 2. (3)
- Row 3: turn; 1 sc in all. (3)
Change to white yarn:
- Rows 4 to 8: turn; 1 sc in all. (3)
Fasten off, leaving a long tail.
Sew 2 legs to the front of the body and 2 legs to the back, as shown in your photos.


Part 5: Horn
With a 3 mm hook and purple yarn:
(Tip: I did not ch 1 before turning to keep the sides straighter.)
- Row 1: ch 3. (3)
- Row 2: turn; 1 sc in 2nd ch from hook, 1 sc in next st. (2)
- Row 3: turn; 1 sc in all. (2)
- Row 4: turn; 1 sc in all. (2)
- Row 5: turn; 1 dec. (1)
- Row 6: turn; 1 sc in all. (1)
Fasten off, leaving a long tail.
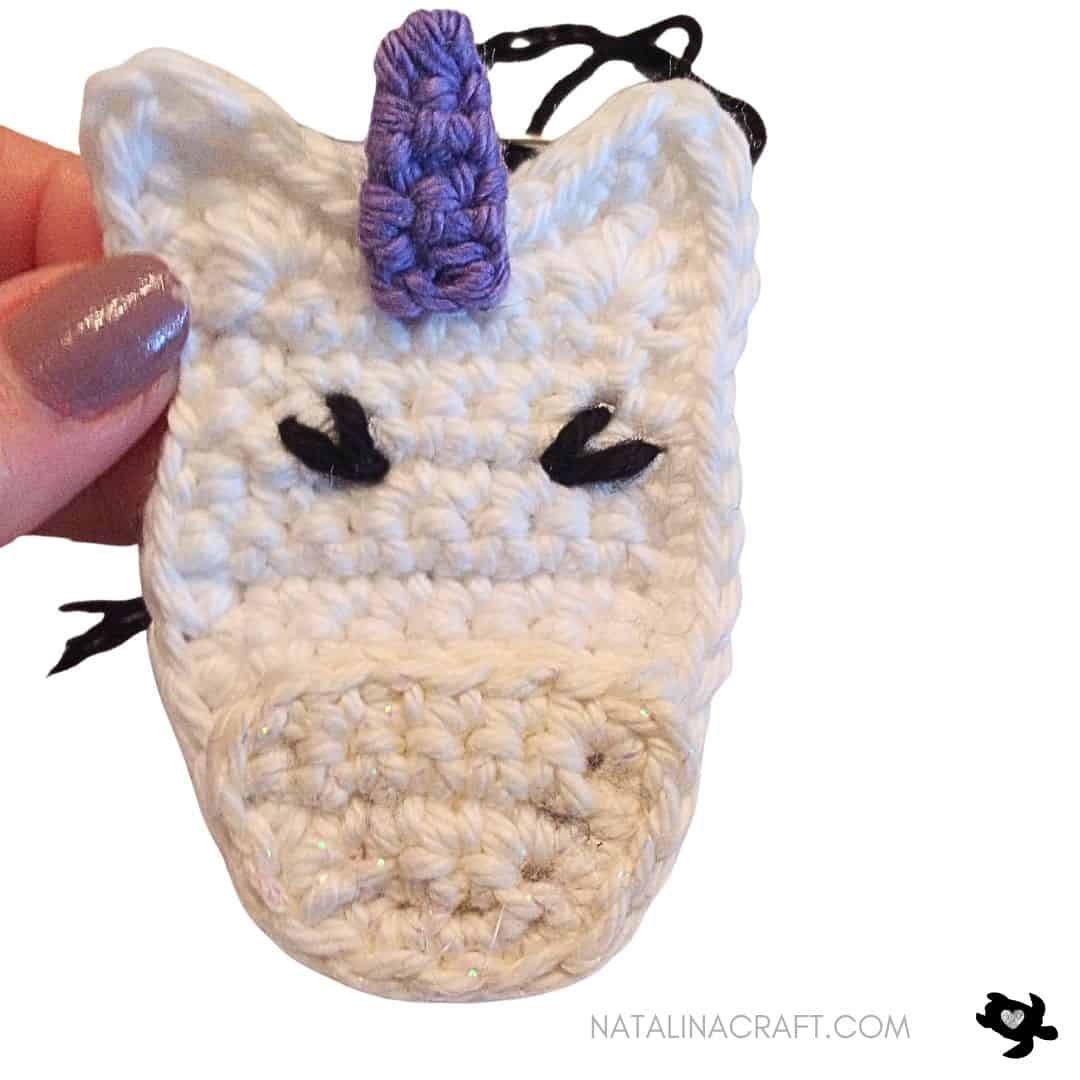
Sew the horn to the center of the head between the ears.

Part 6: Eyes
Use 7.5 mm safety eyes.
Place them in the center of the head, about 2 rows above the nose, leaving 2 stitches between the eyes.
Optional: add eyelashes with black yarn using a tapestry needle.

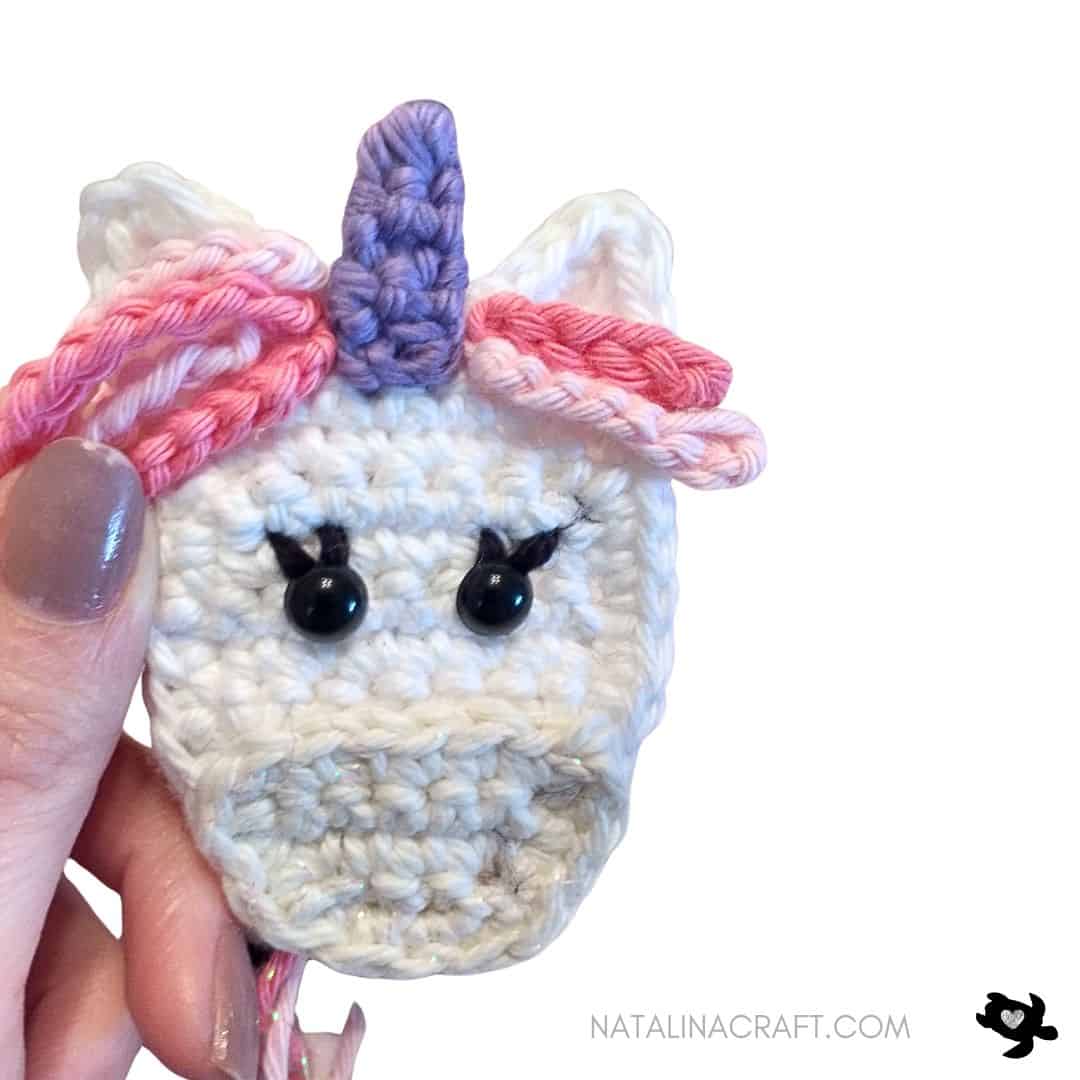
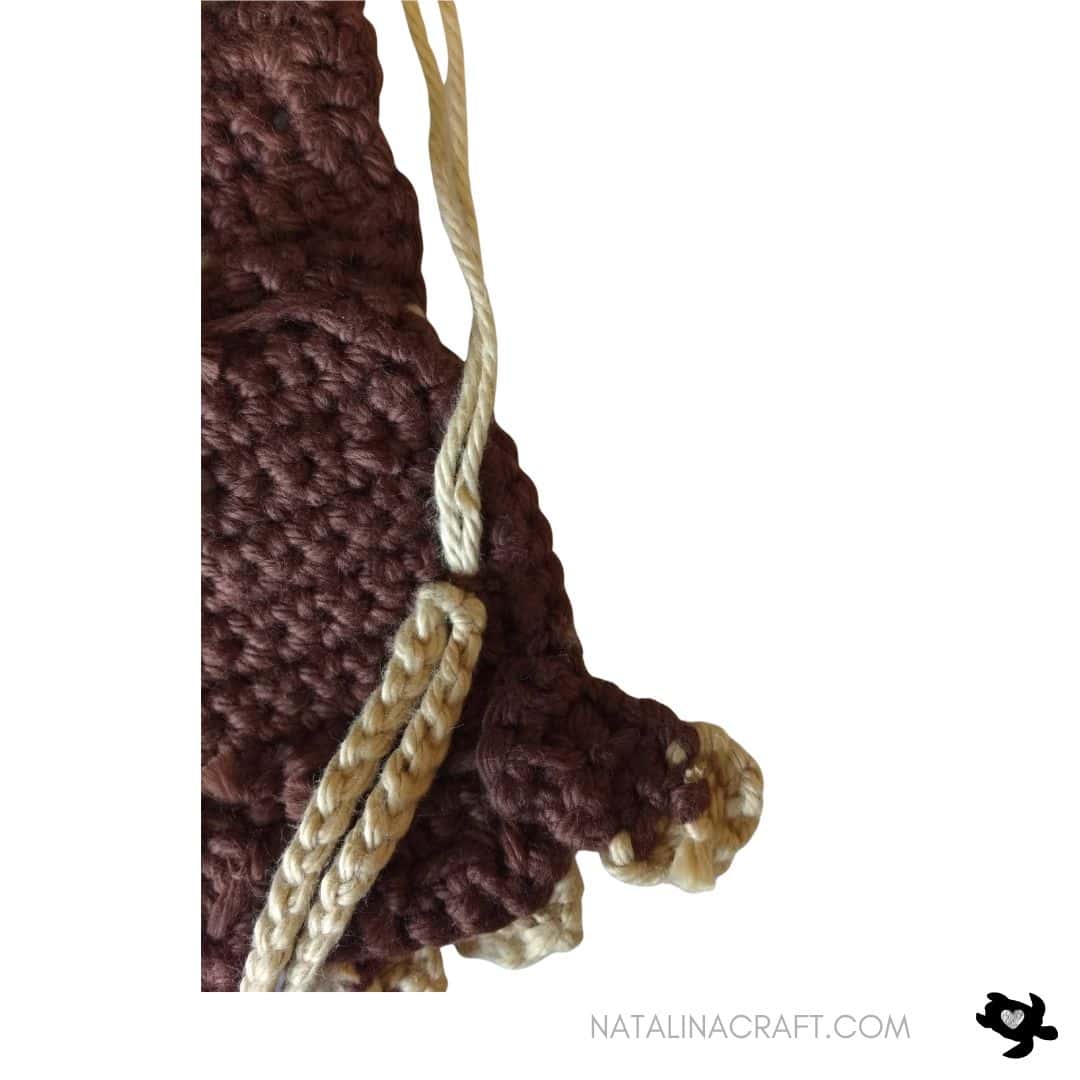
Part 7: Hair (Mane + Tail)
With a 3 mm hook and pink shades:
Mane (Head)
-
Make 4 chains of 14 (long strands). Leave long tails for sewing.
-
Make 2 chains of 7 (fringe). Leave long tails for sewing.
I attached the fringe on the right side of the horn and the longer strands on the left side.
Tail
-
Make 4 chains of 17
Attach them to the left side of the body.

🎉 Congratulations! Your crochet unicorn applique is ready!
If you made one, please tag @natalinacraft and use #natalinacraft — I’d love to see your creation!
Copyright Notice
All rights reserved. This pattern and all accompanying photographs are the property of Natalina Craft and are protected by copyright law. This pattern is for personal use only. Any unauthorized reproduction, redistribution, or publication of this pattern, in whole or in part, is strictly prohibited.
You are welcome to sell finished items made from this pattern in small quantities. While crediting Natalina Craft as the designer is not required, it is always greatly appreciated—especially when selling online—so others can find the original pattern.
Thank you for respecting these guidelines.
Crochet Applique: Unicorn
Crochet Applique: Unicorn
Instructions
Size
Approx. 4.5” / 12 cm tall with the indicated yarn and hooks.Use a smaller hook to make a smaller applique.
Materials
- Light worsted yarn calling for a 5.5 mm (US I-9) hook in 5 colors: White, Sparkly white (for the nose + legs details), Purple (horn), Light pink + dark pink (hair/tail)
- 3.5 mm crochet hook
- 3 mm crochet hook
- Tapestry needle
- Black safety eyes (7.5 mm)
Yarn Used
Light worsted cotton yarn (Hobby Lobby I Love This Cotton!) in:White (06), White Sparkle (06), Purple (252), Pink (74), Rosey (99)
Abbreviations
- ch = chain
- mr = magic ring
- sc = single crochet
- inc = increase
- dec = invisible decrease
- sl st = slip stitch
- hdc = half double crochet
- dc = double crochet
How to crochet a unicorn applique?
Part 1: Head
With a 3.5 mm hook and white yarn:
- Row 1: ch 5. (5)
- Row 2: turn; 1 sc in 2nd ch from hook, 1 sc in next 3. (4)
- Row 3: ch1, turn; Work 2 sc in 1st st, 1 sc in each of the next 2 st, work 2 sc in last st. (6)
- Row 4: ch1, turn; 1 sc in all. (6)
- Row 5: ch1, turn; 1 sc in all. (6)
- Row 6: ch1, turn; Work 2 sc in 1st st, 1 sc in each of the next 4 st, Work 2 sc in last st. (8)
- Row 7: ch1, turn; 1 sc in all. (8)
- Row 8: ch1, turn; 1 sc in all. (8)
- Row 9: ch1, turn; 1 dec, 1 sc in each of the next 4 st, 1 dec. (6)
- Row 10: ch1, turn; 1 sc in all. (6)
- Row 11: ch1, turn; 1 sc in all. (6)
- Row 12: ch 1, turn;In first st: (1 sc, place stitch marker; 1 hdc, 1 dc, 1 hdc, 1 sc),sc in next 4 sts,in last st: (1 sc, 1 hdc, 1 dc, 1 hdc, 1 sc). (14)
Do not turn. Now work an edging of single crochet evenly around the head:1 sc evenly all around and stop just before the first stitch of Row 12 (the one with the stitch marker). (20)
- Row 13 (ears): Starting in the stitch with the stitch marker:1 sc in next 2 sts,(1 sc, 1 dc) in next st, ch 2, (1 dc, 1 sc) in next st,sl st in next 6 sts,repeat the ear: (1 sc, 1 dc) in next st, ch 2, (1 dc, 1 sc) in next st,sc in next 2 sts. (22)
sl st in next st. Fasten off and weave in the end.
Part 2: Nose
With a 3.5 mm hook and sparkly white yarn:
- Row 1: ch 5. (5)
- Row 2: turn; 1 sc in 2nd ch from hook, 1 sc in next 3. (4)
- Row 3: ch1, turn; Work 2 sc in 1st st, 1 sc in each of the next 2 st, work 2 sc in last st. (6)
- Row 4: ch1, turn; 1 sc in all. (6)
- Row 5: ch1, turn; 1 sc in all. (6)
Do not turn. sc evenly around the nose. (10)sl st to the first stitch of Row 5. Fasten off, leaving a long tail.Sew the nose onto the head.
Part 3: Body
With a 3.5 mm hook and white yarn:
- Row 1: ch 6. (6)
- Row 2: turn; 1 sc in 2nd ch from hook, 1 sc in next 5. (5)
- Row 3: ch1, turn; Work 2 sc in 1st st, 1 sc in each of the next 3 st, work 2 sc in last st. (7)
- Row 4: ch1, turn; Work 2 sc in 1st st, 1 sc in each of the next 5 st, Work 2 sc in last st.(9)
- Rows 5 to 15: ch1, turn; 1 sc in all. (9)
- Row 16: ch1, turn; 1 dec, 1 sc in each of the next 5 st, 1 dec. (7)
- Row 17: ch1, turn; 1 dec (place stitch marker), 1 sc in each of the next 3 st, 1 dec. (5)
Do not turn. sc evenly around the body. (34)sl st in the first stitch of Row 17 (the one with the stitch marker).Fasten off, leaving a long tail.
Sew the head to the body. (The bottom of the body is the flat side—see your photos.)You can place the head centered or slightly tilted.
Part 4: Legs (Make 4)
With a 3.5 mm hook, start with sparkly white yarn.(Tip: I did not ch 1 before turning to keep the sides straighter.)
- Row 1: ch 4. (4)
- Row 2: turn; 1 sc in 2nd ch from hook, 1 sc in next 2. (3)
- Row 3: turn; 1 sc in all. (3)
Change to white yarn:
- Rows 4 to 8: turn; 1 sc in all. (3)
Fasten off, leaving a long tail.Sew 2 legs to the front of the body and 2 legs to the back, as shown in your photos.
Part 5: Horn
With a 3 mm hook and purple yarn:(Tip: I did not ch 1 before turning to keep the sides straighter.)
- Row 1: ch 3. (3)
- Row 2: turn; 1 sc in 2nd ch from hook, 1 sc in next st. (2)
- Row 3: turn; 1 sc in all. (2)
- Row 4: turn; 1 sc in all. (2)
- Row 5: turn; 1 dec. (1)
- Row 6: turn; 1 sc in all. (1)
Fasten off, leaving a long tail.Sew the horn to the center of the head between the ears.
Part 6: Eyes
Use 7.5 mm safety eyes. Place them in the center of the head, about 2 rows above the nose, leaving 2 stitches between the eyes.
Optional: add eyelashes with black yarn using a tapestry needle.
Part 7: Hair (Mane + Tail)
With a 3 mm hook and pink shades:
Mane (Head)
- Make 4 chains of 14 (long strands). Leave long tails for sewing.
- Make 2 chains of 7 (fringe). Leave long tails for sewing.
I attached the fringe on the right side of the horn and the longer strands on the left side.
Tail
- Make 4 chains of 17. Attach them to the left side of the body.
🎉 Congratulations! Your crochet unicorn applique is ready!If you made one, please tag @natalinacraft and use #natalinacraft — I’d love to see your creation!
Copyright Notice
All rights reserved. This pattern and all accompanying photographs are the property of Natalina Craft and are protected by copyright law. This pattern is for personal use only. Any unauthorized reproduction, redistribution, or publication of this pattern, in whole or in part, is strictly prohibited.
You are welcome to sell finished items made from this pattern in small quantities. While crediting Natalina Craft as the designer is not required, it is always greatly appreciated—especially when selling online—so others can find the original pattern.Thank you for respecting these guidelines.
Thank you for the unicorn pattern. Very cute.
Thank you very much Kathryn
Bonjour,je suis très contente d’avoir trouver votre site que je cherchais des appliqués pour mon garçon qui va arrivé
bientôt dans quelque semaines les patron sur papier que je ne trouve pas pouvez vous m’aider a les trouvés s.v.p.
Merci
Bonjour Suzanne, je suis désolée, je n’ai pas encore fait de version pdf de me patrons.
Thank you, my granddaughters are going to love them.
You are very welcome!
I love this sweet unicorn I’m making a pink dog sweater for my little dog
and will sew it on
Thank you very much. It is such a cute idea, I hope your little dog will enjoy it!