
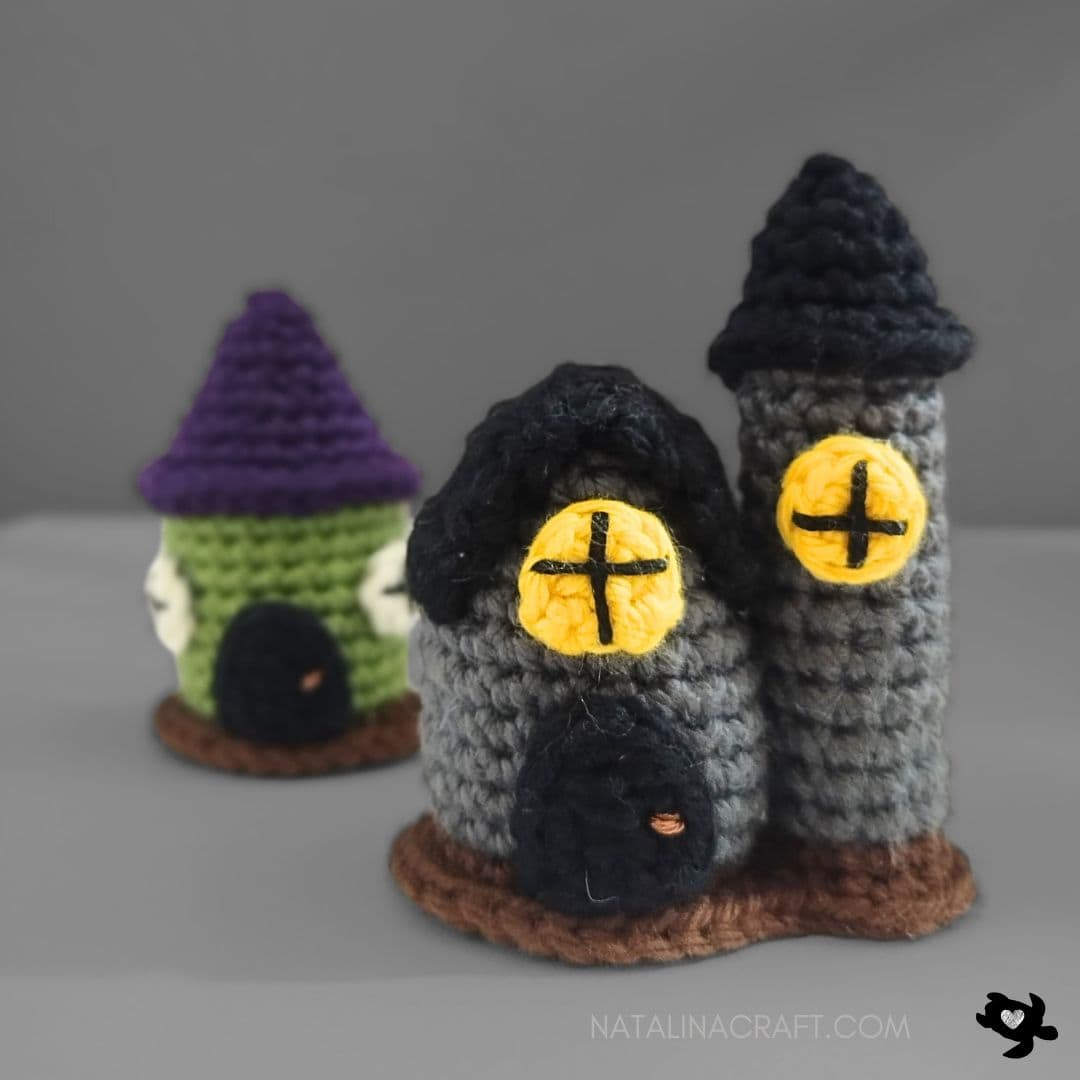
Looking for a crochet project that’s a little spooky and a lot of fun? This Tiny Haunted Manor Dollhouse is the perfect Halloween make! Part eerie playset, part festive décor, this miniature manor is filled with creepy-cute charm that will delight kids and adults alike.
Beginner-friendly and quick to work up, this haunted house is ideal for imaginative play, trick-or-treat season displays, or as a unique handmade gift for Halloween lovers. With simple stitches and step-by-step instructions, you’ll have your very own crochet haunted manor ready to welcome its ghostly guests in no time.
Remember to become a part of my VIP Facebook group HERE. This is where you can ask any questions you might have and showcase your completed projects. I’ll frequently inquire about the patterns you’d like to work on next. Of course, feel free to propose ideas even if I haven’t asked for suggestions!
I hope you will enjoy and understand the pattern. If you have any questions, please don’t hesitate to write to me. I’ll do my best to help you. And I would love to see your work! Don’t forget to share your finished projects using the hashtag #natalinacraft. I love seeing your incredible work!
Follow me on Instagram and Facebook for exclusive sneak peeks, behind-the-scenes updates, and the latest news on upcoming patterns and collections. Let’s build a vibrant crochet community together!


Crochet Pattern – Free Crochet Pattern – Haunted Manor
Start Here:
Please read the entire pattern carefully before beginning.
The pattern is written using US terms. The design can be created with yarn in various sizes. I made it with worsted yarn.
Size:
- 3 inches (8 cm) tall with light worsted yarn
Material:
- Yarn calling for a 5.5 mm hook in black, dark grey, brown, and yellow.
- Embroidery thread in black for the windows.
- Embroidery thread in light brown for the door handle.
- Size 2.75 mm crochet hook (B/2).
- Stitch markers (if needed)
- Tapestry needle
- Facultative: Fabric or hot glue
- poly-fill
Abbreviations:
- chain (ch)
- magic ring (mr)
- single crochet (sc)
- increase (inc)
- invisible decrease (dec)
- slip stitch (sl st)
- half double crochet (hdc)
- double crochet (dc)
- back loop only (blo)
Pattern: How to crochet a haunted manor dollhouse?
Let’s start – Free Crochet Pattern – Haunted Manor
- The dollhouse is worked in continuous rounds (as a spiral). Use a stitch marker if needed.
- Fill as you work.
- The manor is composed of two parts: the main house and the tower.
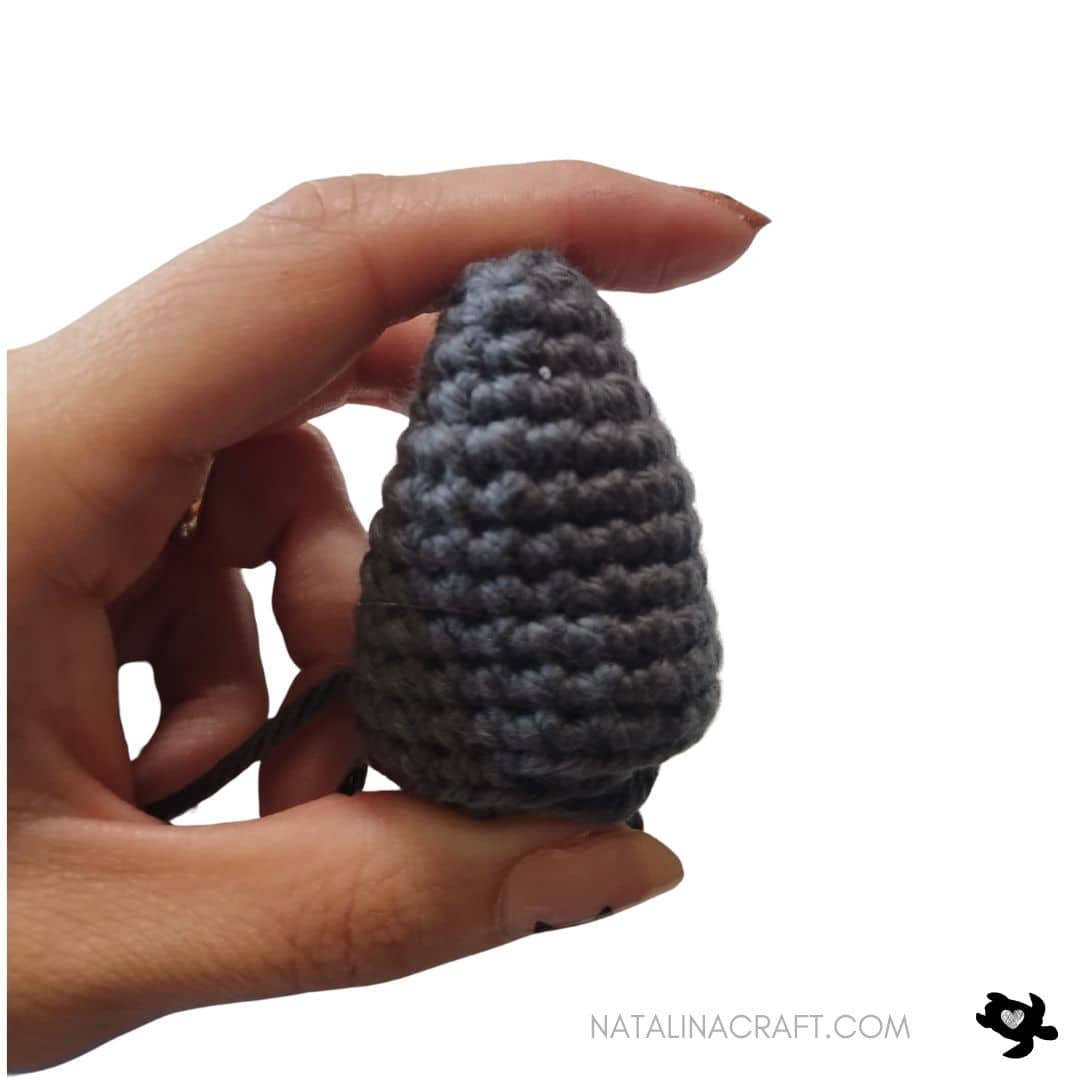
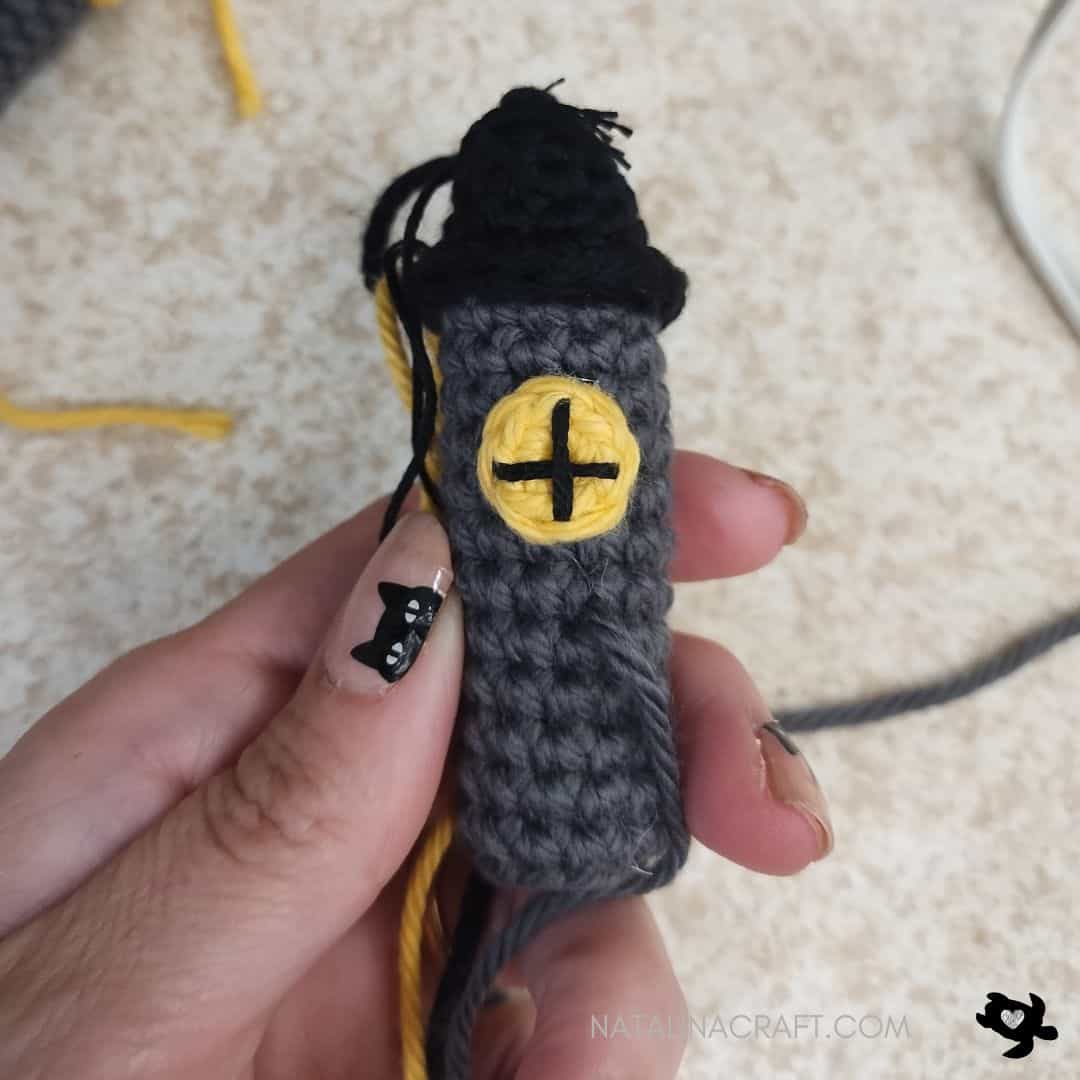
The Tower:
We are starting at the top of the tower.
With a 2.75 mm crochet and the black:
- Round 1: start 4 sc in a magic ring. (4)
- Round 2: [1 inc, 1 sc] x2. (6)
- Round 3: [1 inc, 1 sc] x3. (9)
- Round 4: [1 inc, 2 sc] x3. (12)
- Round 5: [1 sc in all st]. (12)
- Round 6: working in the front loops only: [1 inc, 1 sc] x6. (18)
Cut the yarn and fasten off.
Continue with the dark grey yarn: join it into the back loop of any stitch from Round 5 (I attached mine at the back to keep it less noticeable).
- Round 7: working in the back loops only of Round 5: [1 sc in all st]. (12)
- Rounds 8 to 19 : [1 sc in all st]. (12)
Fill the tower.
- Round 20: working in the back loops only: [6 dec]. (6)
Cut the yarn, leaving a long tail to close the tower. Using your tapestry needle, weave the tail through all the front loops of Round 20, then pull tight to close. Fasten off.
Keep the tower for later.

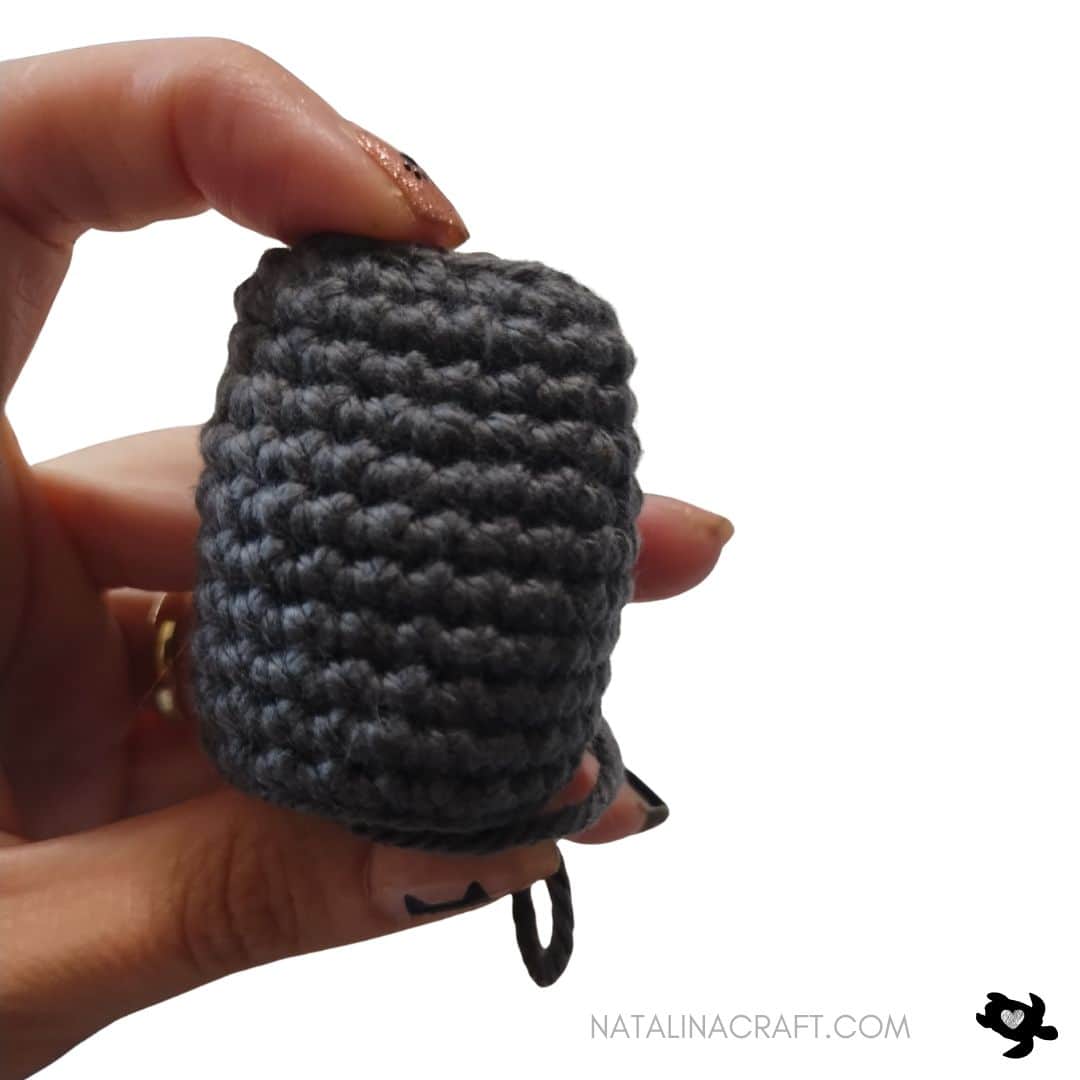
The House:
We are starting at the top of the house.
With a 2.75 mm crochet and the dark grey:
- Round 1: ch 7. Starting in the 2nd ch from the hook: 1 sc in the next 5 ch, 2 sc in the last ch. Now working on the other side of the chain: 1 sc in the next 5 ch. (12)
- Round 2: working in the back loops only: [1 sc, 1 inc] x6. (18)
- Rounds 3 to 4: [1 sc in all st]. (18)
- Round 5: [2 sc, 1 inc] x6. (24)
- Rounds 6 to 11: [1 sc in all st]. (24)
Fill the house – do not overfill, as you want to maintain a triangular shape at the top of the house.
- Round 12: working in the back loops only: [12 dec]. (12)
- Round 13: [6 dec]. (6)
Cut the yarn, leaving a long tail to close the tower. Using your tapestry needle, weave the tail through all the front loops of Round 13, then pull tight to close. Fasten off.
The House’s Roof:
With a 2.75 mm crochet and the black:
- Round 1: ch 8. Starting in the 2nd ch from the hook: 1 hdc in the next 7 ch. (7)
- Rounds 2 to 4: ch1, turn; 1 hdc in the next 7 st. (7)
- Round 5: ch1, turn; working in the back loop only: 1 hdc in the next 7 st. (7)
- Rounds 6 to 8: ch1, turn; 1 hdc in the next 7 st. (7)
- Round 9: ch1, turn; 1 sc in the next 7 st. (7)
Cut the yarn, leaving a long tail to sew the roof to the house. Fold the roof in half between Rounds 4 and 5 (where you worked in the back loops only). Place the roof on the top of the house. Sew or glue it to the house.


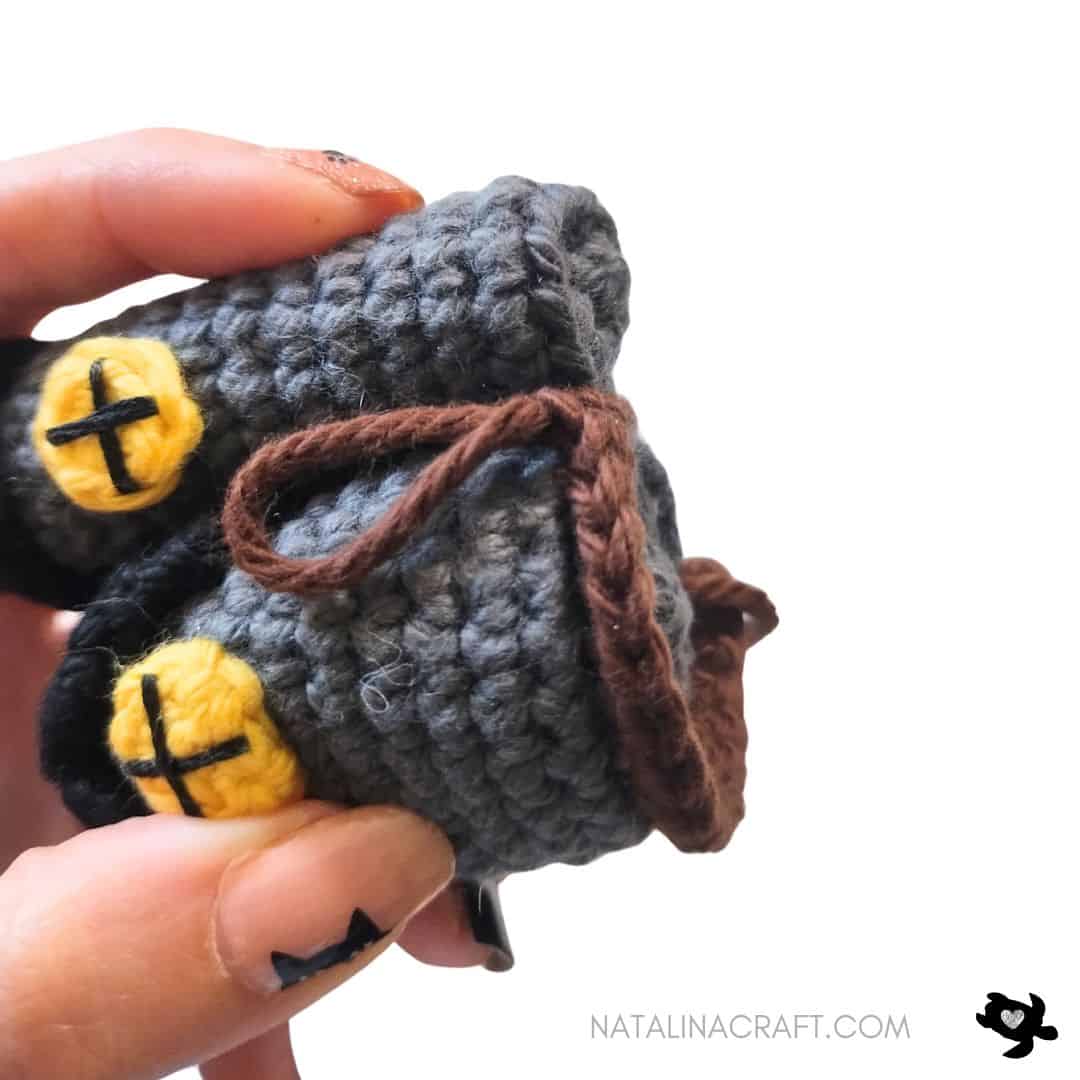
The ground:
In this step, we’ll crochet the ground that goes around both the house and the tower.
First, decide where to place the tower next to the house. You have three options to secure them together before you start crocheting:
-
Sew them together — just make sure you’ll still be able to work around Round 11 of the house and Round 19 of the tower.
-
Use pins — pin the pieces in place to hold them steady.
-
Hold them by hand while you work — this is the method I used.
Join the brown yarn at the centre back of the house, in the front loop only of Round 11.
- Round 1: Join the brown yarn at the centre back of the house, in the front loop only of Round 11, make 1 sc in the same st where you joined, [1 sc in the next 17 st], now keep working in the front loops of Round 19 of the tower: [1 sc in the next 12 st], now in round 11 of the house again: [1 sc in the next 6 st]. (36)
- Round 2 [5 sc, 1 inc] x6. (42)
Cut the yarn and fasten off.


The door:
With a 2.75 mm crochet and the black yarn:
- Row 1: ch 5; starting in the second ch from the hook: [1 sc, 1 hdc in the next 3 ch]. (4)
- Row 2: ch1, turn; [1 sc in the next 3 st, 3 sc in the last st; working now on the other side of the chain, 1 sc in the next 3 ch]. (9)
Cut the yarn, leaving a long tail for sewing.
Using a tapestry needle and the light brown embroidery thread, stitch a small door handle. Then sew (or glue) the door to the front of the dollhouse.

The tower’s window:
With a 2.75 mm crochet and the yellow yarn:
- Round 1: start 6 sc in a magic ring. (6)
Cut the yarn, leaving a long tail for sewing. Using your tapestry needle, insert the yarn through both loops of the first stitch of Round 1, then into the back loop only of the last stitch of Round 1. This creates a ‘fake’ single crochet and helps form a neat, perfect circle for the window.
With a tapestry needle and black embroidery thread, stitch a small ‘+’ on each window. Then sew (or glue) the window at the top of the tower.
The house’s window:
With a 2.75 mm crochet and the yellow yarn:
- Row 1: ch 3; starting in the second ch from the hook: [1 sc, 1 hdc]. (2)
- Row 2: ch1, turn; [1 sc, 3 sc in the last st; working now on the other side of the chain, 1 sc]. (5)
Cut the yarn, leaving a long tail for sewing.
With a tapestry needle and black embroidery thread, stitch a small ‘+’ on each window. Then sew (or glue) the window at the top of the house.
If you haven’t done it before, sew the tower to the house.

All rights reserved.
The pattern and photographs contained in this document are the property of Natalina Craft. This pattern is available for personal use only. No unauthorized reproduction, in whole or in part, or distribution of this pattern or content is allowed.
You may sell finished items in limited amounts. If you sell your finished products online, I would be grateful if you can add a statement saying « Pattern by Natalina Craft » and link back to my post.
Free Crochet Pattern – Haunted House Dollhouse
Free Crochet Pattern – Haunted Manor Dollhouse
Instructions
Crochet Pattern - Free Crochet Pattern - Haunted Manor
Start Here:
Please read the entire pattern carefully before beginning.
The pattern is written using US terms. The design can be created with yarn in various sizes. I made it with worsted yarn.
Size:
- 3 inches (8 cm) tall with light worsted yarn
Material:
- Yarn calling for a 5.5 mm hook in black, dark grey, brown, and yellow.
- Embroidery thread in black for the windows.
- Embroidery thread in light brown for the door handle.
- Size 2.75 mm crochet hook (B/2).
- Stitch markers (if needed)
- Tapestry needle
- Facultative: Fabric or hot glue
- poly-fill
Abbreviations:
- chain (ch)
- magic ring (mr)
- single crochet (sc)
- increase (inc)
- invisible decrease (dec)
- slip stitch (sl st)
- half double crochet (hdc)
- double crochet (dc)
- back loop only (blo)
Pattern: How to crochet a haunted manor dollhouse?
Let's start - Free Crochet Pattern - Haunted Manor
- The dollhouse is worked in continuous rounds (as a spiral). Use a stitch marker if needed.
- Fill as you work.
- The manor is composed of two parts: the main house and the tower.
The Tower:
We are starting at the top of the tower.
With a 2.75 mm crochet and the black:
- Round 1: start 4 sc in a magic ring. (4)
- Round 2: [1 inc, 1 sc] x2. (6)
- Round 3: [1 inc, 1 sc] x3. (9)
- Round 4: [1 inc, 2 sc] x3. (12)
- Round 5: [1 sc in all st]. (12)
- Round 6: working in the front loops only: [1 inc, 1 sc] x6. (18)
Cut the yarn and fasten off.
Continue with the dark grey yarn: join it into the back loop of any stitch from Round 5 (I attached mine at the back to keep it less noticeable).
- Round 7: working in the back loops only of Round 5: [1 sc in all st]. (12)
- Rounds 8 to 19 : [1 sc in all st]. (12)
Fill the tower.
- Round 20: working in the back loops only: [6 dec]. (6)
Cut the yarn, leaving a long tail to close the tower. Using your tapestry needle, weave the tail through all the front loops of Round 20, then pull tight to close. Fasten off.
Keep the tower for later.
The House:
We are starting at the top of the house.
With a 2.75 mm crochet and the dark grey:
- Round 1: ch 7. Starting in the 2nd ch from the hook: 1 sc in the next 5 ch, 2 sc in the last ch. Now working on the other side of the chain: 1 sc in the next 5 ch. (12)
- Round 2: working in the back loops only: [1 sc, 1 inc] x6. (18)
- Rounds 3 to 4: [1 sc in all st]. (18)
- Round 5: [2 sc, 1 inc] x6. (24)
- Rounds 6 to 11: [1 sc in all st]. (24)
Fill the house - do not overfill, as you want to maintain a triangular shape at the top of the house.
- Round 12: working in the back loops only: [12 dec]. (12)
- Round 13: [6 dec]. (6)
Cut the yarn, leaving a long tail to close the tower. Using your tapestry needle, weave the tail through all the front loops of Round 13, then pull tight to close. Fasten off.
The House's Roof:
With a 2.75 mm crochet and the black:
- Round 1: ch 8. Starting in the 2nd ch from the hook: 1 hdc in the next 7 ch. (7)
- Rounds 2 to 4: ch1, turn; 1 hdc in the next 7 st. (7)
- Round 5: ch1, turn; working in the back loop only: 1 hdc in the next 7 st. (7)
- Rounds 6 to 8: ch1, turn; 1 hdc in the next 7 st. (7)
- Round 9: ch1, turn; 1 sc in the next 7 st. (7)
Cut the yarn, leaving a long tail to sew the roof to the house. Fold the roof in half between Rounds 4 and 5 (where you worked in the back loops only). Place the roof on the top of the house. Sew or glue it to the house.
The ground:
In this step, we’ll crochet the ground that goes around both the house and the tower.
First, decide where to place the tower next to the house. You have three options to secure them together before you start crocheting:
- Sew them together — just make sure you’ll still be able to work around Round 11 of the house and Round 19 of the tower.
- Use pins — pin the pieces in place to hold them steady.
- Hold them by hand while you work — this is the method I used.
Join the brown yarn at the centre back of the house, in the front loop only of Round 11.
- Round 1: Join the brown yarn at the centre back of the house, in the front loop only of Round 11, make 1 sc in the same st where you joined, [1 sc in the next 17 st], now keep working in the front loops of Round 19 of the tower: [1 sc in the next 12 st], now in round 11 of the house again: [1 sc in the next 6 st]. (36)
- Round 2 [5 sc, 1 inc] x6. (42)
Cut the yarn and fasten off.
The door:
With a 2.75 mm crochet and the black yarn:
- Row 1: ch 5; starting in the second ch from the hook: [1 sc, 1 hdc in the next 3 ch]. (4)
- Row 2: ch1, turn; [1 sc in the next 3 st, 3 sc in the last st; working now on the other side of the chain, 1 sc in the next 3 ch]. (9)
Cut the yarn, leaving a long tail for sewing.
Using a tapestry needle and the light brown embroidery thread, stitch a small door handle. Then sew (or glue) the door to the front of the dollhouse.
The tower's window:
With a 2.75 mm crochet and the yellow yarn:
- Round 1: start 6 sc in a magic ring. (6)
Cut the yarn, leaving a long tail for sewing. Using your tapestry needle, insert the yarn through both loops of the first stitch of Round 1, then into the back loop only of the last stitch of Round 1. This creates a ‘fake’ single crochet and helps form a neat, perfect circle for the window.
With a tapestry needle and black embroidery thread, stitch a small ‘+’ on each window. Then sew (or glue) the window at the top of the tower.
The house's window:
With a 2.75 mm crochet and the yellow yarn:
- Row 1: ch 3; starting in the second ch from the hook: [1 sc, 1 hdc]. (2)
- Row 2: ch1, turn; [1 sc, 3 sc in the last st; working now on the other side of the chain, 1 sc]. (5)
Cut the yarn, leaving a long tail for sewing.
With a tapestry needle and black embroidery thread, stitch a small ‘+’ on each window. Then sew (or glue) the window at the top of the house.
If you haven't done it before, sew the tower to the house.
All rights reserved.
The pattern and photographs contained in this document are the property of Natalina Craft. This pattern is available for personal use only. No unauthorized reproduction, in whole or in part, or distribution of this pattern or content is allowed.
You may sell finished items in limited amounts. If you sell your finished products online, I would be grateful if you can add a statement saying « Pattern by Natalina Craft » and link back to my post.