
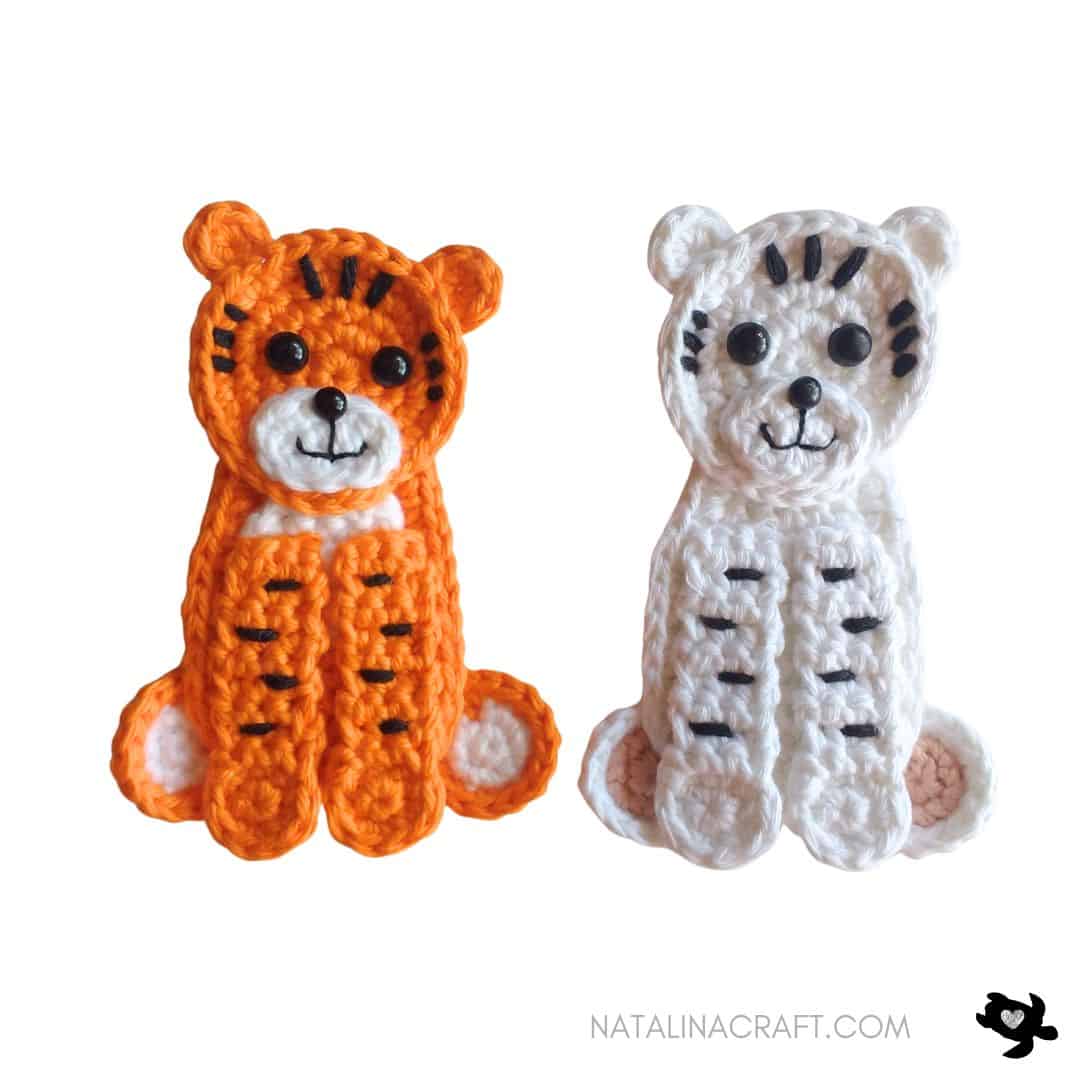
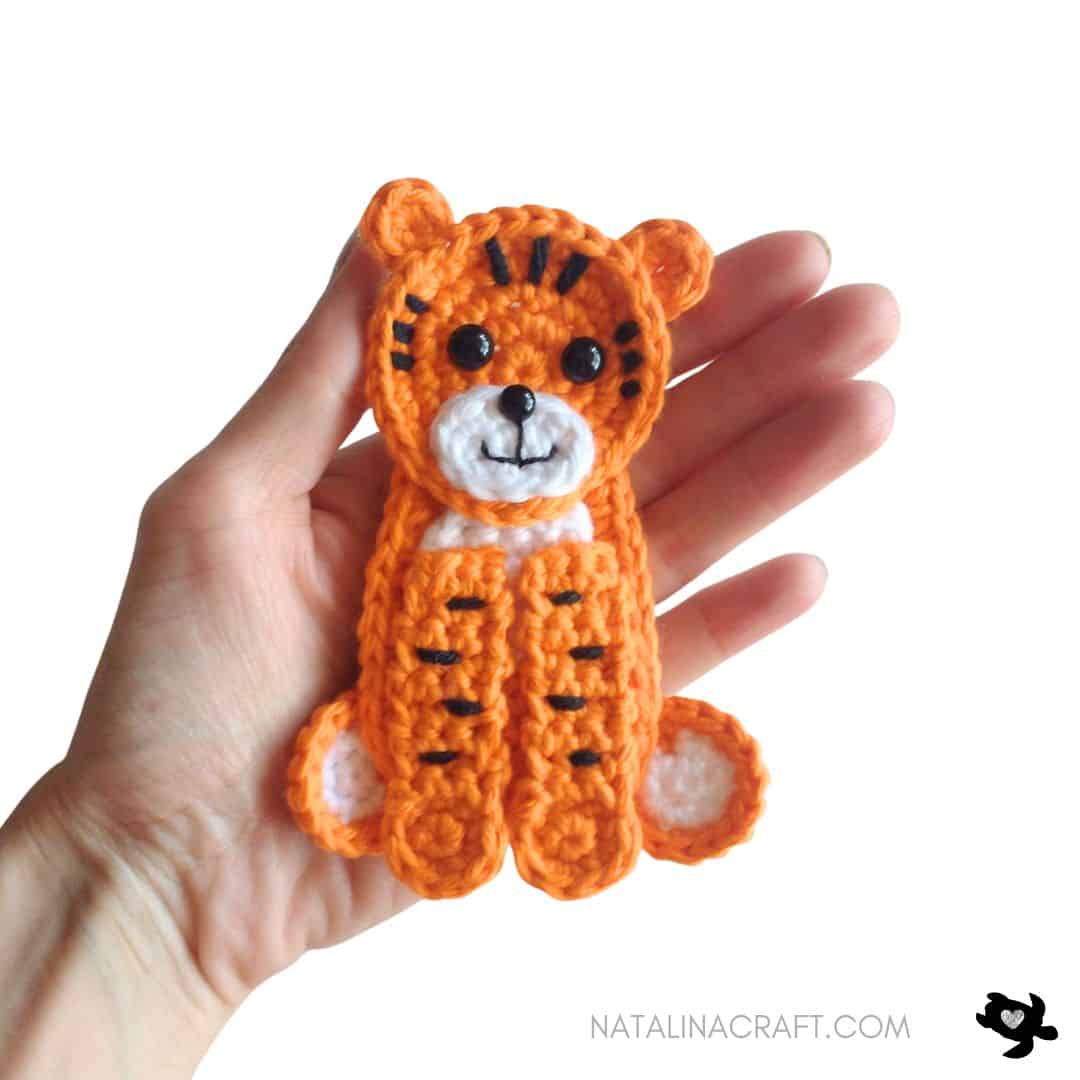
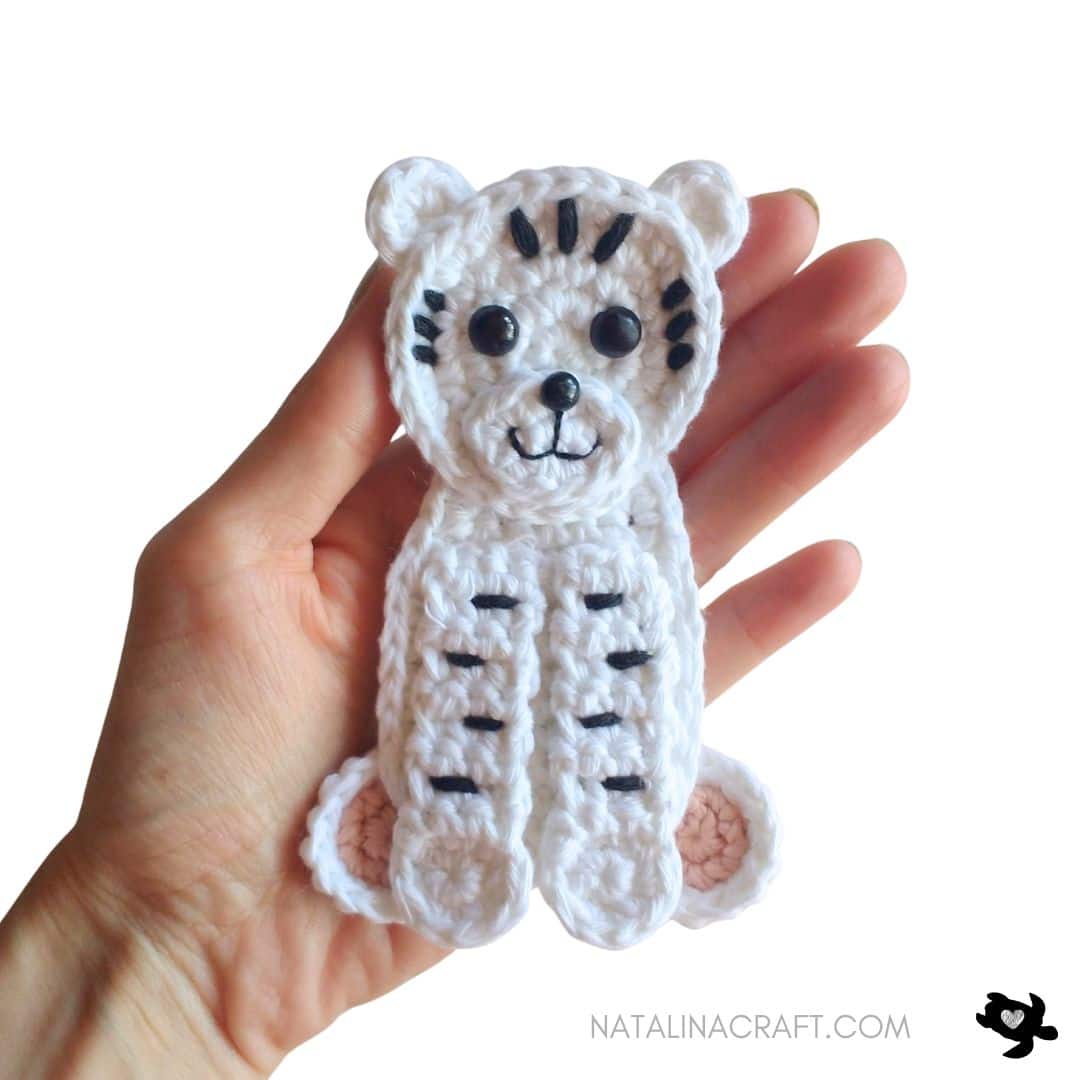
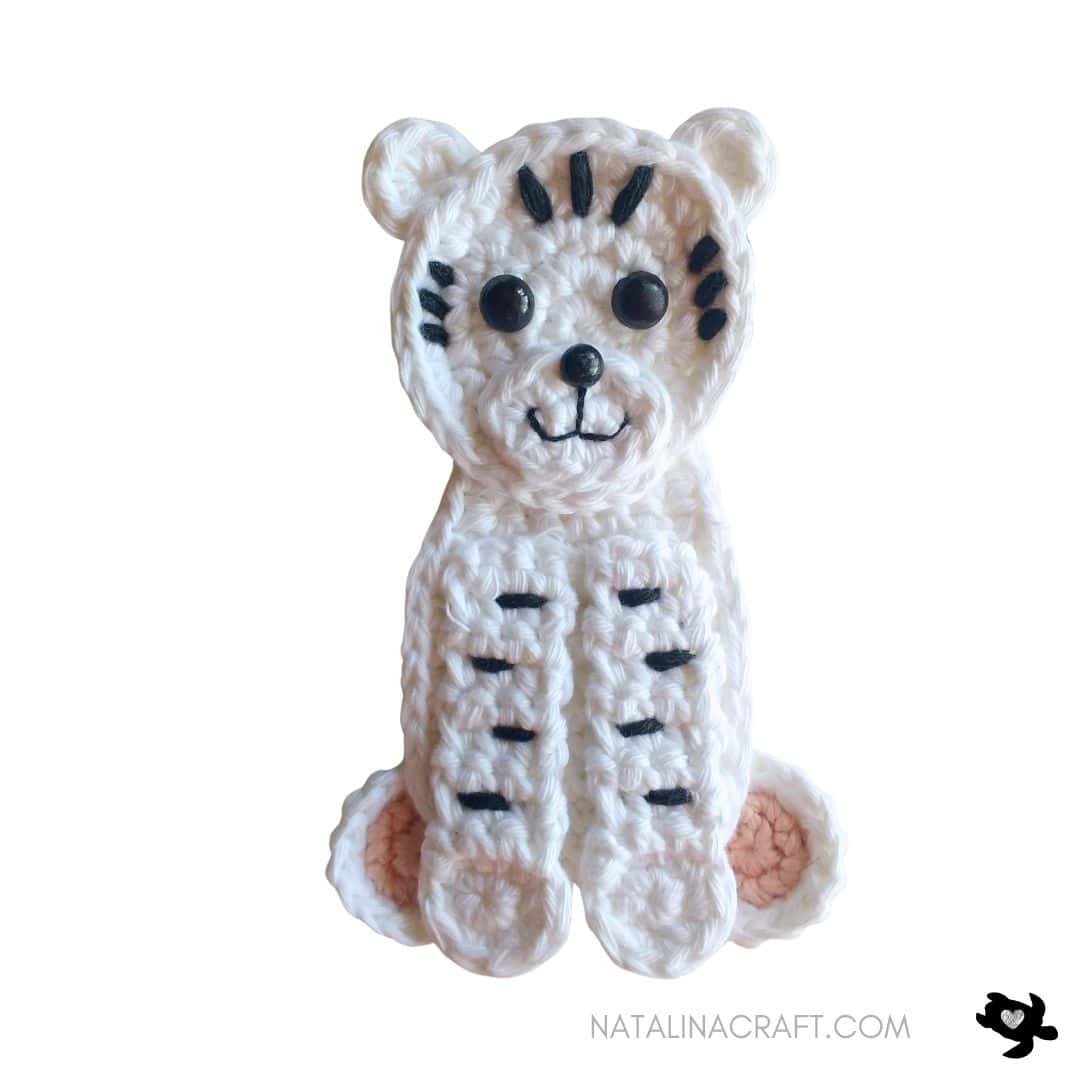
This Crochet Tiger Applique is a fun and playful design that’s perfect for decorating blankets, bags, sweaters, wall hangings, or children’s accessories. You can make a classic orange tiger or a sweet white tiger simply by changing the colors.
The applique is worked flat and includes separate pieces for the head, body, legs, and details, allowing you to assemble and customize your tiger exactly how you like.
Don’t forget to join my facebook group, you can ask your questions, and share your finished projects. I will regularly ask you what pattern you would like to see next (or you can even suggest something even if I am not asking!).
I hope you enjoy this pattern and find it easy to follow. If you have any questions, feel free to write to me—I’ll do my best to help. And I would absolutely love to see your creations!
Crochet Tiger Applique
Start Here
Please read the entire pattern before starting.
- Pattern is written in US crochet terms
- This is an applique pattern, worked flat
- Use a stitch marker if helpful
Material:
- Worsted yarn in orange, black and white. (For a white tiger: white, black, and light pink)
- Small amount of black pearl cotton (mouth)
- 3.5 mm crochet hook.
- 2 black safety eyes (7.5 mm) for the eyes
- 1 black safety eye (6 mm) for the nose
- Stitch markers
- Tapestry needle
Abbreviations:
- chain (ch)
- magic ring (mr)
- single crochet (sc)
- increase (inc)
- invisible decrease (dec)
- slip stitch (sl st)
- half double crochet (hdc)
- double crochet (dc)
Yarn Used
Light worsted yarn.
Sample shown uses I Love This Cotton (Hobby Lobby) and Rico Creative Cotton for the white tiger version.
How to crochet a Tiger applique?
Head
- Work in rounds; do not turn unless specified. If needed, use a stitch marker for the first stitch of each round.
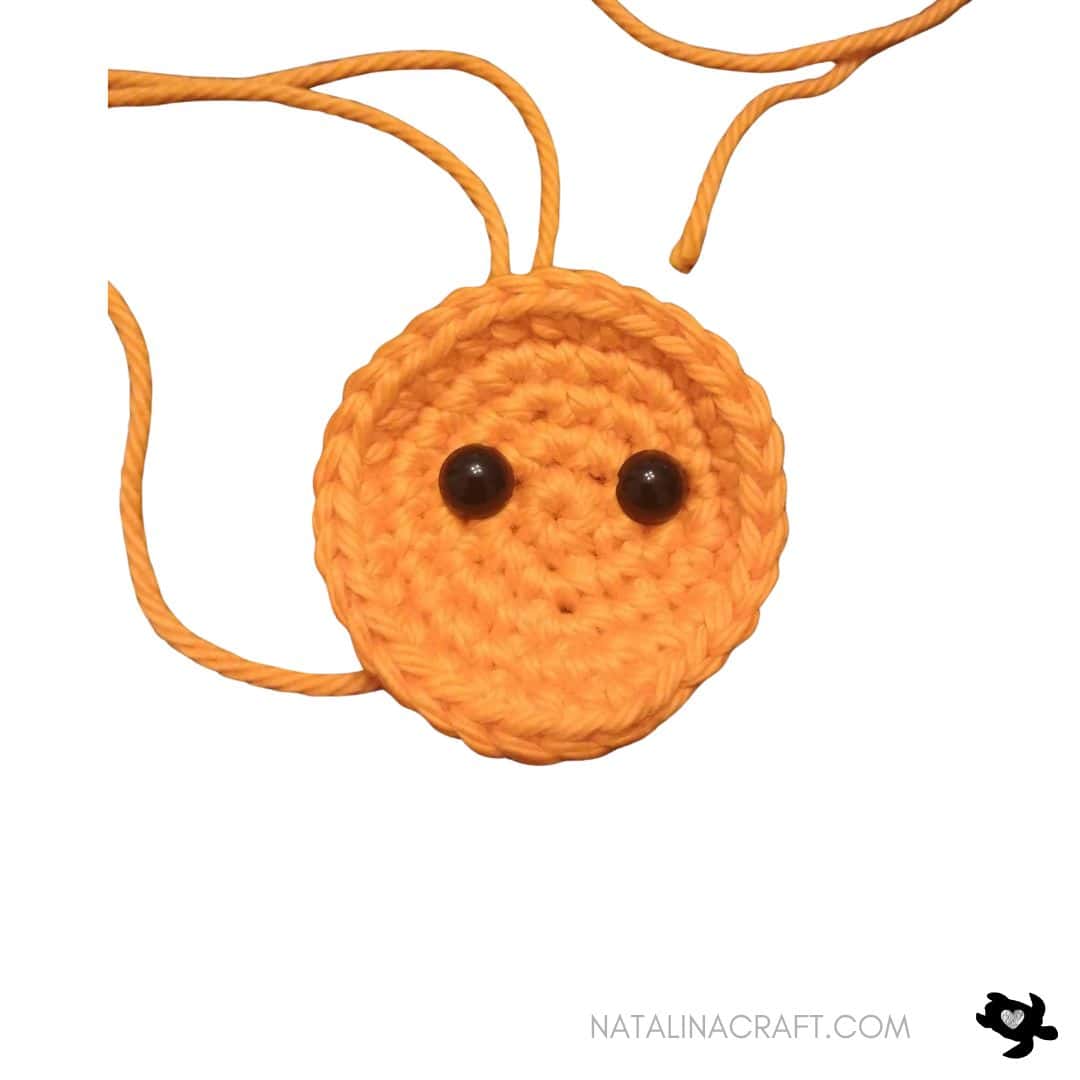
With orange yarn (or white for the white tiger) and a 3.5 mm hook:
- Round 1: 6 sc in a magic ring. (6)
- Round 2: inc 6 times. (12)
- Round 3: [1 sc in next st, 1 inc in next st] x6. (18)
- Round 4: [1 sc in next 2 st, 1 inc in next st] x6. (24)
- Round 5: [1 sc in next 3 st, 1 inc in next st] x6. (30)
Place the eyes between Rounds 2 and 3, spaced by 4 stitches.
Fasten off.
Ears (make 2)
With orange yarn (or white) and a 3.5 mm hook:
- Round 1: 6 sc in a magic ring. (6)
Fasten off.
Sew the ears to the head over 2 stitches, spaced by 5 stitches.
Stripes (Head)
Using black yarn and a tapestry needle:
- Embroider 3 stripes at the top of the head, starting from the last round and extending over 2 rounds
- Add 3 smaller stripes on each side, just below the ears
Exact placement does not need to be precise.
Muzzle
With white yarn and a 3.5 mm hook:
- ch 5.
- Round 1:
Starting in the 2nd ch from the hook:
1 sc in next 3 ch, 2 sc in last ch,
working on the other side of the chain: 1 sc in next 3 ch. (8) - Round 2:
Working around the oval:
1 inc, 1 sc in the next 2 st, 1 inc. (6) - Round 2: 2 sc in the next st, 1 sc in the next 2 st, 2 sc in the next st. (6)
Sl st in next st.
Fasten off, leaving a long tail.
Insert the nose at the top center of the muzzle.
Remove the nose temporarily to embroider a small mouth with black pearl cotton, then reattach the nose.
Sew the muzzle to the head.
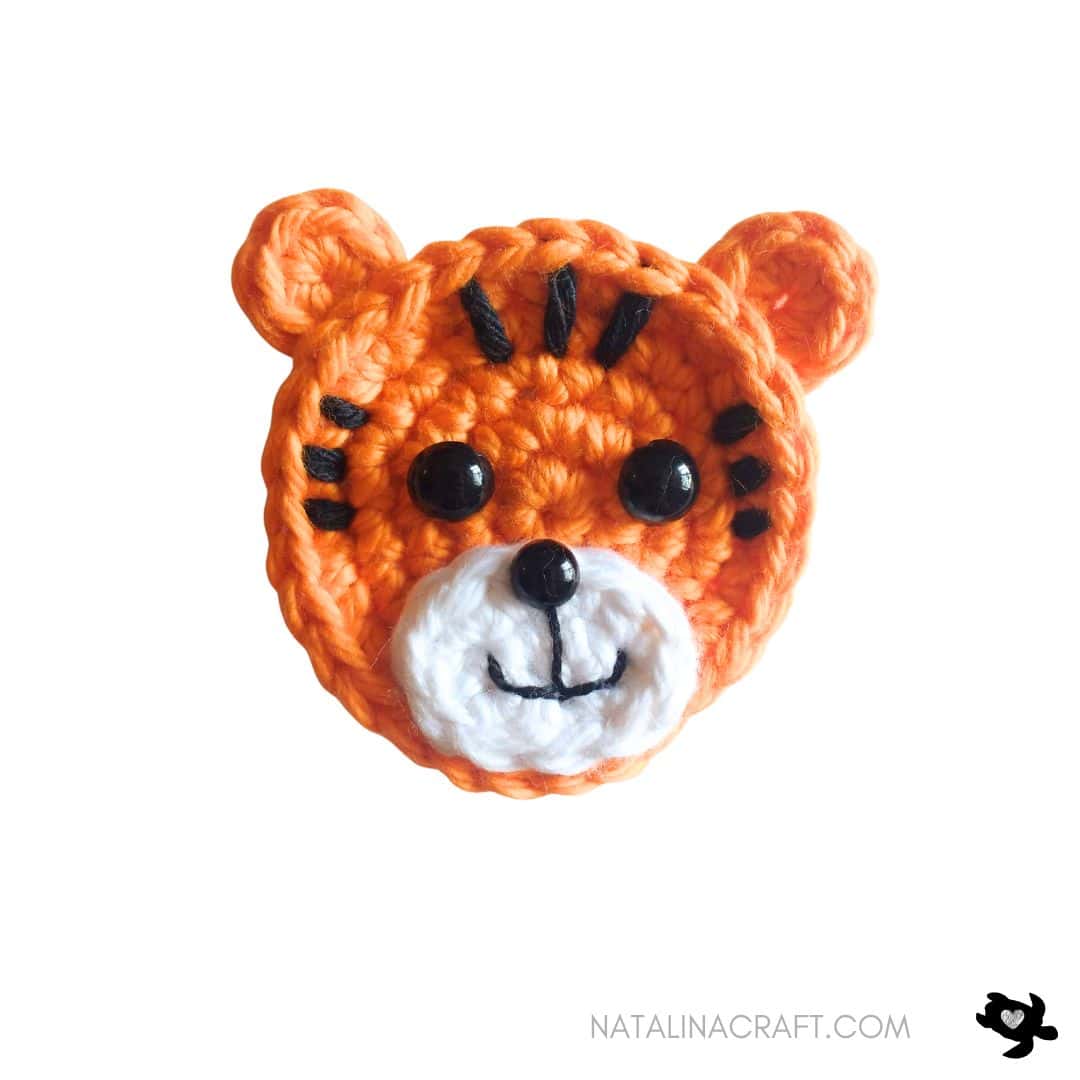
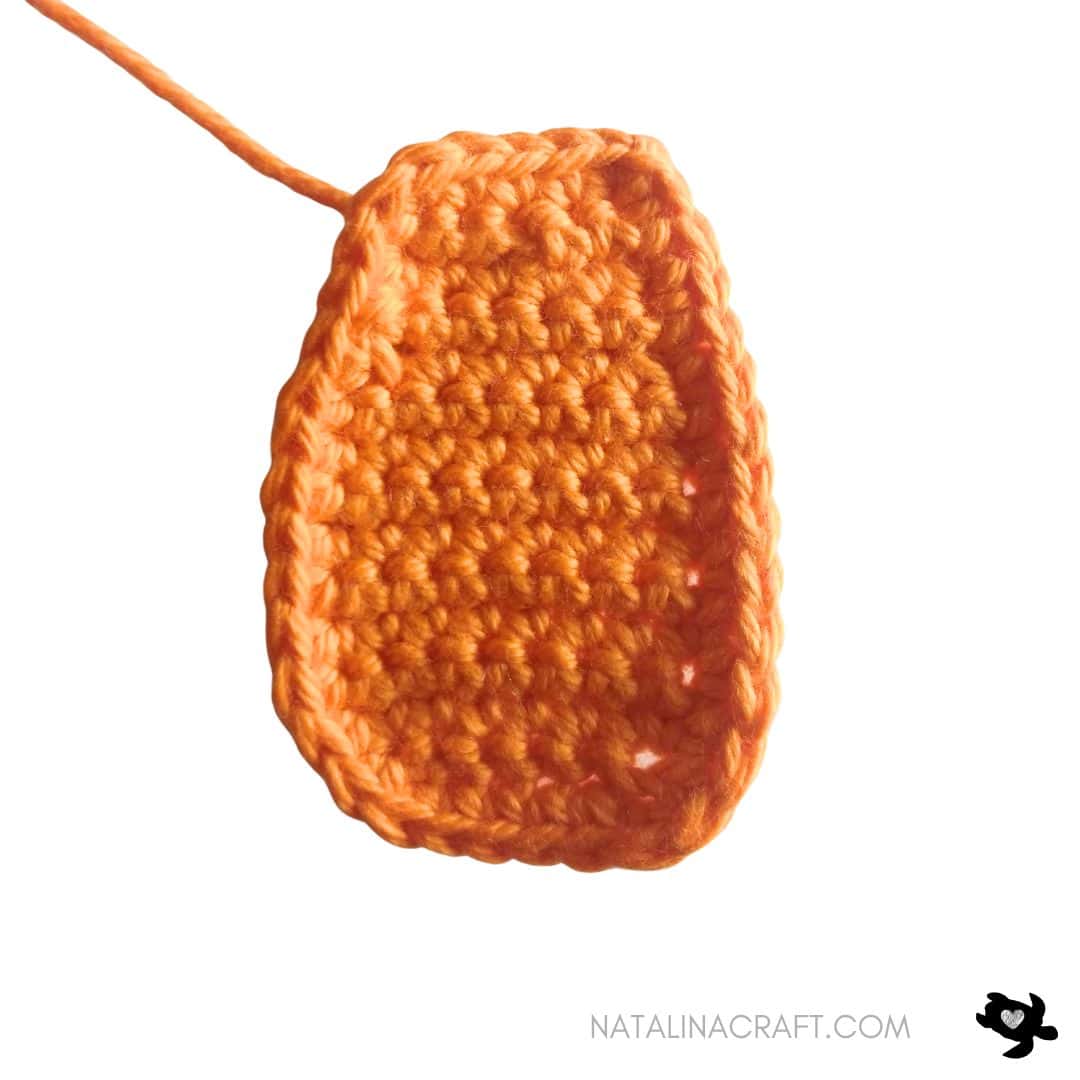
Body
With orange yarn (or white) and a 3.5 mm hook:
- ch 7. (7)
- Row 1: starting from the 2nd ch from the hook: 1 sc in the next 6 ch. (6)
- Row 2: ch1, turn; 1 inc, 1 sc in the next 4 st, 1 inc. (8)
- Rows 3 to 9: ch1, turn; 1 sc in all st. (8)
- Row 10: ch1, turn; 1 dec, 1 sc in the next 4 st, 1 dec. (6)
- Rows 11 to 12: ch1, turn; 1 sc in all st. (6)
- Row 13: ch1, turn; 1 sc in the next 2 st, 1 dec, 1 sc in the next 2 st. (5)
- Row 14: ch1, turn; 1 sc in all st. (5)
Edging
Do not turn.
Sc evenly around the body (do not crochet too tightly).
Approx. 32 stitches.
Fasten off, leaving a long tail to sew the head.
Optional White Belly
With white yarn and a 3.5 mm hook:
- ch 5.
- Row 1: starting from the 2nd ch from the hook: 1 sc in the next 4 ch. (4)
- Row 2: ch1, turn; 1 sc in all st. (4)
- Row 3: ch1, turn; 1 inc, 1 sc in the next 2 st, 1 inc. (6)
- Rows 4 to 5: ch1, turn; 1 sc in all st. (6)
- Row 6: ch1, turn; 1 dec, 1 sc in the next 2 st, 1 dec. (4)
- Row 7: ch1, turn; 1 sc in all st. (4)
Fasten off, leaving a long tail.
Sew to the body.
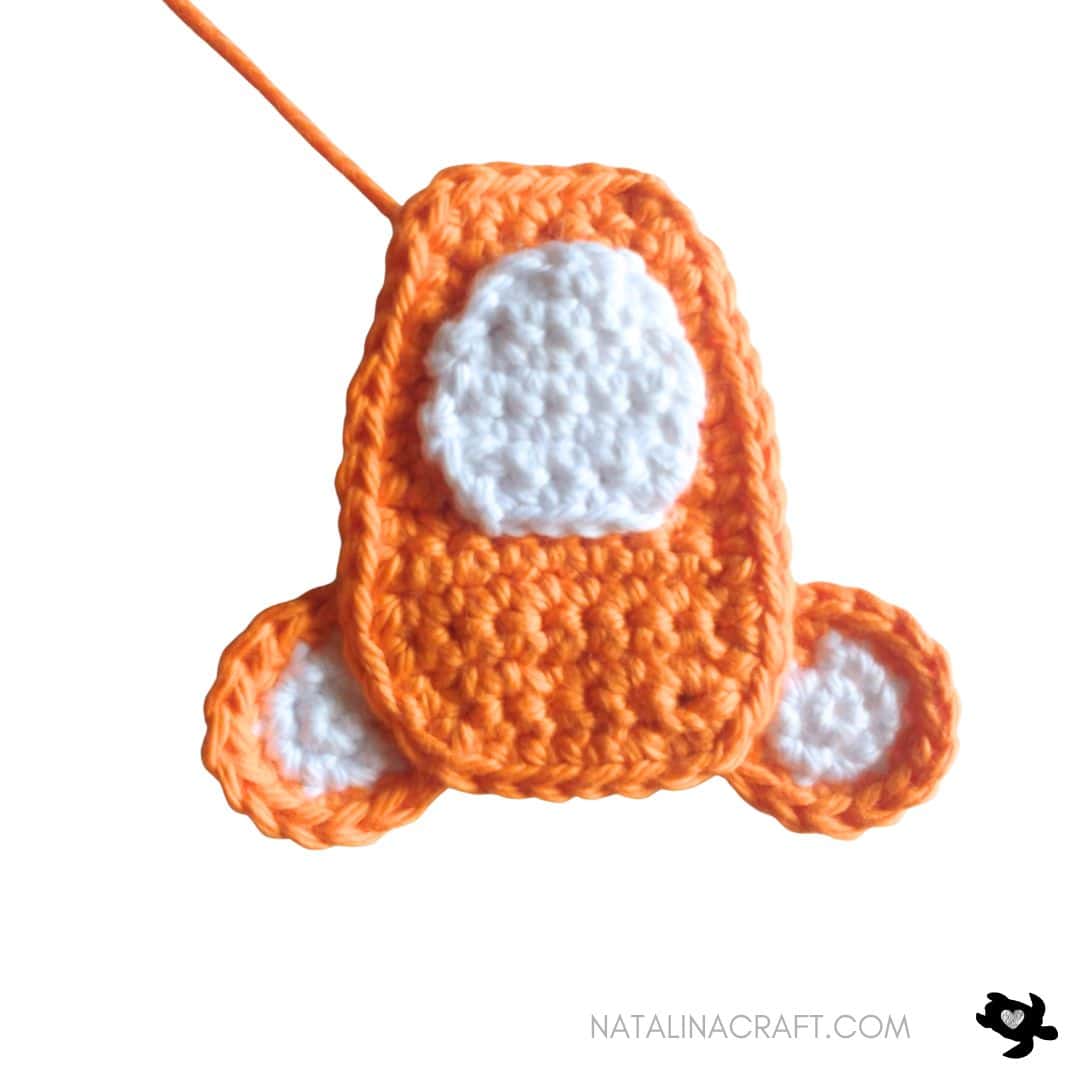
Back legs (make 2)
- Worked in rounds (feet) and then in rows (legs).
With white yarn (light pink for white tiger):
- Round 1: 5 sc in a magic ring. (5)
- Round 2: [1 inc in all st]. (10)
Change to orange yarn (or white).
- Round 3: [1 sc in the next st, 1 inc] x5. (15)
Now work in rows:
- Row 4: 1 sc in the next 3 st. (3)
- Row 5: ch1, turn; 1 sc in all st. (3)
- Row 6-7: ch1, turn; 1 sc in all st. (3)
Fasten off.
Sew the back legs behind the body so only the feet are visible from the front.

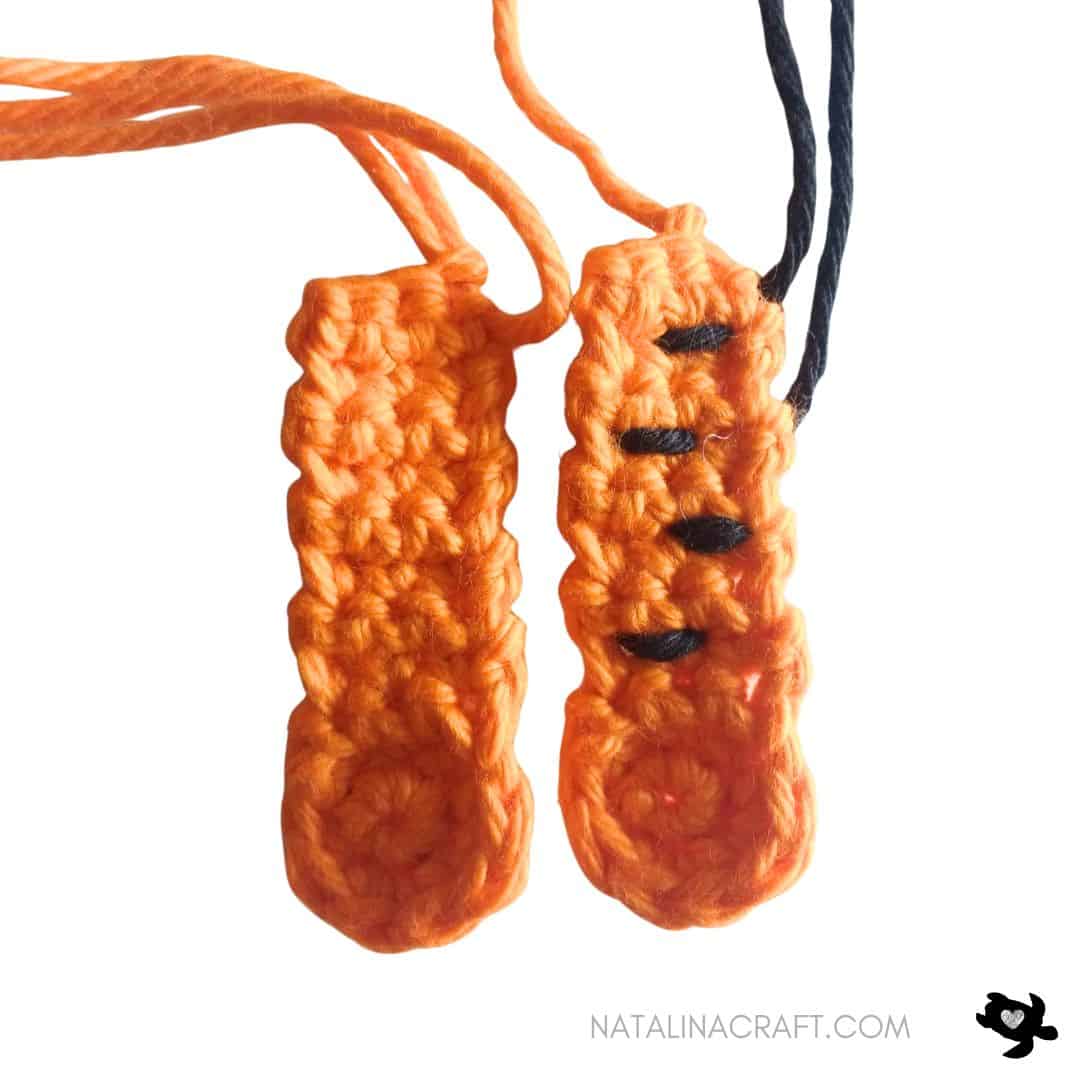
Front legs (make 2)
With orange yarn (or white):
- Round 1: 6 sc in a magic ring. (6)
- Round 2: [1 inc in the next 3 st; 1 sc in the next 3 st]. (9)
- Row 3: 1 sl st in the next st; ch1, turn; skip the sl st and make 1 sc in the next 3 st. (3)
- Row 4: ch1, turn; make 1 sc in the next 3 st. (3)
- Rows 5-11: ch1, turn; make 1 sc in the next 3 st. (3)
Fasten off.
Embroider 4 black stripes on each leg.
Sew the front legs to the body.
Assembly
- Sew the head to the body
- Check alignment before securing tightly
🎉 Finished!
Your Crochet Tiger Applique is complete 🐯
I hope you enjoyed making it! Don’t forget to share your work — it truly encourages me to create more patterns.
Copyright Notice
All rights reserved. This pattern and all accompanying photographs are the property of Natalina Craft and are protected by copyright law. This pattern is for personal use only. Any unauthorized reproduction, redistribution, or publication of this pattern, in whole or in part, is strictly prohibited.
You are welcome to sell finished items made from this pattern in small quantities. While crediting Natalina Craft as the designer is not required, it is always greatly appreciated—especially when selling online—so others can find the original pattern. Thank you for respecting these guidelines.
Crochet Tiger Applique
Crochet Applique - Tiger
Instructions
Crochet Tiger Applique
Start Here
Please read the entire pattern before starting.
- Pattern is written in US crochet terms
- This is an applique pattern, worked flat
- Use a stitch marker if helpful
Material:
- Worsted yarn in orange, black and white. (For a white tiger: white, black, and light pink)
- Small amount of black pearl cotton (mouth)
- 3.5 mm crochet hook.
- 2 black safety eyes (7.5 mm) for the eyes
- 1 black safety eye (6 mm) for the nose
- Stitch markers
- Tapestry needle
Abbreviations:
- chain (ch)
- magic ring (mr)
- single crochet (sc)
- increase (inc)
- invisible decrease (dec)
- slip stitch (sl st)
- half double crochet (hdc)
- double crochet (dc)
Yarn Used
Light worsted yarn.Sample shown uses I Love This Cotton (Hobby Lobby) and Rico Creative Cotton for the white tiger version.
How to crochet a Tiger applique?
Head
- Work in rounds; do not turn unless specified. If needed, use a stitch marker for the first stitch of each round.
With orange yarn (or white for the white tiger) and a 3.5 mm hook:
- Round 1: 6 sc in a magic ring. (6)
- Round 2: inc 6 times. (12)
- Round 3: [1 sc in next st, 1 inc in next st] x6. (18)
- Round 4: [1 sc in next 2 st, 1 inc in next st] x6. (24)
- Round 5: [1 sc in next 3 st, 1 inc in next st] x6. (30)
Place the eyes between Rounds 2 and 3, spaced by 4 stitches.
Fasten off.
Ears (make 2)
With orange yarn (or white) and a 3.5 mm hook:
- Round 1: 6 sc in a magic ring. (6)
Fasten off.
Sew the ears to the head over 2 stitches, spaced by 5 stitches.
Stripes (Head)
Using black yarn and a tapestry needle:
- Embroider 3 stripes at the top of the head, starting from the last round and extending over 2 rounds
Add 3 smaller stripes on each side, just below the ears
Exact placement does not need to be precise.
Muzzle
With white yarn and a 3.5 mm hook:
- ch 5.
- Round 1:Starting in the 2nd ch from the hook:1 sc in next 3 ch, 2 sc in last ch,working on the other side of the chain: 1 sc in next 3 ch. (8)
- Round 2:Working around the oval:1 inc, 1 sc in the next 2 st, 1 inc. (6)
- Round 2: 2 sc in the next st, 1 sc in the next 2 st, 2 sc in the next st. (6)
Sl st in next st.
Fasten off, leaving a long tail.
Insert the nose at the top center of the muzzle.Remove the nose temporarily to embroider a small mouth with black pearl cotton, then reattach the nose.
Sew the muzzle to the head.
Body
With orange yarn (or white) and a 3.5 mm hook:
- ch 7. (7)
- Row 1: starting from the 2nd ch from the hook: 1 sc in the next 6 ch. (6)
- Row 2: ch1, turn; 1 inc, 1 sc in the next 4 st, 1 inc. (8)
- Rows 3 to 9: ch1, turn; 1 sc in all st. (8)
- Row 10: ch1, turn; 1 dec, 1 sc in the next 4 st, 1 dec. (6)
- Rows 11 to 12: ch1, turn; 1 sc in all st. (6)
- Row 13: ch1, turn; 1 sc in the next 2 st, 1 dec, 1 sc in the next 2 st. (5)
- Row 14: ch1, turn; 1 sc in all st. (5)
Edging
Do not turn.Sc evenly around the body (do not crochet too tightly).Approx. 32 stitches.
Fasten off, leaving a long tail to sew the head.
Optional White Belly
With white yarn and a 3.5 mm hook:
- ch 5.
- Row 1: starting from the 2nd ch from the hook: 1 sc in the next 4 ch. (4)
- Row 2: ch1, turn; 1 sc in all st. (4)
- Row 3: ch1, turn; 1 inc, 1 sc in the next 2 st, 1 inc. (6)
- Rows 4 to 5: ch1, turn; 1 sc in all st. (6)
- Row 6: ch1, turn; 1 dec, 1 sc in the next 2 st, 1 dec. (4)
- Row 7: ch1, turn; 1 sc in all st. (4)
Fasten off, leaving a long tail.Sew to the body.
Back legs (make 2)
- Worked in rounds (feet) and then in rows (legs).
With white yarn (light pink for white tiger):
- Round 1: 5 sc in a magic ring. (5)
- Round 2: [1 inc in all st]. (10)
Change to orange yarn (or white).
- Round 3: [1 sc in the next st, 1 inc] x5. (15)
Now work in rows:
- Row 4: 1 sc in the next 3 st. (3)
- Row 5: ch1, turn; 1 sc in all st. (3)
- Row 6-7: ch1, turn; 1 sc in all st. (3)
Fasten off.
Sew the back legs behind the body so only the feet are visible from the front.
Front legs (make 2)
With orange yarn (or white):
- Round 1: 6 sc in a magic ring. (6)
- Round 2: [1 inc in the next 3 st; 1 sc in the next 3 st]. (9)
- Row 3: 1 sl st in the next st; ch1, turn; skip the sl st and make 1 sc in the next 3 st. (3)
- Row 4: ch1, turn; make 1 sc in the next 3 st. (3)
- Rows 5-11: ch1, turn; make 1 sc in the next 3 st. (3)
Fasten off.
Embroider 4 black stripes on each leg.Sew the front legs to the body.
Assembly
- Sew the head to the body
- Check alignment before securing tightly
🎉 Finished!
Your Crochet Tiger Applique is complete 🐯I hope you enjoyed making it! Don’t forget to share your work — it truly encourages me to create more patterns.
Copyright Notice
All rights reserved. This pattern and all accompanying photographs are the property of Natalina Craft and are protected by copyright law. This pattern is for personal use only. Any unauthorized reproduction, redistribution, or publication of this pattern, in whole or in part, is strictly prohibited.
You are welcome to sell finished items made from this pattern in small quantities. While crediting Natalina Craft as the designer is not required, it is always greatly appreciated—especially when selling online—so others can find the original pattern. Thank you for respecting these guidelines.
I am a fan of your crochet creations that are so fun and beautiful. I use them on clothing, pillows, blankets and also on greeting cards and gifts. Thank you for sharing. Have a very happy, healthy and hassle-free New Year. Greetings from Christel
Thank you very much for your nice words. All my best wishes for the New Year!
Thank you for sharing your talents. The tiger is cute.
Thank you very much!
Thank you for sharing your patterns. I made the Elephant and the Lion. They are adorable. I put them on blankets. Easy to follow instructions. Continue with your good work. Blessings for the year ahead.
Thank you very much for your nice words. It means a lot to me.
Do you have a moose one
Sorry for my late reply. I don’t have one right now but I can try to make one!
hermozo muchas gracias ,tienes una mente y manos maravillosas felicitaciones
Muchas Gracias!
What are the height and width of the appliques?
Judy
Hi Judy, they are about 4 inches (11 cm) tall by 3 inches wide (8 cm).
Hi Natalina,
Thank you for sharing your talents. I have a question about #6 white belly, should that be a decrease instead of the increase to achieve 4 stitches?
Regards,
Patricia
Hi Patricia,
You’re absolutely right. Thank you so much for pointing that out! I’m really sorry for the mistake and appreciate you taking the time to let me know.
Best regards,
Nathalie
is there maybe a pdf file
Thank you for asking! I don’t have a PDF file right now, but I just added a printer-friendly version at the end of the page so it’s easier to use. I hope that helps, and happy crocheting!
Do you sell the appliqués already made . I am interested in buying some for a blanket for my great grandson
What a beautiful idea for your great grandson 💛
I don’t sell finished appliqués, I am sorry.
You might want to ask a local crocheter or crochet group near you, I’m sure someone would love to help make such a special blanket.