
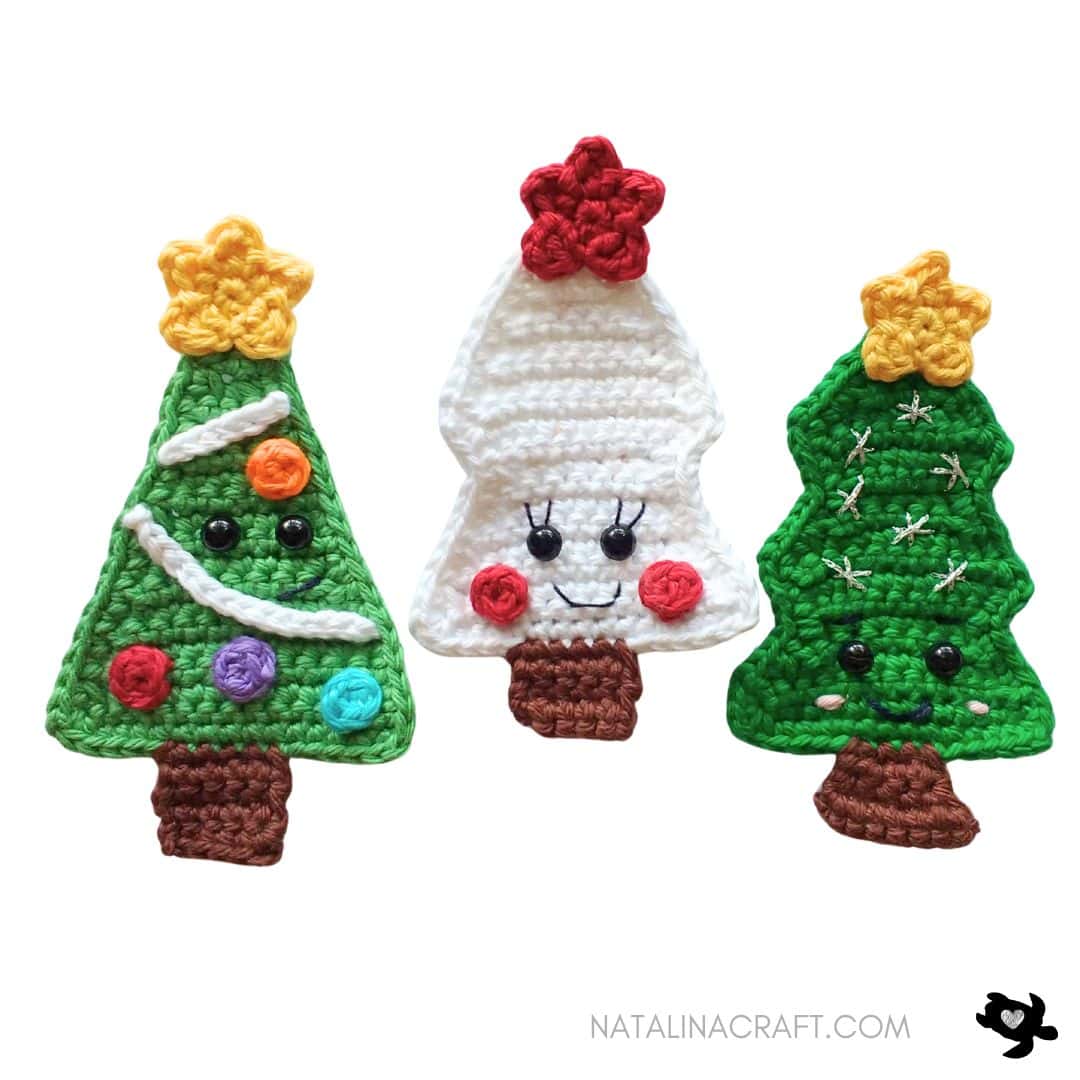
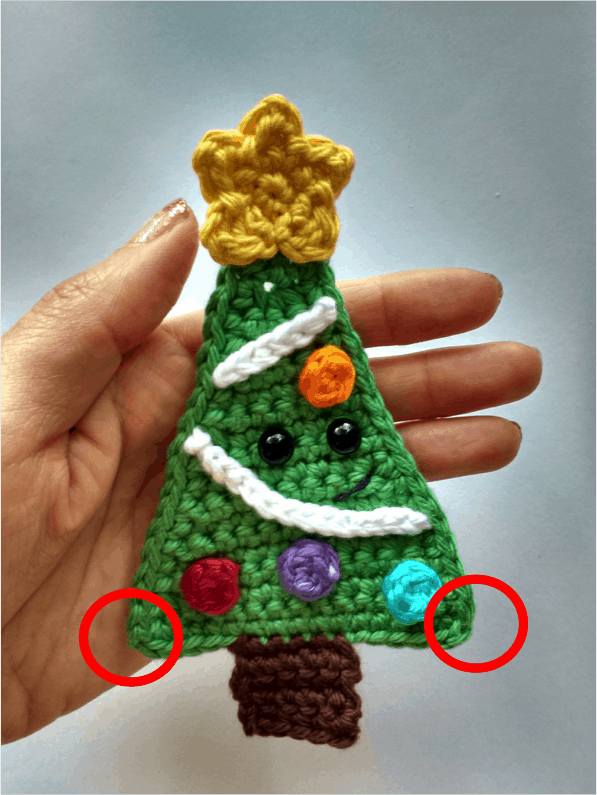
These Crochet Christmas Tree Appliques are quick, fun, and perfect for adding a festive touch to your holiday projects.
In this pattern, you’ll find three different tree designs, each with its own foliage shape, trunk style, and decorative options. You can mix and match stars, ornaments, faces, and embellishments to create your own unique Christmas trees.
These appliques are great for:
- garlands
- gift wrapping
- cards
- stockings
- bags, blankets, and wall decor
Don’t forget to join my facebook group, you can ask your questions, and share your finished projects. I will regularly ask you what pattern you would like to see next (or you can even suggest something even if I am not asking!).
I hope you enjoy this pattern and find it easy to follow. If you have any questions, feel free to write to me—I’ll do my best to help. And I would absolutely love to see your creations!
Crochet Christmas Tree Appliques
Start Here
Please read the entire pattern before starting.
- Pattern is written in US crochet terms
- This is an applique pattern (worked flat in rows)
- Use a stitch marker if helpful
- Stitch counts are approximate for the edging rounds
Finished Size
Size will vary slightly depending on yarn and tension.
Each tree is approximately 4–5 inches tall.
Material:
- Worsted yarn in the colors of your choice.
- Small amount of black pearl cotton (mouth and eyelashes)
- Small amount of glitter thread (optional, snowflakes)
- 3.5 mm crochet hook.
- 2 black safety eyes (7.5 mm) or embroider eyes
- Stitch markers
- Tapestry needle
Abbreviations:
- chain (ch)
- magic ring (mr)
- single crochet (sc)
- increase (inc)
- invisible decrease (dec)
- slip stitch (sl st)
- half double crochet (hdc)
- double crochet (dc)
Yarn Used
Light worsted yarn.
Sample shown uses I Love This Cotton (Hobby Lobby).
How to crochet a Christmas Tree applique?
Tree 1: Traditional Christmas Tree
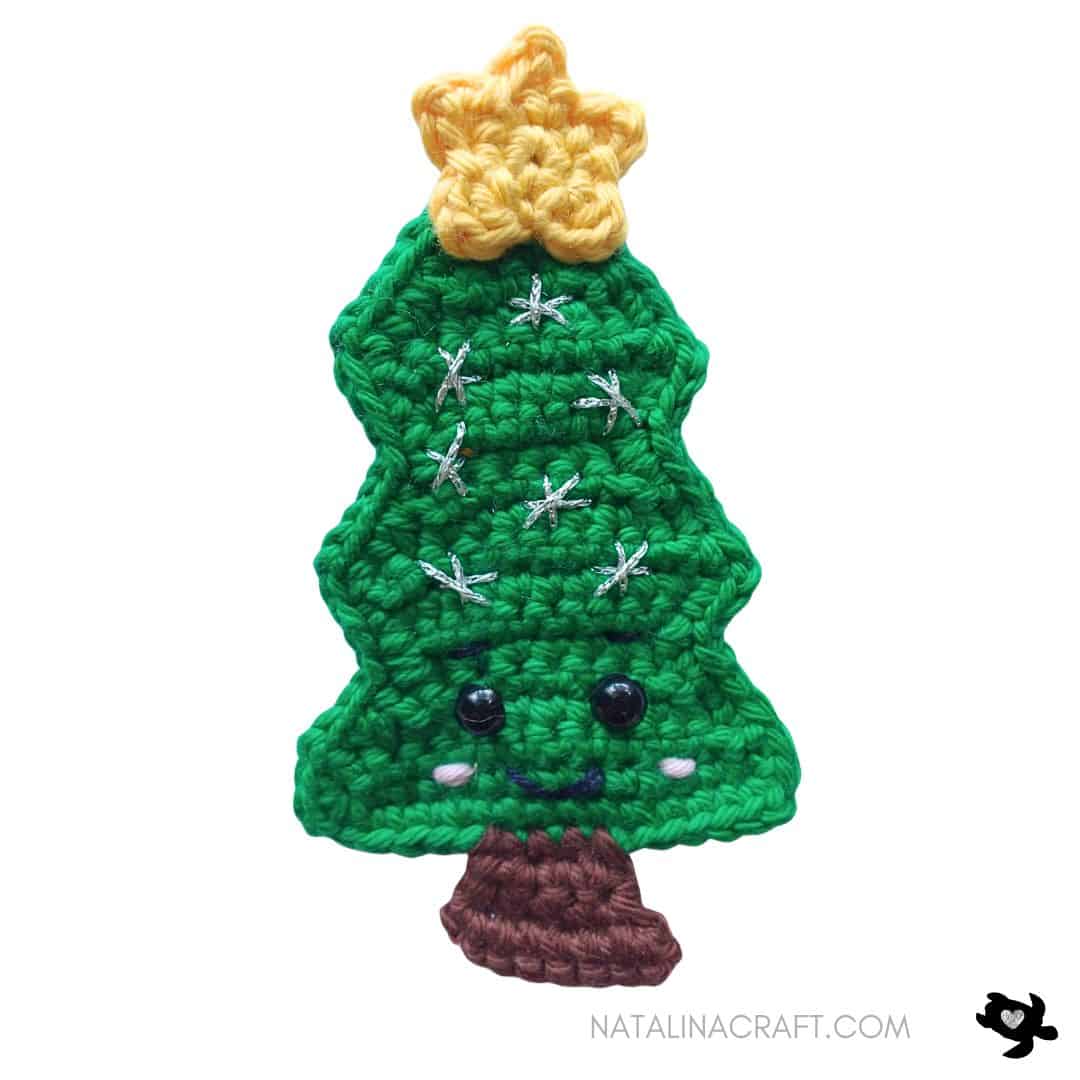
The Tree
With green yarn and a 3.5 mm hook:
- ch 15. (15)
- Row 1: starting from the 2nd ch from the hook: 1 sc in the next 14 ch. (14)
- Row 2: ch1, turn; 1 dec, 1 sc in the next 10 st, 1 dec. (12)
- Row 3: ch1, turn; 1 dec, 1 sc in the next 8 st, 1 dec. (10)
- Row 4: ch1, turn; 1 dec, 1 sc in the next 6 st, 1 dec. (8)
- Row 5: ch1, turn; 1 dec, 1 sc in the next 4 st, 1 dec. (6)
- Row 6: ch1, turn; 2 inc, 1 sc in the next 2 st, 2 inc. (10)
- Row 7: ch1, turn; 1 inc, 1 sc in the next 8 st, 1 inc. (12)
- Row 8: ch1, turn; 1 dec, 1 sc in the next 8 st, 1 dec. (10)
- Row 9: ch1, turn; 1 dec, 1 sc in the next 6 st, 1 dec. (8)
- Row 10: ch1, turn; 1 dec, 1 sc in the next 4 st, 1 dec. (6)
- Row 11: ch1, turn; 1 dec, 1 sc in the next 2 st, 1 dec. (4)
- Row 12: ch1, turn; 4 inc. (8)
- Row 13: ch1, turn; 1 inc, 1 sc in the next 6 st, 1 inc. (10)
- Row 14: ch1, turn; 1 dec, 1 sc in the next 6 st, 1 dec. (8)
- Row 15: ch1, turn; 1 dec, 1 sc in the next 4 st, 1 dec. (6)
- Row 16: ch1, turn; 1 dec, 1 sc in the next 2 st, 1 dec. (4)
- Row 17: ch1, turn; 2 dec. (2)
- Row 18: ch1, turn; 1 dec. (1)
- Row 19: ch1, turn; 1 sc. (1)
Edging
Do not turn. Sc evenly all around the tree.
In each corner stitch, work (sc, ch 1, sc) to keep the points sharp.
Finish with 1 sc at the very top.
(Approx. 70 sts)
Fasten off.

Trunk
With brown yarn:
Holding the tree upside down, join the brown yarn 5th stitch from the right side.
- Row 1: 1 sc in the st where you joined, 1 sc in next 3 sts. (4). Note: you should have 5 st of green left unworking on the left side – the trunk should be in the middle
- Rows 2-3: ch1, turn; 1 sc in the next 4 st. (4)
- Row 4: ch1, turn; 1 inc, 1 sc in the next 2 st, 1 inc. (6)
- Row 5: ch1, turn; 1 inc, 1 sc in the next 4 st, 1 inc. (8)
Fasten off.

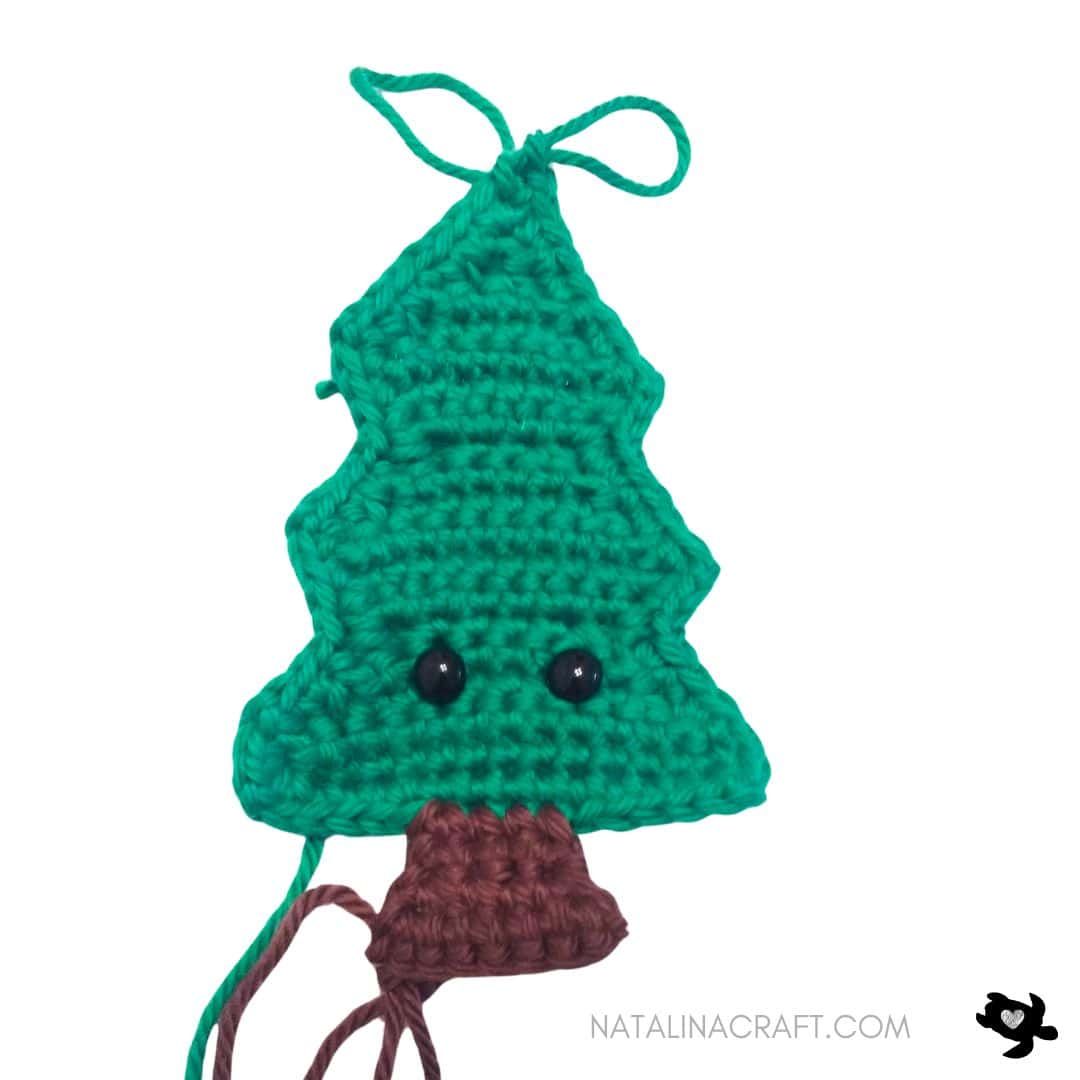
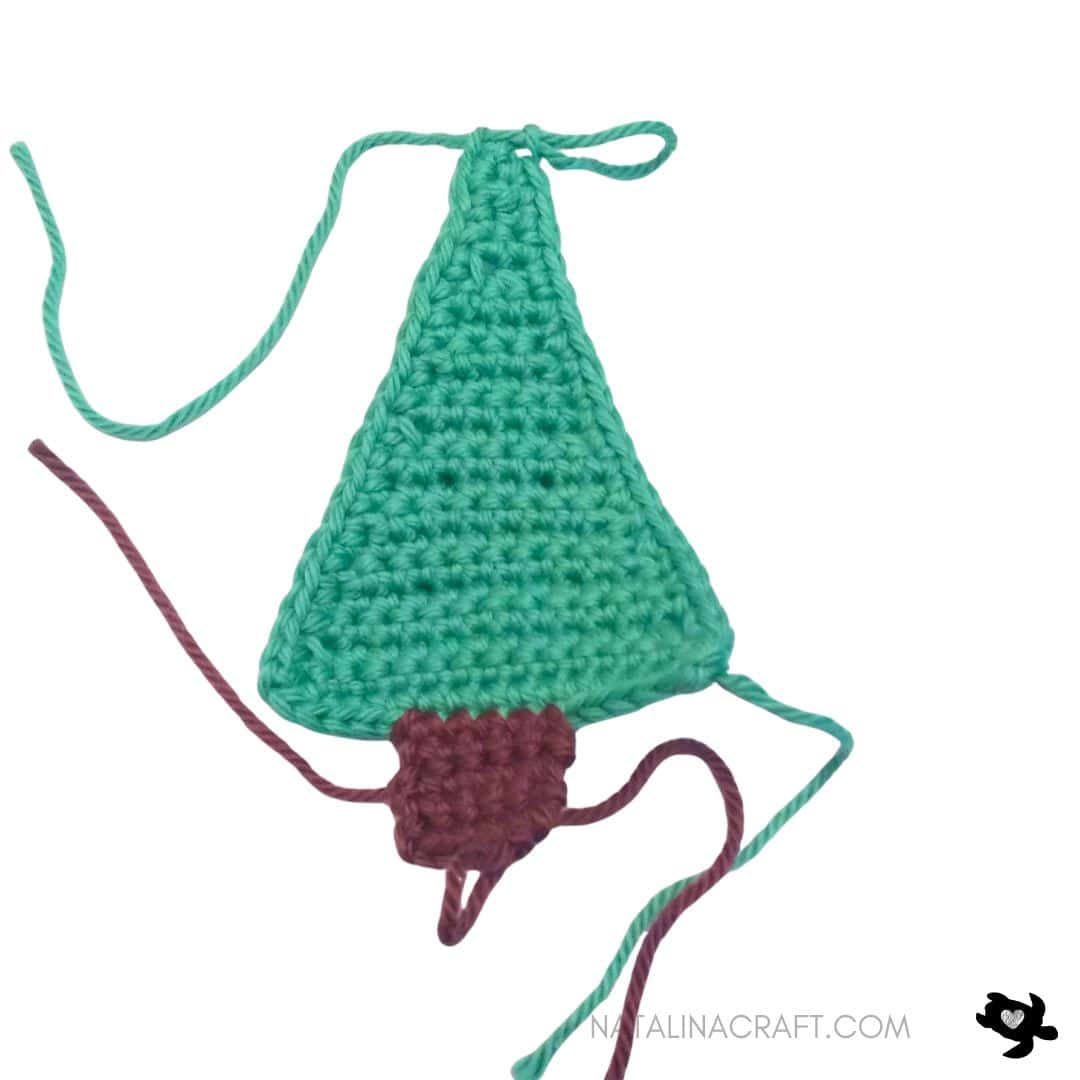
Tree 2: Triangle Christmas Tree
The Tree
With green yarn and a 3.5 mm hook:
- ch 15. (15)
- Row 1: starting from the 2nd ch from the hook: 1 sc in the next 14 ch. (14)
- Row 2: ch1, turn; 1 dec, 1 sc in the next 10 st, 1 dec. (12)
- Rows 3 to 4: ch1, turn; 1 sc in all st. (12)
- Row 5: ch1, turn; 1 dec, 1 sc in the next 8 st, 1 dec. (10)
- Rows 6 to 7: ch1, turn; 1 sc in all st. (10)
- Row 8: ch1, turn; 1 dec, 1 sc in the next 6 st, 1 dec. (8)
- Rows 9 to 10: ch1, turn; 1 sc in all st. (8)
- Row 11: ch1, turn; 1 dec, 1 sc in the next 4 st, 1 dec. (6)
- Rows 12 to 13: ch1, turn; 1 sc in all st. (6)
- Row 14: ch1, turn; 1 dec, 1 sc in the next 2 st, 1 dec. (4)
- Rows 15 to 16: ch1, turn; 1 sc in all st. (4)
- Row 17: ch1, turn; 2 dec. (2)
- Rows 18: ch1, turn; 1 sc in all st. (2)
- Row 19: ch1, turn; 1 dec. (1)
- Row 20: ch1, turn; 1 sc. (1)
Edging
Do not turn. Sc evenly all around the tree.
In each corner stitch, work (sc, ch 1, sc) to keep the points sharp.
Finish with 1 sc at the very top.
(Approx. 56 sts)
Fasten off.
Trunk
With brown yarn:
Holding the tree upside down, join the brown yarn 4th stitch from the right side.
- Row 1: 1 sc in the st where you joined, 1 sc in next 5 sts. (6). Note: you should have 4 st of green left unworking on the left side – the trunk should be in the middle
- Rows 2-6: ch1, turn; 1 sc in the next 6 st. (6)
Fasten off.
Face
- Place the eyes between Rows 9–10, spaced by 2 sts
- With a double strand of black thread, embroider a mouth over Rows 7–8
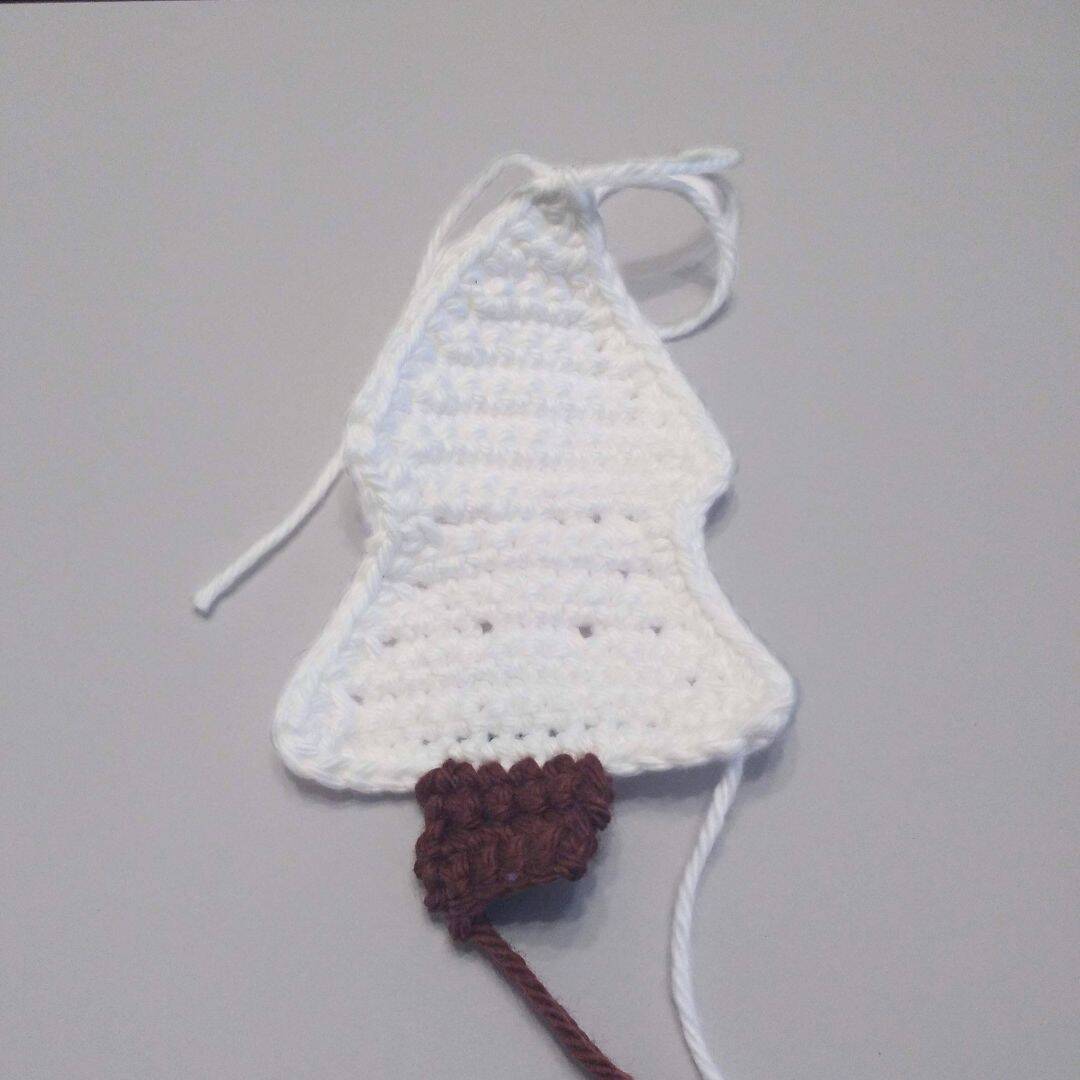
Tree 3: White Christmas Tree
The Tree
With white yarn and a 3.5 mm hook:
- ch 15. (15)
- Row 1: starting from the 2nd ch from the hook: 1 sc in the next 14 ch. (14)
- Row 2: ch1, turn; 1 dec, 1 sc in the next 10 st, 1 dec. (12)
- Row 3: ch1, turn; 1 sc in all st. (12)
- Row 4: ch1, turn; 1 dec, 1 sc in the next 8 st, 1 dec. (10)
- Row 5: ch1, turn; 1 sc in all st. (10)
- Row 6: ch1, turn; 1 dec, 1 sc in the next 6 st, 1 dec. (8)
- Row 7: ch1, turn; 1 sc in all st. (8)
- Row 8: ch1, turn; 1 dec, 1 sc in the next 4 st, 1 dec. (6)
- Row 9: ch1, turn; 2 inc, 1 sc in the next 2 st, 2 inc. (10)
- Row 10: ch1, turn; 1 inc, 1 sc in the next 8 st, 1 inc. (12)
- Row 11: ch1, turn; 1 dec, 1 sc in the next 8 st, 1 dec. (10)
- Row 12: ch1, turn; 1 sc in all st. (10)
- Row 13: ch1, turn; 1 dec, 1 sc in the next 6 st, 1 dec. (8)
- Row 14: ch1, turn; 1 sc in all st. (8)
- Row 15: ch1, turn; 1 dec, 1 sc in the next 4 st, 1 dec. (6)
- Row 16: ch1, turn; 1 sc in all st. (6)
- Row 17: ch1, turn; 1 dec, 1 sc in the next 2 st, 1 dec. (4)
- Rows 18: ch1, turn; 1 sc in all st. (2)
- Row 19: ch1, turn; 1 dec. (1)
- Row 20: ch1, turn; 1 sc. (1)
Edging
Do not turn. Sc evenly all around the tree.
In each corner stitch, work (sc, ch 1, sc) to keep the points sharp.
Finish with 1 sc at the very top.
(Approx. 62 sts)
Fasten off.

Trunk
With brown yarn:
Holding the tree upside down, join the brown yarn 4th stitch from the right side.
- Row 1: 1 sc in the st where you joined, 1 sc in next 5 sts. (6). Note: you should have 4 st of green left unworking on the left side – the trunk should be in the middle
- Rows 2-6: ch1, turn; 1 sc in the next 6 st. (6)
Fasten off.
Cheeks (make 2)
With red yarn:
- Round 1: 4 sc in mr.
Sl st, fasten off.
Sew one cheek on each side.
Copyright Notice
All rights reserved. This pattern and all accompanying photographs are the property of Natalina Craft and are protected by copyright law. This pattern is for personal use only. Any unauthorized reproduction, redistribution, or publication of this pattern, in whole or in part, is strictly prohibited.
You are welcome to sell finished items made from this pattern in small quantities. While crediting Natalina Craft as the designer is not required, it is always greatly appreciated—especially when selling online—so others can find the original pattern. Thank you for respecting these guidelines.
Crochet Christmas Tree appliques
Crochet Appliques - Christmas Trees
Instructions
Crochet Christmas Tree Appliques
Start Here
Please read the entire pattern before starting.
- Pattern is written in US crochet terms
- This is an applique pattern (worked flat in rows)
- Use a stitch marker if helpful
- Stitch counts are approximate for the edging rounds
Finished Size
Size will vary slightly depending on yarn and tension.Each tree is approximately 4–5 inches tall.
Material:
- Worsted yarn in the colors of your choice.
- Small amount of black pearl cotton (mouth and eyelashes)
- Small amount of glitter thread (optional, snowflakes)
- 3.5 mm crochet hook.
- 2 black safety eyes (7.5 mm) or embroider eyes
- Stitch markers
- Tapestry needle
Abbreviations:
- chain (ch)
- magic ring (mr)
- single crochet (sc)
- increase (inc)
- invisible decrease (dec)
- slip stitch (sl st)
- half double crochet (hdc)
- double crochet (dc)
Yarn Used
Light worsted yarn.Sample shown uses I Love This Cotton (Hobby Lobby).
How to crochet a Christmas Tree applique?
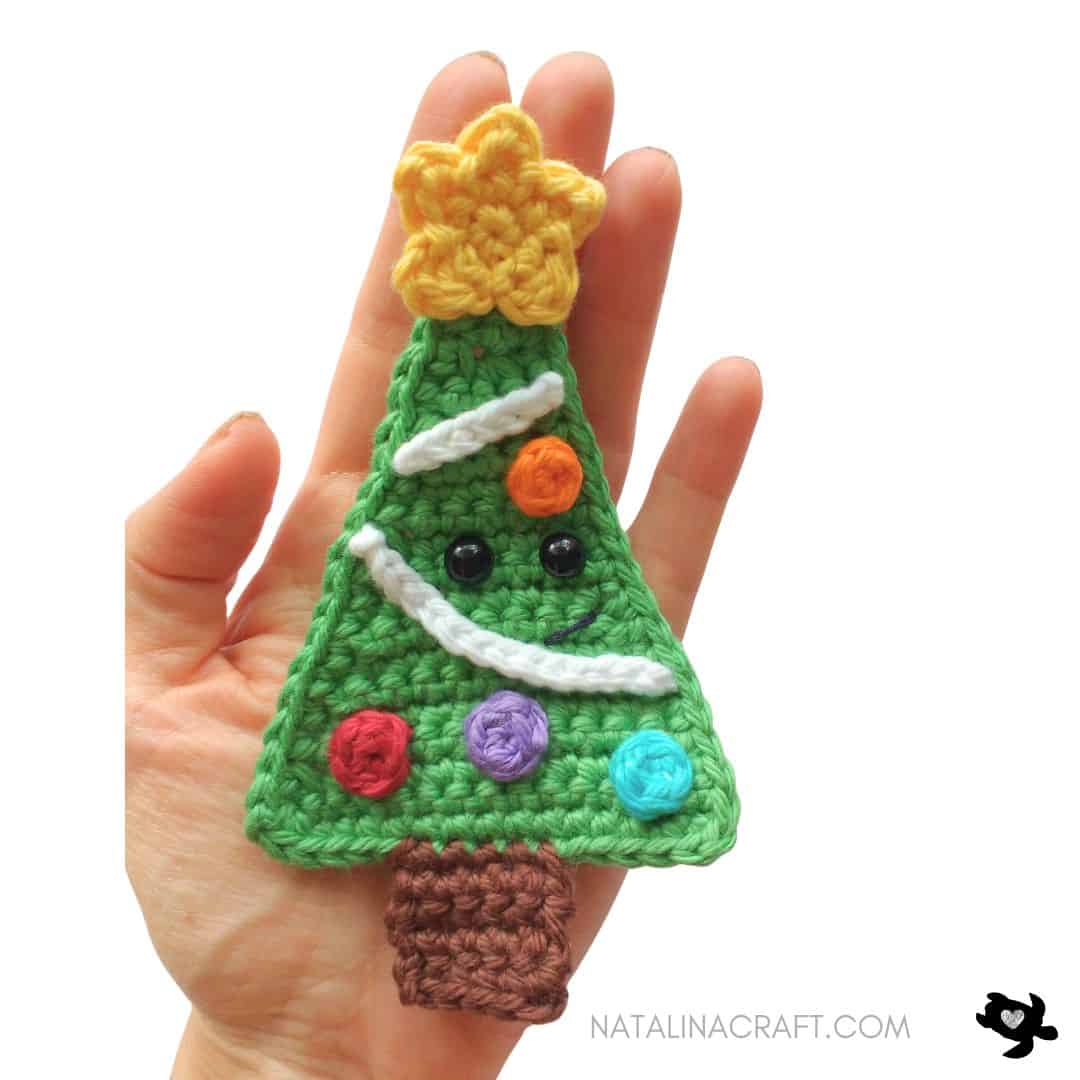
Tree 1: Traditional Christmas Tree
The Tree
With green yarn and a 3.5 mm hook:
- ch 15. (15)
- Row 1: starting from the 2nd ch from the hook: 1 sc in the next 14 ch. (14)
- Row 2: ch1, turn; 1 dec, 1 sc in the next 10 st, 1 dec. (12)
- Row 3: ch1, turn; 1 dec, 1 sc in the next 8 st, 1 dec. (10)
- Row 4: ch1, turn; 1 dec, 1 sc in the next 6 st, 1 dec. (8)
- Row 5: ch1, turn; 1 dec, 1 sc in the next 4 st, 1 dec. (6)
- Row 6: ch1, turn; 2 inc, 1 sc in the next 2 st, 2 inc. (10)
- Row 7: ch1, turn; 1 inc, 1 sc in the next 8 st, 1 inc. (12)
- Row 8: ch1, turn; 1 dec, 1 sc in the next 8 st, 1 dec. (10)
- Row 9: ch1, turn; 1 dec, 1 sc in the next 6 st, 1 dec. (8)
- Row 10: ch1, turn; 1 dec, 1 sc in the next 4 st, 1 dec. (6)
- Row 11: ch1, turn; 1 dec, 1 sc in the next 2 st, 1 dec. (4)
- Row 12: ch1, turn; 4 inc. (8)
- Row 13: ch1, turn; 1 inc, 1 sc in the next 6 st, 1 inc. (10)
- Row 14: ch1, turn; 1 dec, 1 sc in the next 6 st, 1 dec. (8)
- Row 15: ch1, turn; 1 dec, 1 sc in the next 4 st, 1 dec. (6)
- Row 16: ch1, turn; 1 dec, 1 sc in the next 2 st, 1 dec. (4)
- Row 17: ch1, turn; 2 dec. (2)
- Row 18: ch1, turn; 1 dec. (1)
- Row 19: ch1, turn; 1 sc. (1)
Edging
Do not turn. Sc evenly all around the tree.In each corner stitch, work (sc, ch 1, sc) to keep the points sharp.Finish with 1 sc at the very top.(Approx. 70 sts)
Fasten off.
Trunk
With brown yarn:
Holding the tree upside down, join the brown yarn 5th stitch from the right side.
- Row 1: 1 sc in the st where you joined, 1 sc in next 3 sts. (4). Note: you should have 5 st of green left unworking on the left side - the trunk should be in the middle
- Rows 2-3: ch1, turn; 1 sc in the next 4 st. (4)
- Row 4: ch1, turn; 1 inc, 1 sc in the next 2 st, 1 inc. (6)
- Row 5: ch1, turn; 1 inc, 1 sc in the next 4 st, 1 inc. (8)
Fasten off.
Star (use for all trees)
- Worked in round.
With yellow yarn:
- Round 1: 5 sc in a magic ring. (5)
- Round 2: [1 sl st in next st, ch 3, 1 DC in the same st] x5.
Fasten off, leave long tail. Sew to top.
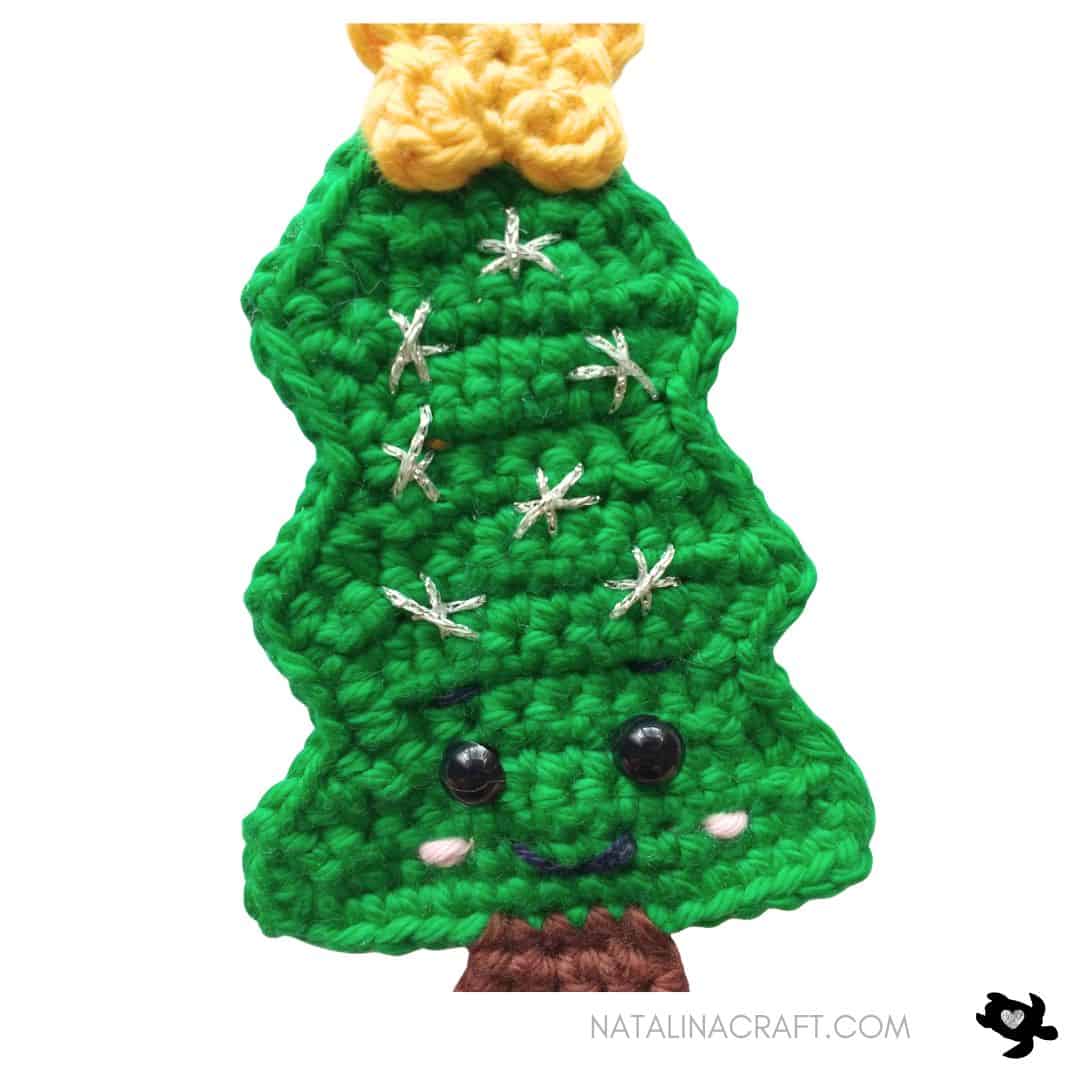
Face
- Place eyes between Rows 3–4, spaced by 3 sts
- Embroider eyebrows between Rows 5–6
- Embroider mouth over Row 3
- Add pink cheeks if desired
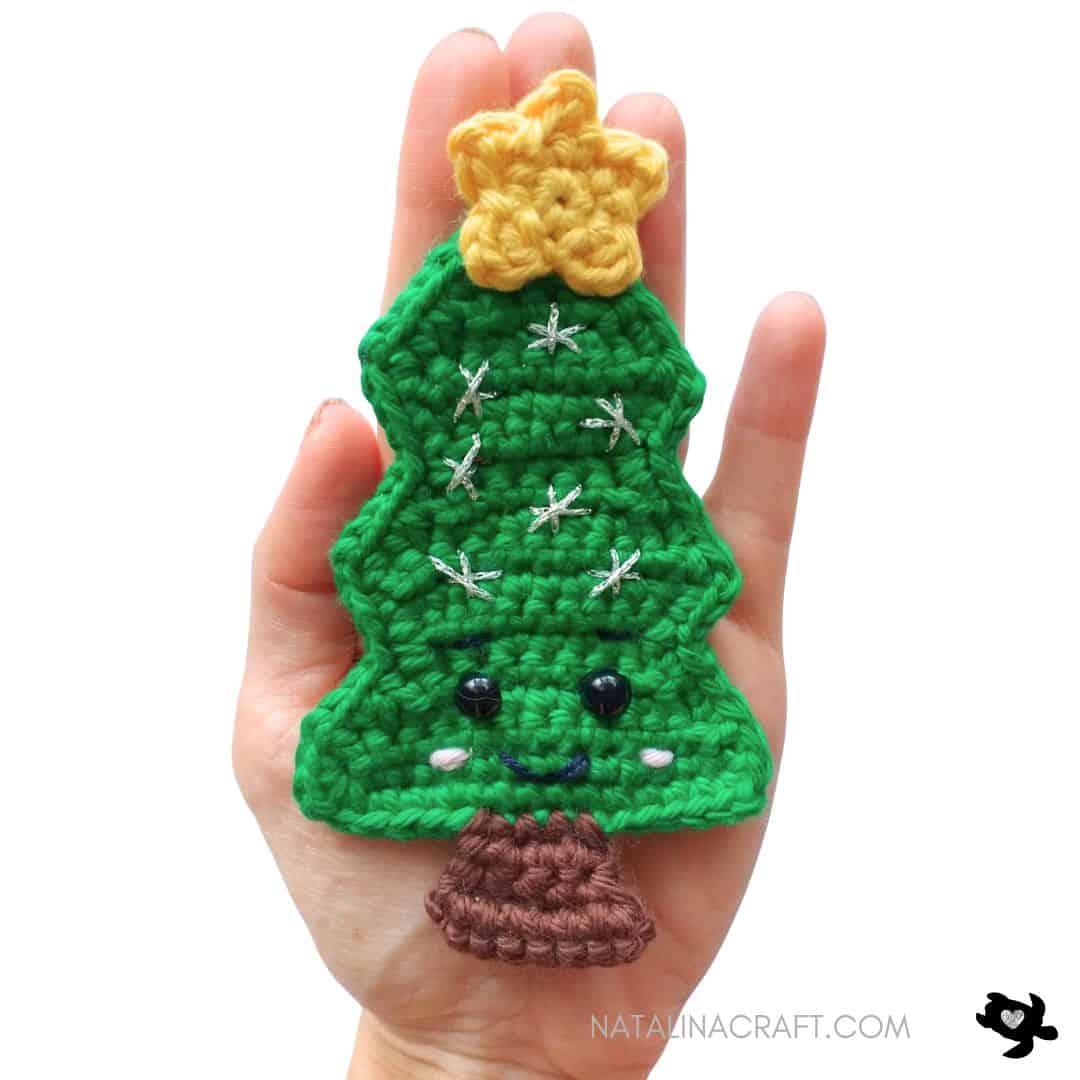
Snowflakes (optional)
With glitter thread, embroider small stars randomly on the tree.
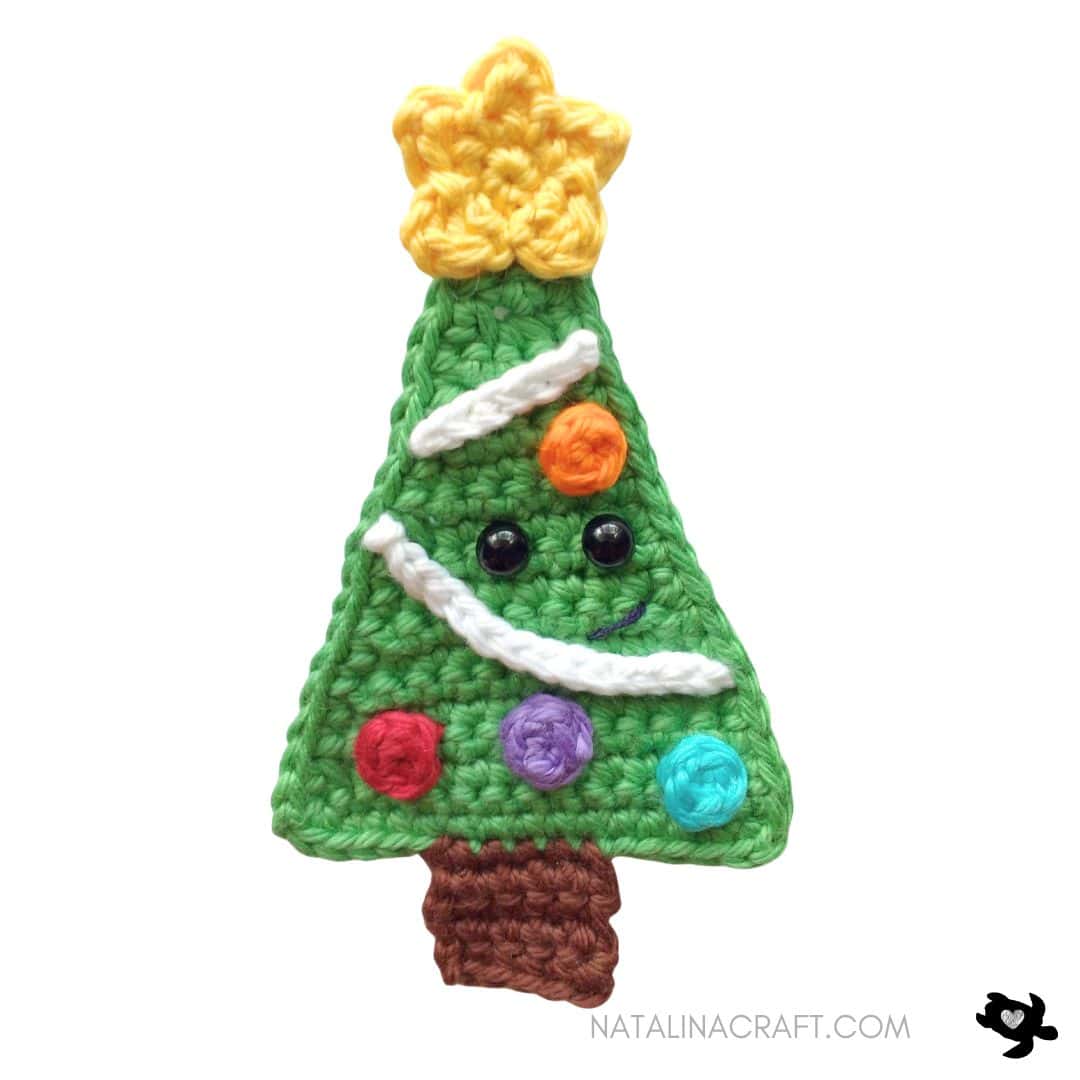
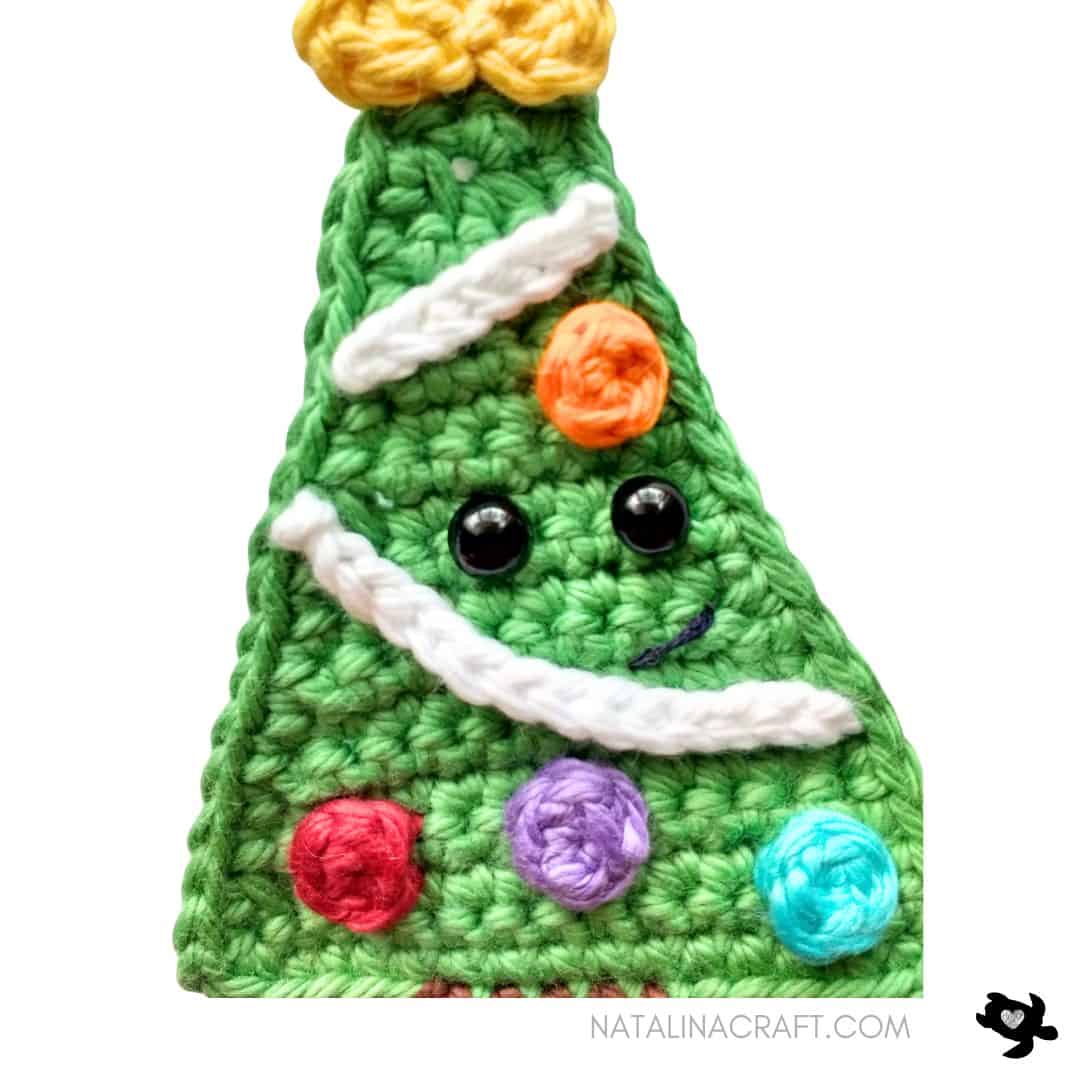
Tree 2: Triangle Christmas Tree
The Tree
With green yarn and a 3.5 mm hook:
- ch 15. (15)
- Row 1: starting from the 2nd ch from the hook: 1 sc in the next 14 ch. (14)
- Row 2: ch1, turn; 1 dec, 1 sc in the next 10 st, 1 dec. (12)
- Rows 3 to 4: ch1, turn; 1 sc in all st. (12)
- Row 5: ch1, turn; 1 dec, 1 sc in the next 8 st, 1 dec. (10)
- Rows 6 to 7: ch1, turn; 1 sc in all st. (10)
- Row 8: ch1, turn; 1 dec, 1 sc in the next 6 st, 1 dec. (8)
- Rows 9 to 10: ch1, turn; 1 sc in all st. (8)
- Row 11: ch1, turn; 1 dec, 1 sc in the next 4 st, 1 dec. (6)
- Rows 12 to 13: ch1, turn; 1 sc in all st. (6)
- Row 14: ch1, turn; 1 dec, 1 sc in the next 2 st, 1 dec. (4)
- Rows 15 to 16: ch1, turn; 1 sc in all st. (4)
- Row 17: ch1, turn; 2 dec. (2)
- Rows 18: ch1, turn; 1 sc in all st. (2)
- Row 19: ch1, turn; 1 dec. (1)
- Row 20: ch1, turn; 1 sc. (1)
Edging
Do not turn. Sc evenly all around the tree.In each corner stitch, work (sc, ch 1, sc) to keep the points sharp.Finish with 1 sc at the very top.(Approx. 56 sts)
Fasten off.
Trunk
With brown yarn:
Holding the tree upside down, join the brown yarn 4th stitch from the right side.
- Row 1: 1 sc in the st where you joined, 1 sc in next 5 sts. (6). Note: you should have 4 st of green left unworking on the left side - the trunk should be in the middle
- Rows 2-6: ch1, turn; 1 sc in the next 6 st. (6)
Fasten off.
Star
Use the same star pattern, changing color if desired.
Decorations
Tinsel:
- Small: ch 6
- Large: ch 12
Christmas Balls (make 4):
- Round 1: 4 sc in mr
- Sl st, fasten off
Sew decorations as desired.
Face
- Place the eyes between Rows 9–10, spaced by 2 sts
With a double strand of black thread, embroider a mouth over Rows 7–8
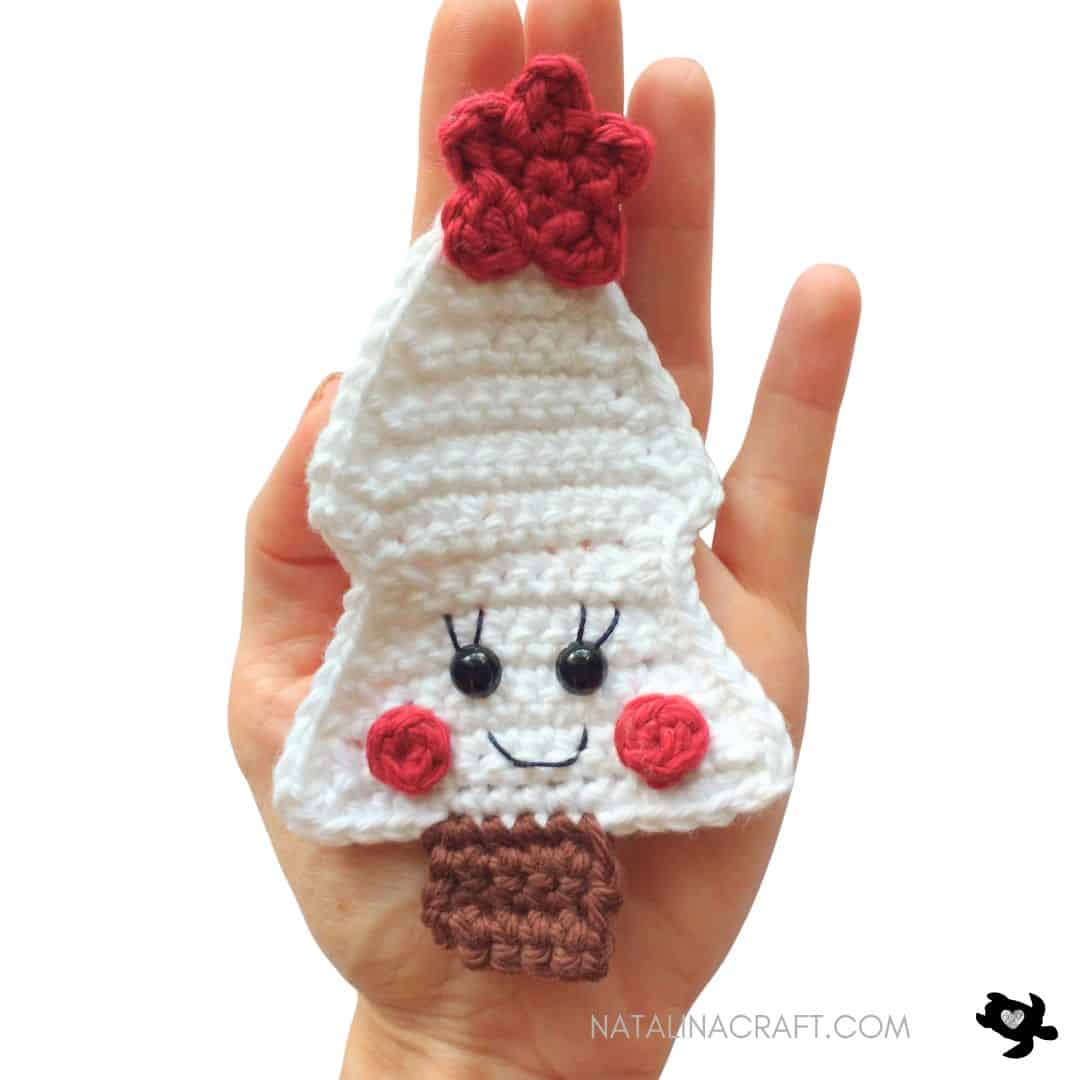
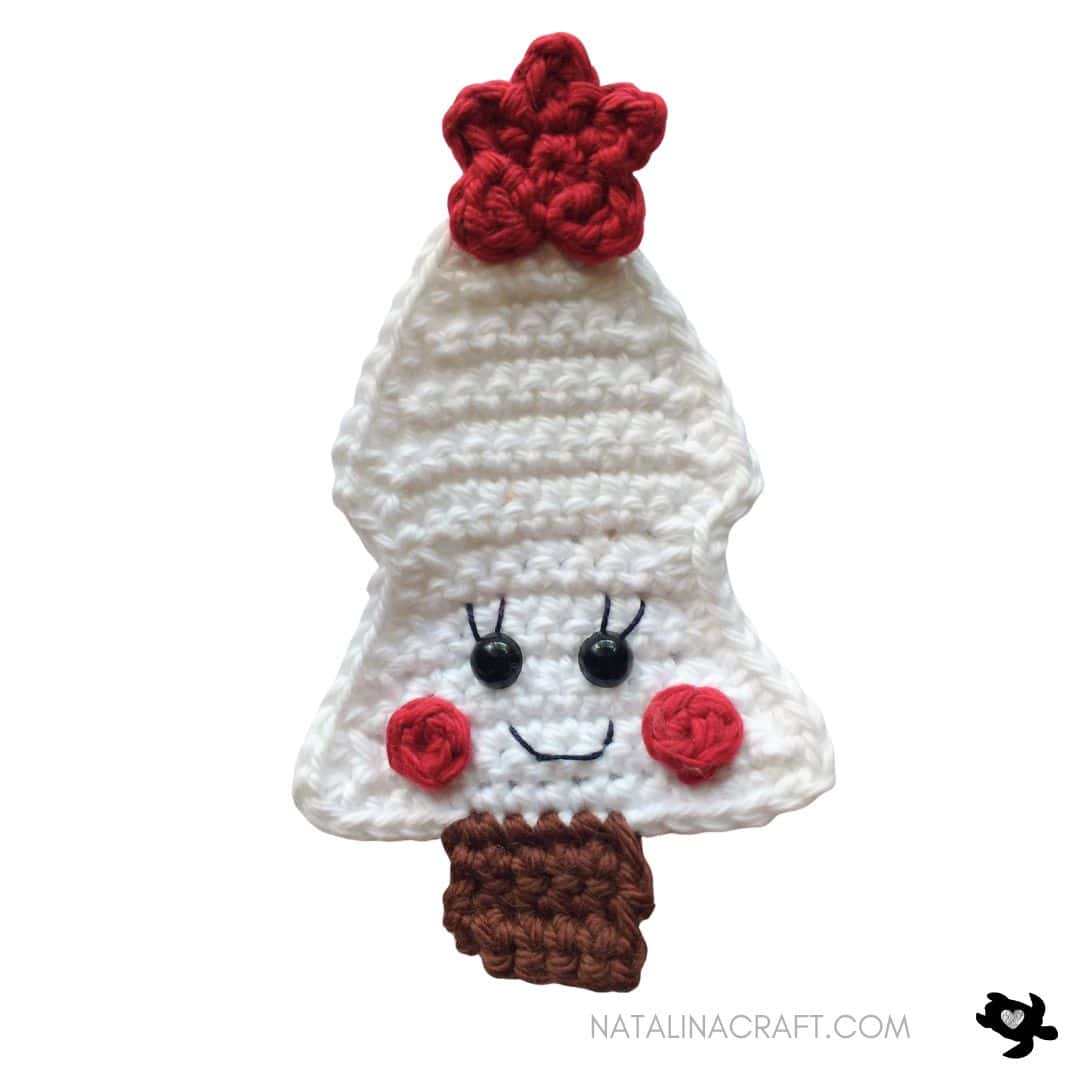
Tree 3: White Christmas Tree
The Tree
With white yarn and a 3.5 mm hook:
- ch 15. (15)
- Row 1: starting from the 2nd ch from the hook: 1 sc in the next 14 ch. (14)
- Row 2: ch1, turn; 1 dec, 1 sc in the next 10 st, 1 dec. (12)
- Row 3: ch1, turn; 1 sc in all st. (12)
- Row 4: ch1, turn; 1 dec, 1 sc in the next 8 st, 1 dec. (10)
- Row 5: ch1, turn; 1 sc in all st. (10)
- Row 6: ch1, turn; 1 dec, 1 sc in the next 6 st, 1 dec. (8)
- Row 7: ch1, turn; 1 sc in all st. (8)
- Row 8: ch1, turn; 1 dec, 1 sc in the next 4 st, 1 dec. (6)
- Row 9: ch1, turn; 2 inc, 1 sc in the next 2 st, 2 inc. (10)
- Row 10: ch1, turn; 1 inc, 1 sc in the next 8 st, 1 inc. (12)
- Row 11: ch1, turn; 1 dec, 1 sc in the next 8 st, 1 dec. (10)
- Row 12: ch1, turn; 1 sc in all st. (10)
- Row 13: ch1, turn; 1 dec, 1 sc in the next 6 st, 1 dec. (8)
- Row 14: ch1, turn; 1 sc in all st. (8)
- Row 15: ch1, turn; 1 dec, 1 sc in the next 4 st, 1 dec. (6)
- Row 16: ch1, turn; 1 sc in all st. (6)
- Row 17: ch1, turn; 1 dec, 1 sc in the next 2 st, 1 dec. (4)
- Rows 18: ch1, turn; 1 sc in all st. (2)
- Row 19: ch1, turn; 1 dec. (1)
- Row 20: ch1, turn; 1 sc. (1)
Edging
Do not turn. Sc evenly all around the tree.In each corner stitch, work (sc, ch 1, sc) to keep the points sharp.Finish with 1 sc at the very top.(Approx. 62 sts)
Fasten off.
Trunk
With brown yarn:
Holding the tree upside down, join the brown yarn 4th stitch from the right side.
- Row 1: 1 sc in the st where you joined, 1 sc in next 5 sts. (6). Note: you should have 4 st of green left unworking on the left side - the trunk should be in the middle
- Rows 2-6: ch1, turn; 1 sc in the next 6 st. (6)
Fasten off.
Star
Use the same star pattern, changing color if desired.
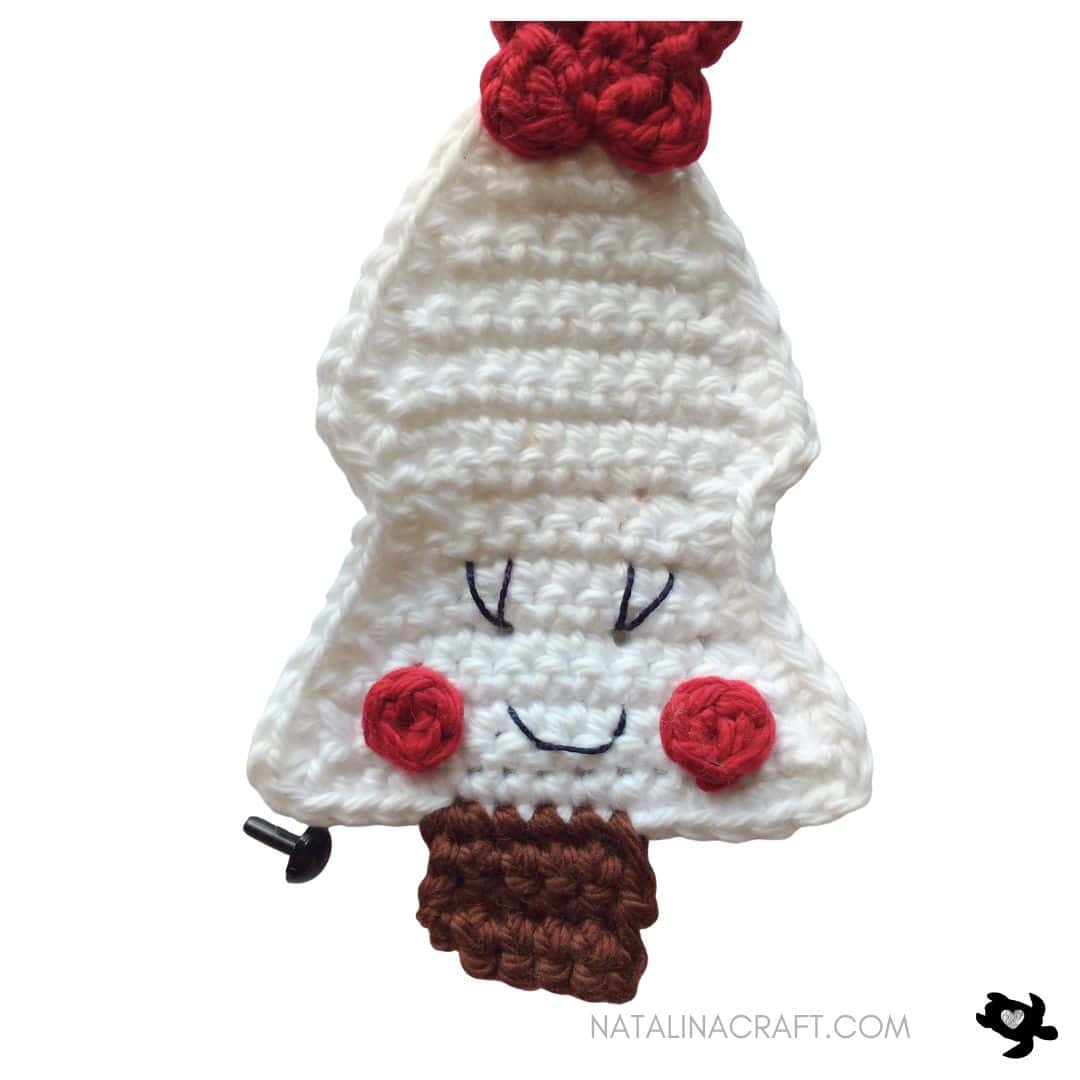
Face
- Place the eyes between Rows 4–5, spaced by 3 sts
- Embroider eyelashes before securing eyes
- With a double strand of black thread, embroider a mouth over Rows 2-3
Cheeks (make 2)
With red yarn:
- Round 1: 4 sc in mr.Sl st, fasten off.
Sew one cheek on each side.
🎉 Finished!
All done!I hope you enjoyed making these Crochet Christmas Tree Appliques 🎄Don’t forget to share your creations — I love seeing your work!
Copyright Notice
All rights reserved. This pattern and all accompanying photographs are the property of Natalina Craft and are protected by copyright law. This pattern is for personal use only. Any unauthorized reproduction, redistribution, or publication of this pattern, in whole or in part, is strictly prohibited.
You are welcome to sell finished items made from this pattern in small quantities. While crediting Natalina Craft as the designer is not required, it is always greatly appreciated—especially when selling online—so others can find the original pattern. Thank you for respecting these guidelines.
Crochet Christmas Tree appliques
I would like to know how big these applique christmas tree ornaments are? I would love to make some and if I use a bigger crochet hook what size do your recommend?
I am so sorry I somehow missed your message. I would say you can use a size up. I have not the appliqués with me right now but they are about 5 inches.
Why can’t I print the patterns for the trees
Hi, I am sorry. Are you looking for a pdf printable version? I do not have any yet but I am thinking about making it.
MAgnifique guirlande de Noel, en si prenant à l’avance, mais trop de cadeaux à faire, je vais commencer ma guirlande Merci bravo
Merci beaucoup!
They are adorable!! Thank you so much!! Ü
Thank you very much!
These were so much fun to make! Thank you for the easy but adorable pattern.
Thank you very much for your kind words.