
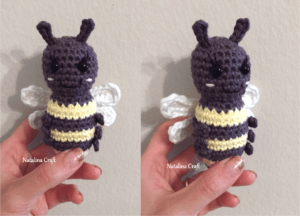
Find here a free pattern to make this adorable little honey bee.
What do you think about this crochet little bee? I promised last summer that I will make more crochet bugs but I have been quite busy with other projects. But here is a new one! What would you like to see next? I was thinking about a crochet bumble bee or maybe an ant. Let me know if you have any suggestions!
Don’t forget to join my facebook group, you can ask your questions, share your finished projects and I will regularly ask you what pattern you would like to see next (or you can even suggest something even if I am not asking! I don’t promise I will do everything but I will try).
I hope you will enjoy and understand the pattern. If you have any questions, feel free to write to me. And I would love to see your work!


Crochet Bee
Material:
- Yarn calling for 5,5 mm hook in: yellow and grey (or black – I used grey to be able to see better the eyes), and a very small amount in pink for the cheeks.
- A very small amount of pearl cotton in black (for the eyelashes and the mouth)
- Size 3.5 mm crochet hook.
- 2 black safety eyes (7.5 mm)
- Stitch markers
- Tapestry needle
Abbreviations:
- chain (ch)
- magic ring (mr)
- single crochet (sc)
- increase (inc)
- invisible decrease (dec)
- slip stitch (sl st)
- half double crochet (hdc)
- double crochet (dc)
What did I use?
Light worsted yarn.
I used « I love this cotton» from Hobby Lobby.
Pattern: How to crochet a honey bee?
The body and head
With the grey yarn and the 3.5 mm hook
Work in rounds, do not turn unless specified. If needed, use a stitch marker for the first stitch of each round.
We start by the bottom of the body and finish by the head.
Round 1: start 6 sc in a magic ring. (6)
Round 2: [1 sc in next st, 1 inc in next st] x3. (9)
Round 3: [1 sc in next 2 st, 1 inc in next st] x3. (12)
Change for the yellow yarn.
Round 4: [1 sc in next st, 1 inc in next st] x6. (18)
Round 5: [1 sc in all st]. (18)
Change for the grey yarn.
Round 6: [1 sc in next 2 st, 1 inc in next st] x6. (24)
Round 7: [1 sc in all st]. (24)
Change for the yellow yarn.
Rounds 8 and 9: [1 sc in all st]. (24)
Change for the grey yarn.
Rounds 10 and 11: [1 sc in all st]. (24)
Change for the yellow yarn.
Rounds 12 and 13: [1 sc in all st]. (24)
Change for the grey yarn.
Round 14: [1 sc in next 2 st, 1 dec in next st] x6. (18)
Round 15: [1 sc in next st, 1 dec in next st] x6. (12)
Round 16: [1 sc in next st, 1 inc in next st] x6. (18)
Fill the body with poly-fil.
Round 17: [1 sc in next 2 st, 1 inc in next st] x6. (24)
Rounds 18 to 21: [1 sc in all st]. (24)
Round 22: [1 sc in next 2 st, 1 dec in next st] x6. (18)
Decide where to place the eyes (I put them between Rounds 19 and 20, spaced by 3 st) but do not fix them yet. First, take your tapestry needle and the black yarn to make some eyelashes. Then put the eyes back and fix them.
Make a mouth below the eyes and with the pink yarn, make 2 little cheeks on each side of the mouth (cheeks between rounds 17 and 18).

Round 23: [1 sc in next st, 1 dec in next st] x6. (12)
Fill the head.
Round 24: [6 dec]. (6)
Close the head and fasten off.

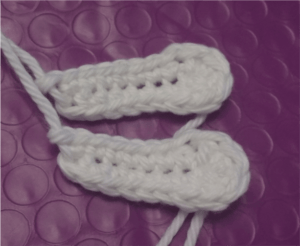
Legs (make 6) :

With a 3 mm crochet and the grey yarn.
Row 1: ch 8. (8)
Row 2: starting in the 4th ch from the hook: sl st in the next 5 ch. (5)
Leave a long tail, cut the yarn. Once you have done the 6 legs, place and sew them on each side of the body (3 on each side).

Wings :
Large wings (make 2):
With a 3 mm crochet and the white yarn.
Row 1: ch 9. (9)
Row 2: starting in the 2nd ch from hook, 1 sc in next 7 ch (place stitch marker in the first sc), make 4 hdc in next last ch. Now working on the other side of the chain: 1 sc in next 7 st, 1 sl st in first sc (the first sc with the stitch marker).
Leave a long tail, cut the yarn.
Small wings (make 2):

With a 3 mm crochet and the white yarn.
Row 1: ch 8. (8)
Row 2:starting in the 2nd ch from hook, 1 sc in next 6 ch (place stitch marker in the first sc), make 4 hdc in next last ch. Now working on the other side of the chain: 1 sc in next 6 st, 1 sl st in first sc (the first sc with the stitch marker).
Leave a long tail, cut the yarn.
Once you have done all the wings, place and sew them on the back of the body just as shown in the picture with the large ones at the top and the small one at the bottom.


Antenna (make 2) :

With a 3 mm crochet and the grey yarn.
Row 1: ch 6. (6)
Row 2: starting in the 4th ch from the hook: 3 sl st in the next 3 ch.
Leave a long tail, cut the yarn. Once you have done both, place and sew them on the top of the head between rounds 2 and 3.


Congratulations, your little crochet bee is finished!


All rights reserved.
The pattern and photographs contained in this document are the property of Natalina Craft. This pattern is available for personal use only. No unauthorized reproduction, in whole or in part, or distribution of this pattern or content is allowed.
You may sell finished items in limited amounts. If you sell your finished products online, I would be grateful if you can add a statement saying « Pattern by Natalina Craft » and link back to my post.
You might also like:


Crochet Honey Bee