
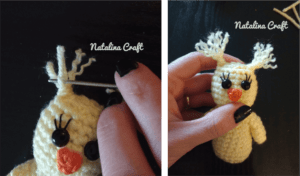
Find here a free crochet pattern chick. I called it: Big eyes chick amigurumi.
Hello everyone! Following the success of my big eyes crochet bunny, I have decided to design a new crochet Easter pattern with this crochet chick. I love small amigurumi, they are just the cutest. And with a toddler at home who does not sleep, quick and easy crochet projects are just perfect for me. This big eyes baby crochet chick is only 3.5 inches tall.
Please feel free to contact me if you have any questions or suggestions! And feel free to share the link to this pattern on social media, as it really does help to support me as a designer. Your support means so much to me!


Size :
3.5” / 10 cm tall.
Material:
• 1 type of yarn calling for 5,5 mm (US I-9) hook in orange and yellow. You will also need a small amount of black embroidery skein for the eyelashes.
• Size 3.5 mm crochet hook
• Tapestry needle
• 7.5 mm black safety eyes
• Poly-fill stuffing

What did I use?
Light worsted yarn in white and yellow.
I used «Stylecraft – special aran».
Abbreviations:
• chain (ch)
• single crochet (sc)
• double crochet (dc)
• half double crochet (hdc)
• increase (inc)
• decrease (dec)
• slip stitch (sl st)
My official tester was really happy with them and they were the perfect size for his fire truck! He is obsessed with trucks so they q “firechick” and a “firebunny” was totally normal!


Let’s start!
PART 1: The wings (make 2)
Work in rounds, do not turn unless specified. If needed, use a stitch marker for the first stitch of each round.
With a 3.5 mm crochet and the yellow yarn.
Round 1: start 4 sc in a magic ring. (4)
Round 2: [1 sc in next st, 1 inc] x2. (6)
Round 3: [1 sc in next 2 st, 1 inc] x2. (8)
Rounds 4 to 5: 1 sc in all st. (8)
Leave a long tail, cut the yarn and keep them for later.
PART 2: The body and head
Work in rounds, do not turn unless specified. If needed, use a stitch marker for the first stitch of each round.
With a 3.5 mm crochet and the yellow yarn.
With start by the bottom of the body to finish by the top of the head.
Round 1: start 6 sc in a magic ring. (6)
Round 2: [6 inc]. (12)
Round 3: [1 sc in next st, 1 inc] x6. (18)
Round 4: [1 sc in next 2 st, 1 inc] x6. (24)
Round 5 : 1 sc in all st. (24)
Round 6: [1 sc in next 2 st, 1 dec] x6. (18)
Rounds 7 to 10 : 1 sc in all st. (18)
It is now time to join the wings.

Round 11: [1 sc in next 3 st; take and join the first wing as follow: insert your crochet hook in 1 st of the wing (from the inside of the wing – it does not matter which st) and in the next st of the body, make 1 sc. Repeat the same thing for the next 2 st; now keep working on the body only and make 1 sc in the next 6 st; take and join the second wing as follow: insert your crochet hook in 1 st of the wing (from the inside of the wing) and in the next st of the body, make 1 sc. Repeat the same thing for the next 2 st; now keep working on the body only and make 1 sc in the next 3 st]. (18)
Round 12: [1 sc in next 3 st; now working in the st from the first wing only (this time we work the st from the outside as normal): 1 sc in the next 3 st; keep working on the body only and make 1 sc in the next 6 st; now working in the st from the second wing only (as before this time we work the st from the outside as normal): 1 sc in the next 3 st; keep working on the body only and make 1 sc in the next 3 st]. (18)
Round 13: [1 sc in next st, 1 dec] x6. (12)
Fill the body.
Round 14: [1 sc in next st, 1 inc] x6. (18)
Round 15: [1 sc in next 2 st, 1 inc] x6. (24)
Rounds 16 to 19 : 1 sc in all st. (24)
Round 20: [1 sc in next 2 st, 1 dec] x6. (18)
Round 21: 1 sc in all st. (18)
Now check where you want to put the eyes but do not fix them yet. I put mine between round 18 and 19, spaced by 3 st. Then with your tapestry needle and the black yarn, make eyelashes (3 for each eye). You can now fix the safety eyes.


Fill the head.
Round 22: [1 sc in next st, 1 dec] x6. (12)
Round 23: [6 dec]. (6)
Leave a long tail, cut the yarn and close the head.
In order to make the “hair”, cut 4 lengths of yarn of about 5 inches (12 cm). Insert your crochet under the stitches where you want to attach the “hair” and grab the middle of 2 strands, bringing it through the head. Now with your hands, wrap both ends of the strand and pull them through the loop. Repeat the same work for the other side of the head. Cut the yarn to a length of your choice. With your tapestry needle, separate the yarn.


PART 3: The beak


With a 3.5 mm crochet and the orange yarn.
Row 1: ch. 3. (3)
Row 2: from the second ch of the hook: 1 dec. (1)
Leave a long tail and cut the yarn and sew the beak under the eyes.
PART 4: The foot (make 2)
Work in rounds, do not turn unless specified. If needed, use a stitch marker for the first stitch of each round.
With a 3.5 mm crochet and the orange yarn.
Round 1: start 4 sc in a magic ring. (4)
Round 2: [4 inc]. (8)
Round 3: 1 sc in all st. (8)
Cut the yarn.
Fold the foot (make them flat), sew the opening.

Attach the foot under the body.


PART 5: The tail
Work in rounds, do not turn unless specified. If needed, use a stitch marker for the first stitch of each round.
With a 3.5 mm crochet and the yellow yarn.
Round 1: start 6 sc in a magic ring. (6)
sl st in the next st.
Fold in half and sew the tail to the back of the body.

Your crochet baby chick is now done. How cute is she? I just want to make a whole bunch of them! Thank you for your interest in my pattern! If you made it, please be sure to tag @natalinacraft on social media with the hashtag #natalinacraft, I would love to see your work!
You can find the pattern for the Big eyes crochet bunny here!


All rights reserved.
The pattern and photographs contained in this document are the property of Natalina Craft. This pattern is available for personal use only. No unauthorized reproduction, in whole or in part, or distribution of this pattern or content is allowed.
You may sell finished items in limited amounts. If you sell your finished products online, I would be grateful if you can add a statement saying « Pattern by Natalina Craft » and link back to my post.


Crochet chick amigurumi – Free pattern: Big eyes baby chick