
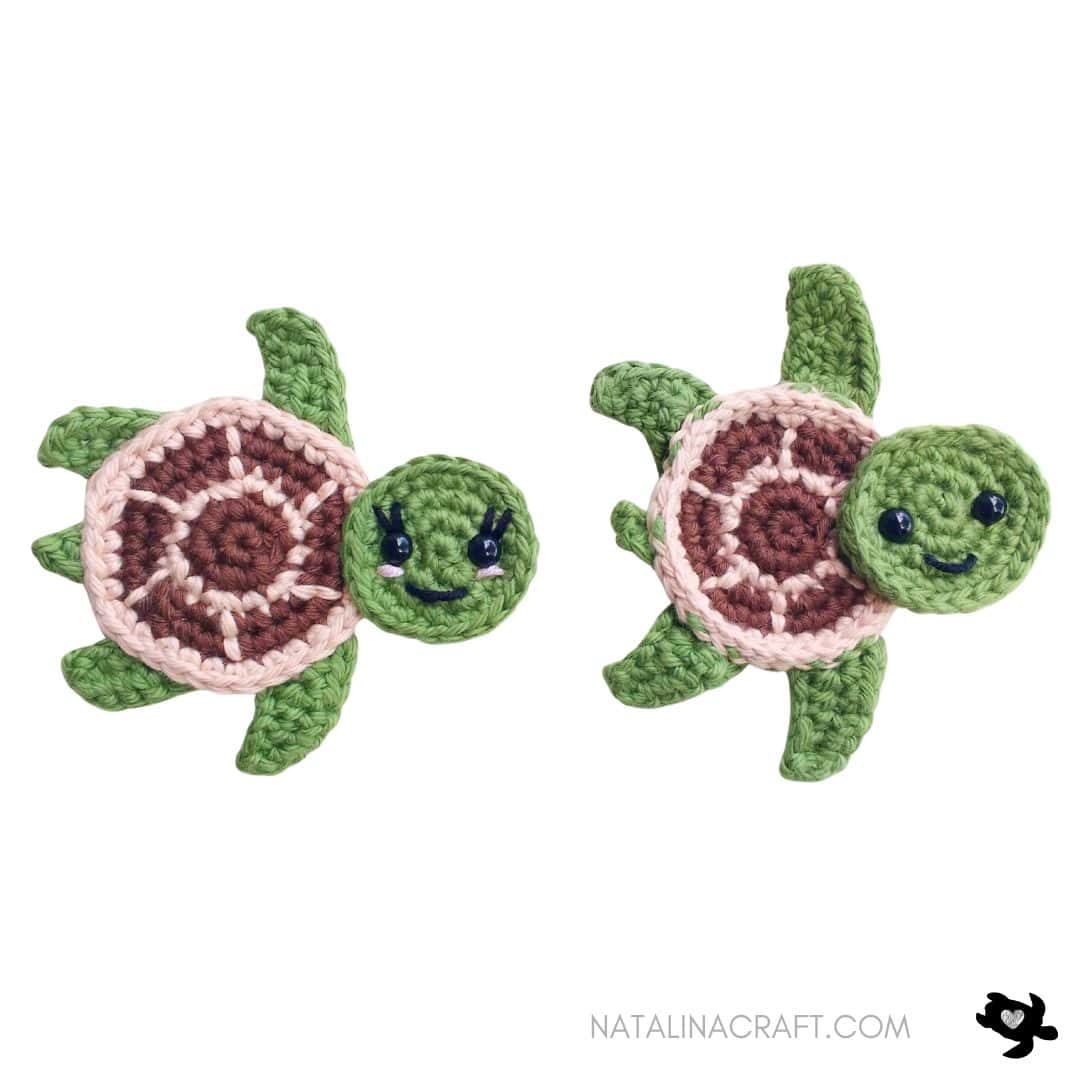
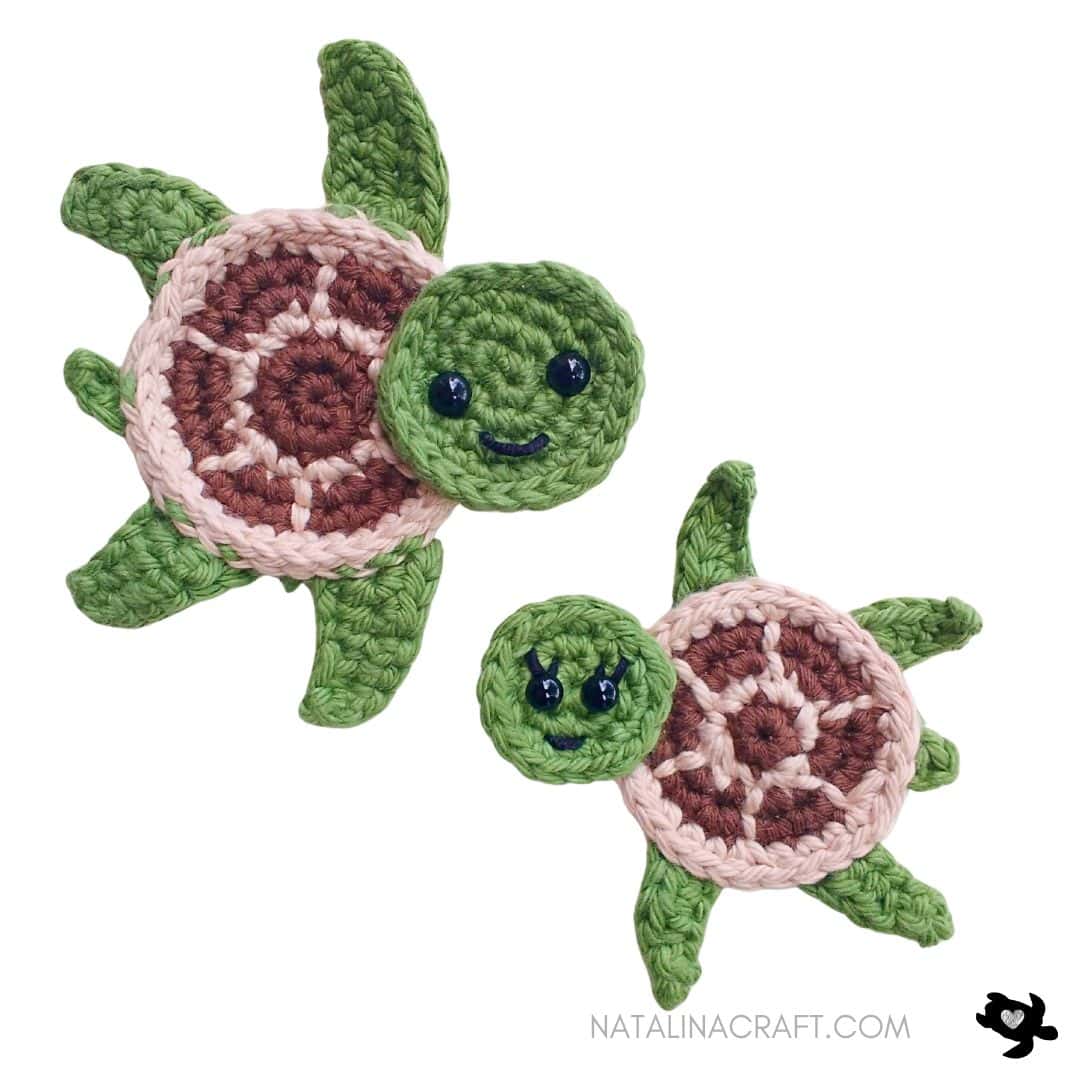
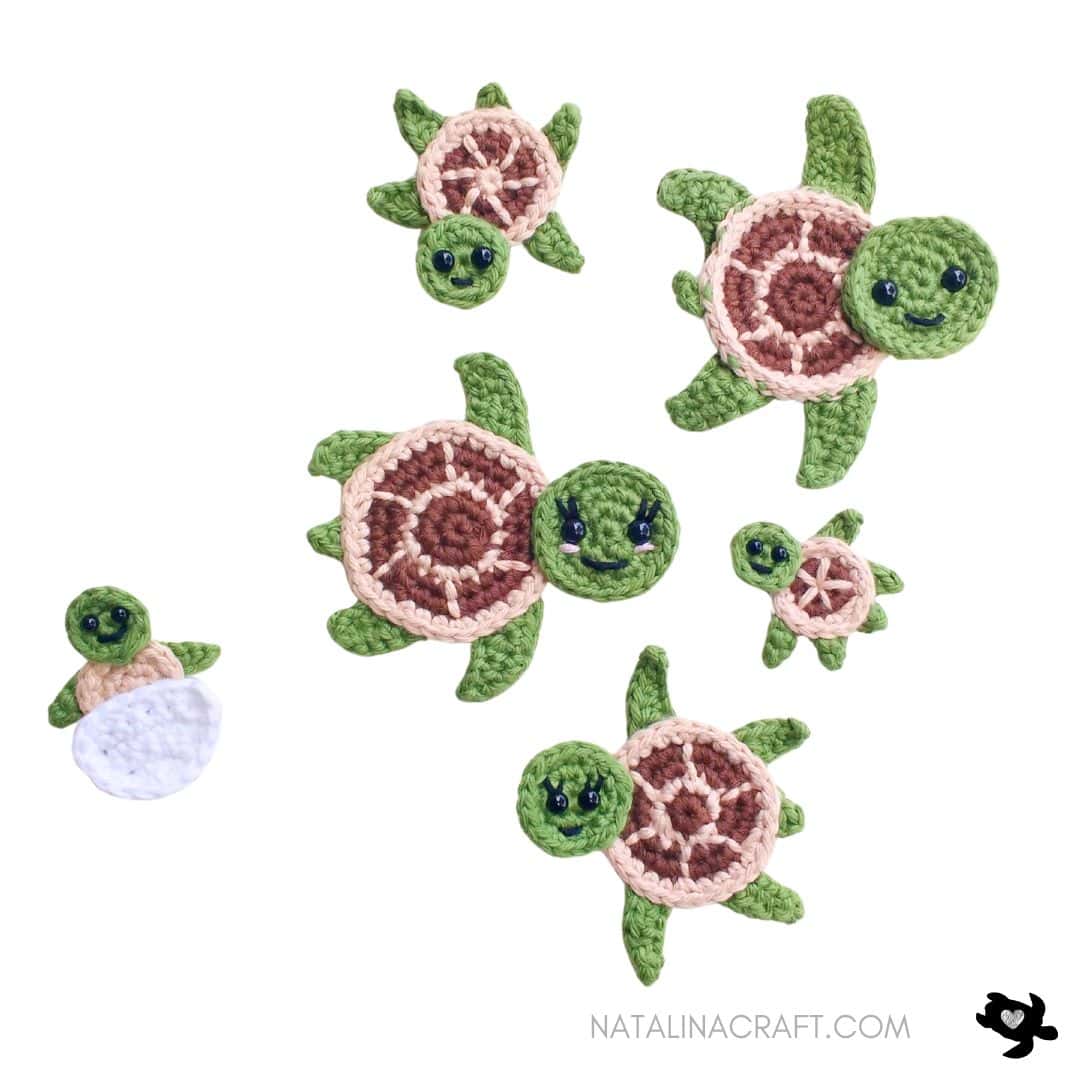
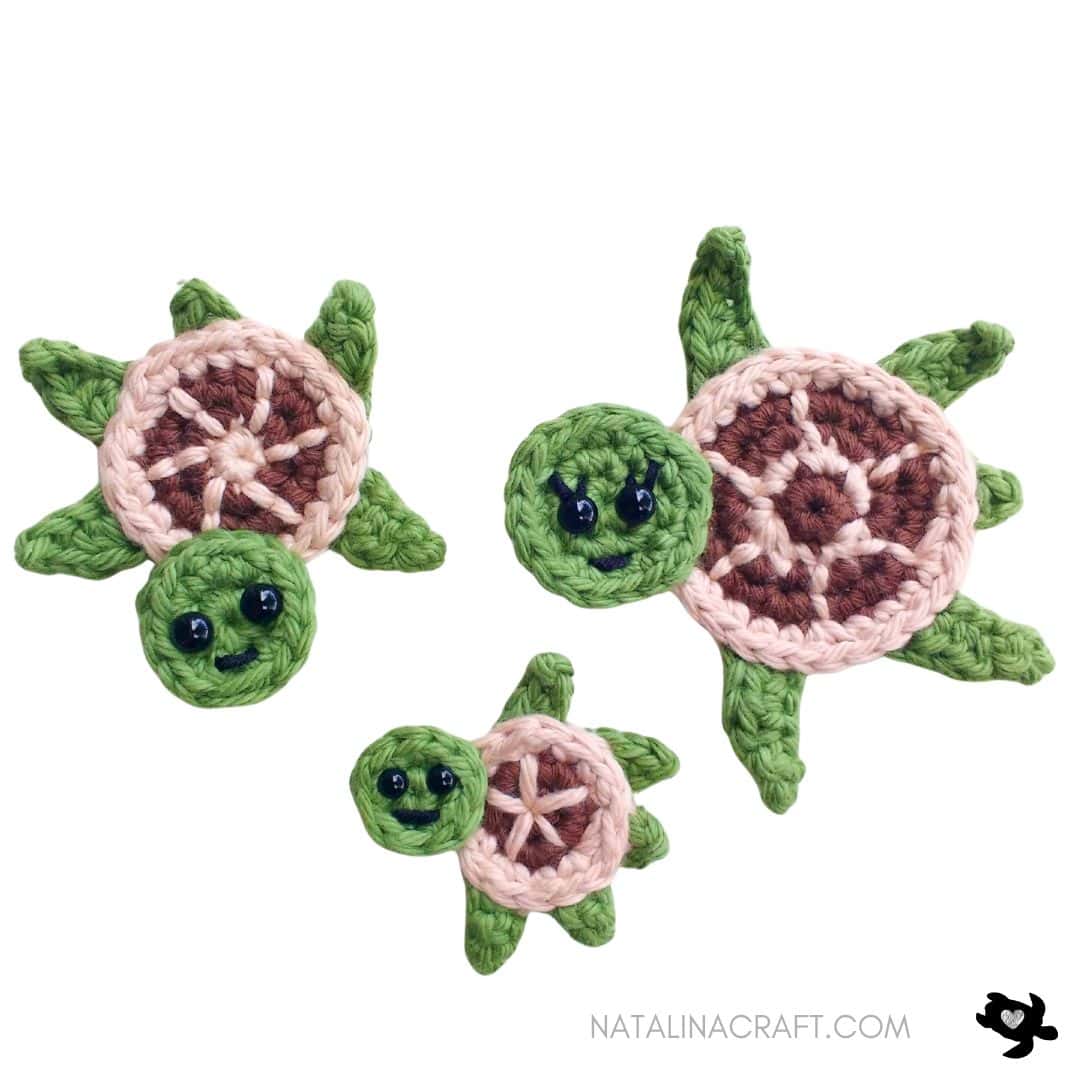
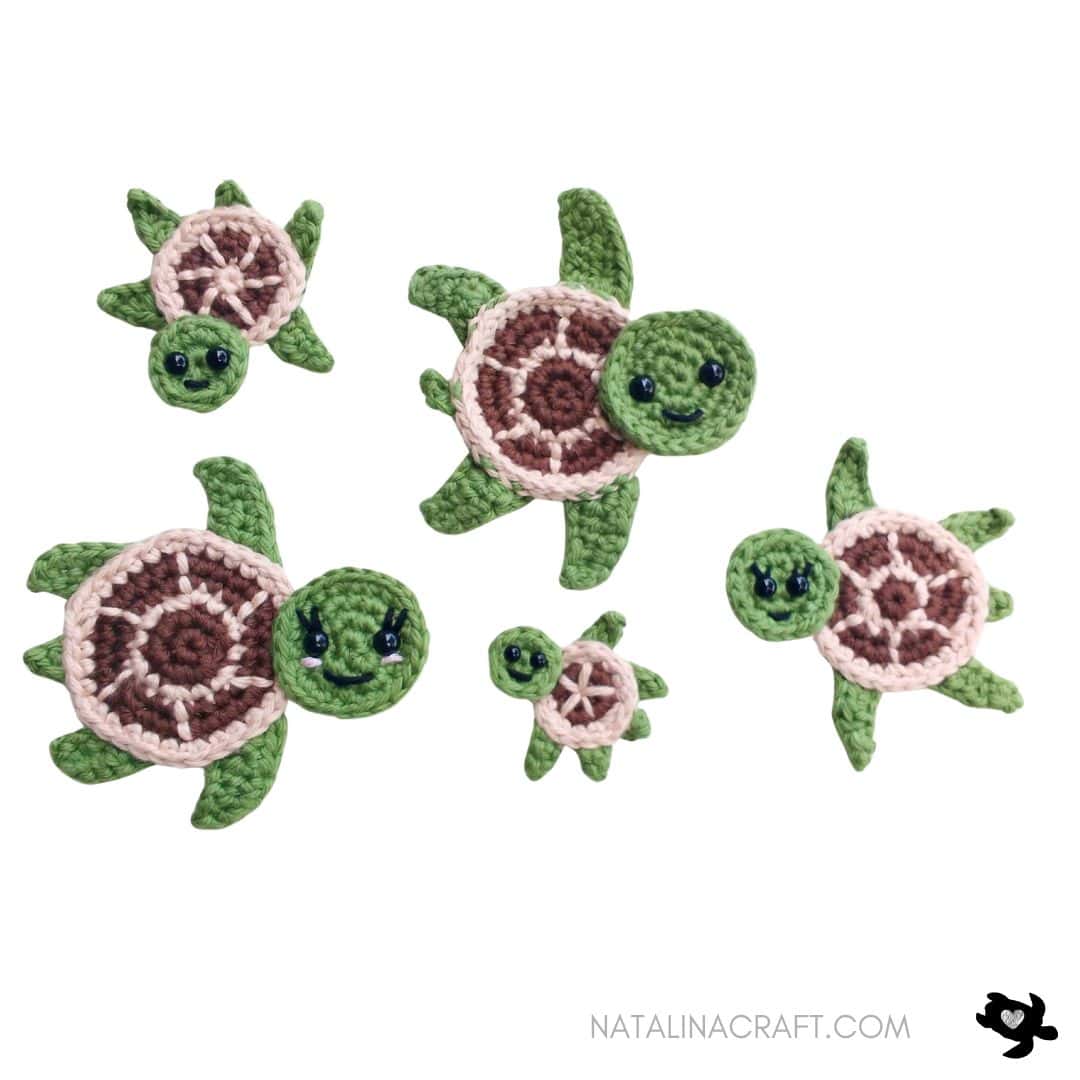
If you’re looking for a sweet and meaningful turtle family applique crochet pattern, this project is for you! This free crochet turtle applique pattern lets you create an adorable turtle family—perfect for adding a handmade touch to baby blankets, children’s crochet projects, bags, pillows, or nursery decor.
These easy crochet turtle appliques are beginner-friendly, quick to make, and designed to use small amounts of yarn, making them a great scrap yarn crochet project. With multiple turtles to represent a family, this pattern is ideal for personalized gifts, family-themed blankets, and animal applique collections.
Whether you’re creating a crochet family blanket, a woodland or ocean-themed project, or looking for a cute animal applique crochet pattern, these turtle family appliques are a charming and versatile addition to your crochet designs.
Don’t forget to join my Facebook group HERE, where you can ask questions, share your finished projects, and help me choose future designs!
I hope you enjoy the pattern. If you have any questions, feel free to message me—and I would love to see your turtles!

General Information
Finished Sizes (approx.)
- Adult: 4 in / 10 cm
- Kid 1: 3 in / 8 cm
- Kid 2: 2.5 in / 6 cm
- Baby: 1.8 in / 4.5 cm
-
Baby in Egg: 2.2 in / 5.5 cm
Sizes are based on the yarn and hooks listed. You can use a smaller or larger hook to make a smaller or larger appliqué.
Materials
- Yarn calling for a 5.5 mm hook in 3 colors
(plus a tiny amount of pink for cheeks, black for mouths/eyebrows, and white for the eggshell) - 3 mm crochet hook
- 3.5 mm crochet hook
- Tapestry needle
- Safety eyes: 6 mm and 4.5 mm
What I used
Light worsted cotton yarn in green, light brown, dark brown, and white
(I used I Love This Cotton! from Hobby Lobby.)
Abbreviations (US Terms)
- ch = chain
- sc = single crochet
- dc = double crochet
- hdc = half double crochet
- inc = increase
- dec = decrease
- sl st = slip stitch
- st marker = stitch marker
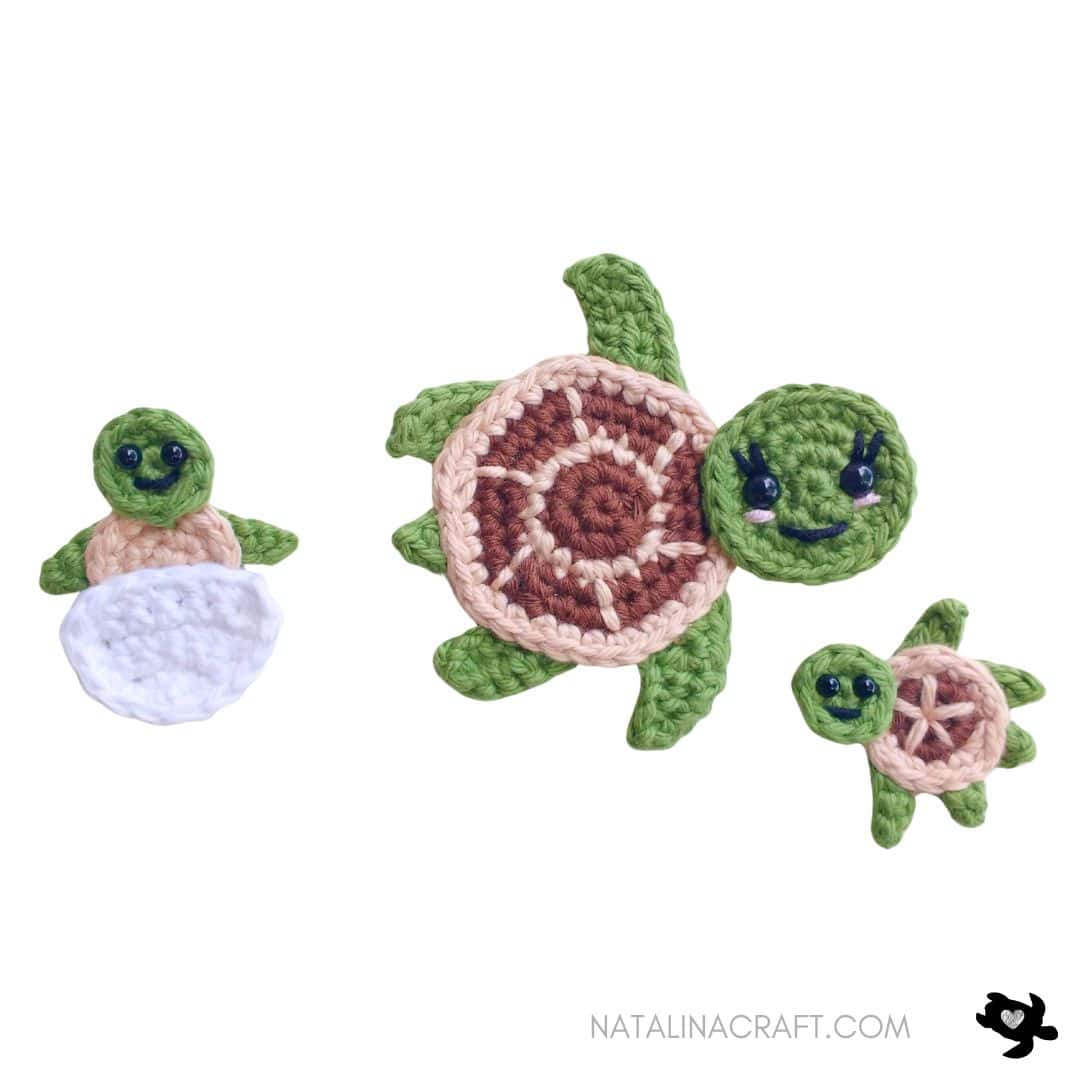
Turtle Family – Pattern Links
To make things easier, you can click on the links below to directly access the pattern of your choice:
Big turtle crochet pattern
Small turtle crochet pattern
Tiny turtle crochet pattern
Baby turtle crochet pattern
Baby turtle in an eggshell crochet pattern
Big turtle crochet pattern
Shell
- The shell is worked in rounds. Use a stitch marker if needed.
With a 3.5 mm hook and dark brown:
- Round 1: 6 sc in a magic ring. (6)
- Round 2: 6 inc. (12)
Change to light brown:
- Round 3: [1 sc in next st, 1 inc in next st] x6. (18)
Change to dark brown:
- Round 4: [1 sc in next 2 st, 1 inc in next st] x6. (24)
- Round 5: [1 sc in next 3 st, 1 inc in next st] x6. (30)
Change to light brown:
- Round 6: [1 sc in next 4 st, 1 inc in next st] x6. (36)
Fasten off, leaving a long tail.
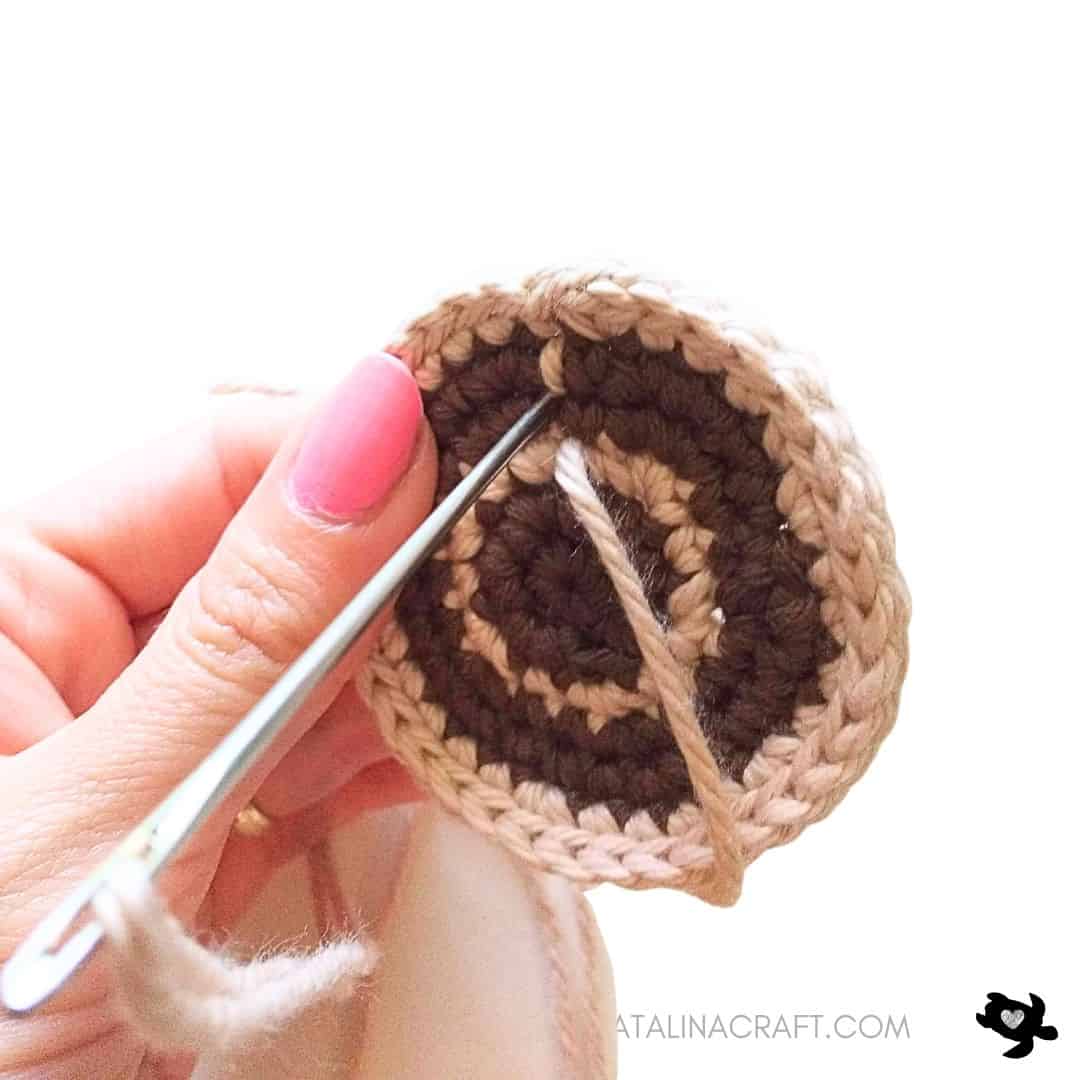
Using light brown yarn and a tapestry needle, embroider 6 shell lines over Rounds 4 and 5 (see photos).


Head
- The head is worked in rounds. Use a stitch marker if needed.
With 3.5 mm hook and green:
- Round 1: 6 sc in a magic ring (6)
- Round 2: 6 inc. (12)
- Round 3: [1 sc in next st, 1 inc in next st] x6 (18)
- Round 4: [1 sc in next 2 st, 1 inc in next st] x6 (24)
Fasten off, leaving a long tail for sewing.
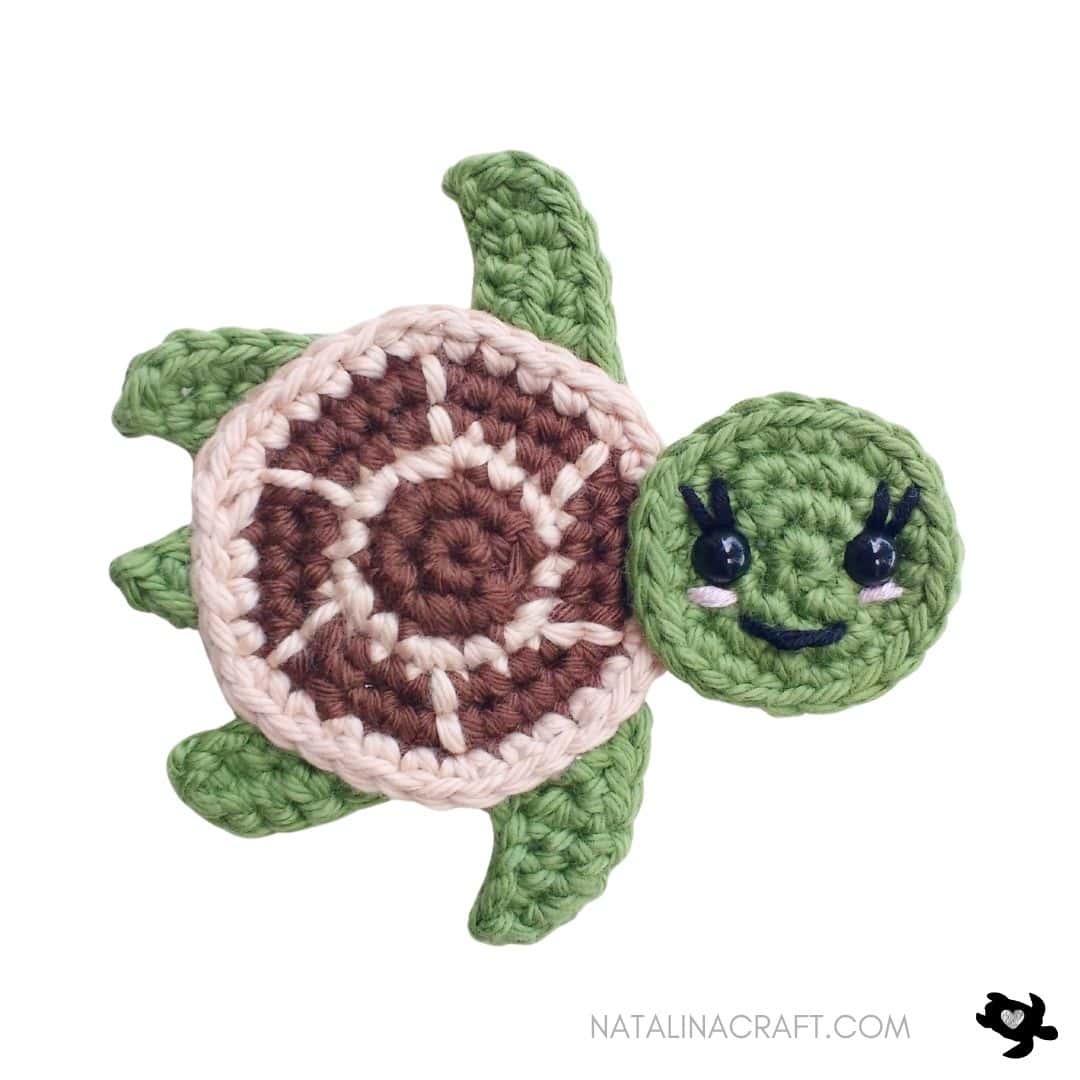
Face (Options)
-
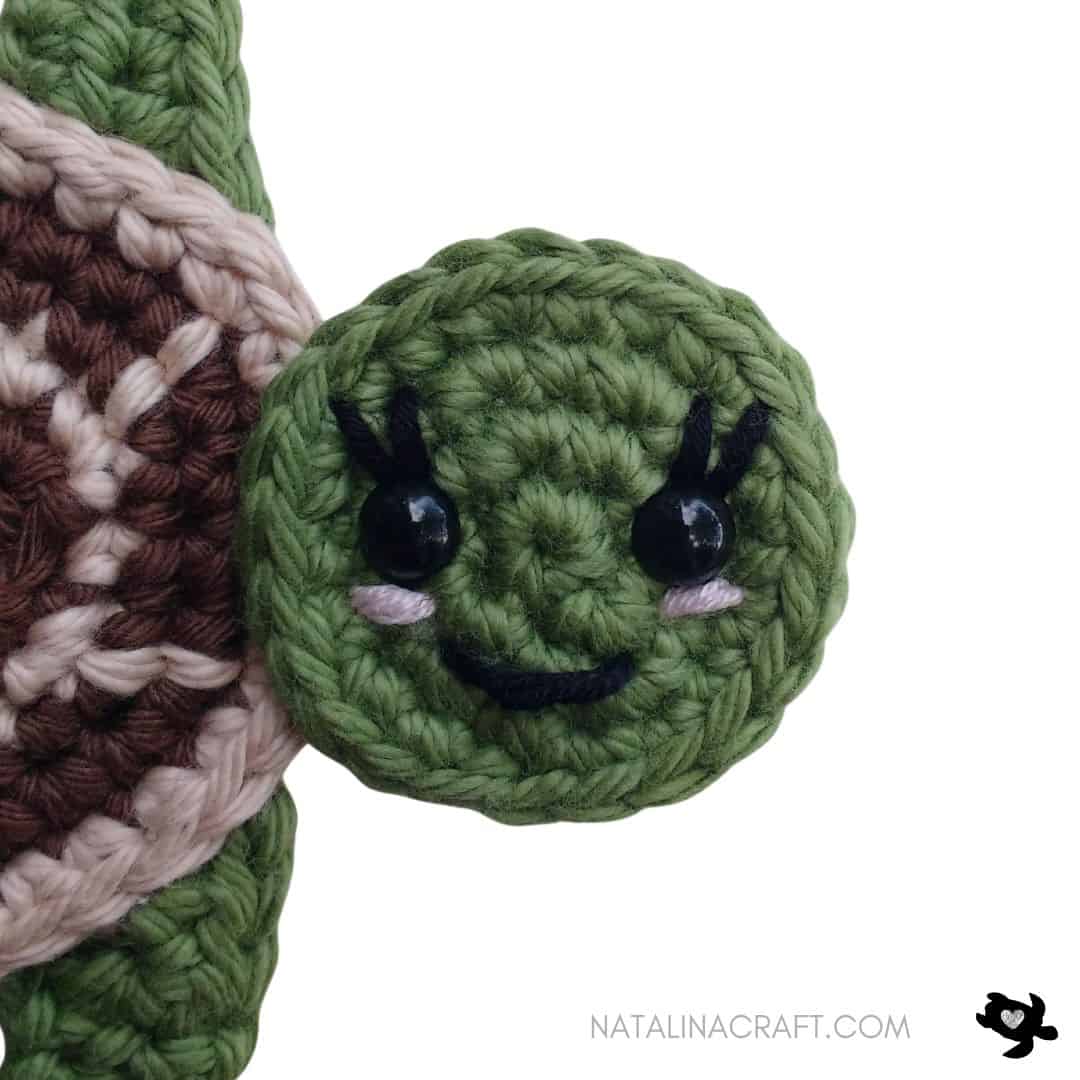
For male and female: place 6 mm safety eyes between Rounds 2 and 3
-
Embroider a small black mouth
-
For a female turtle (optional): add black eyelashes and pink cheeks

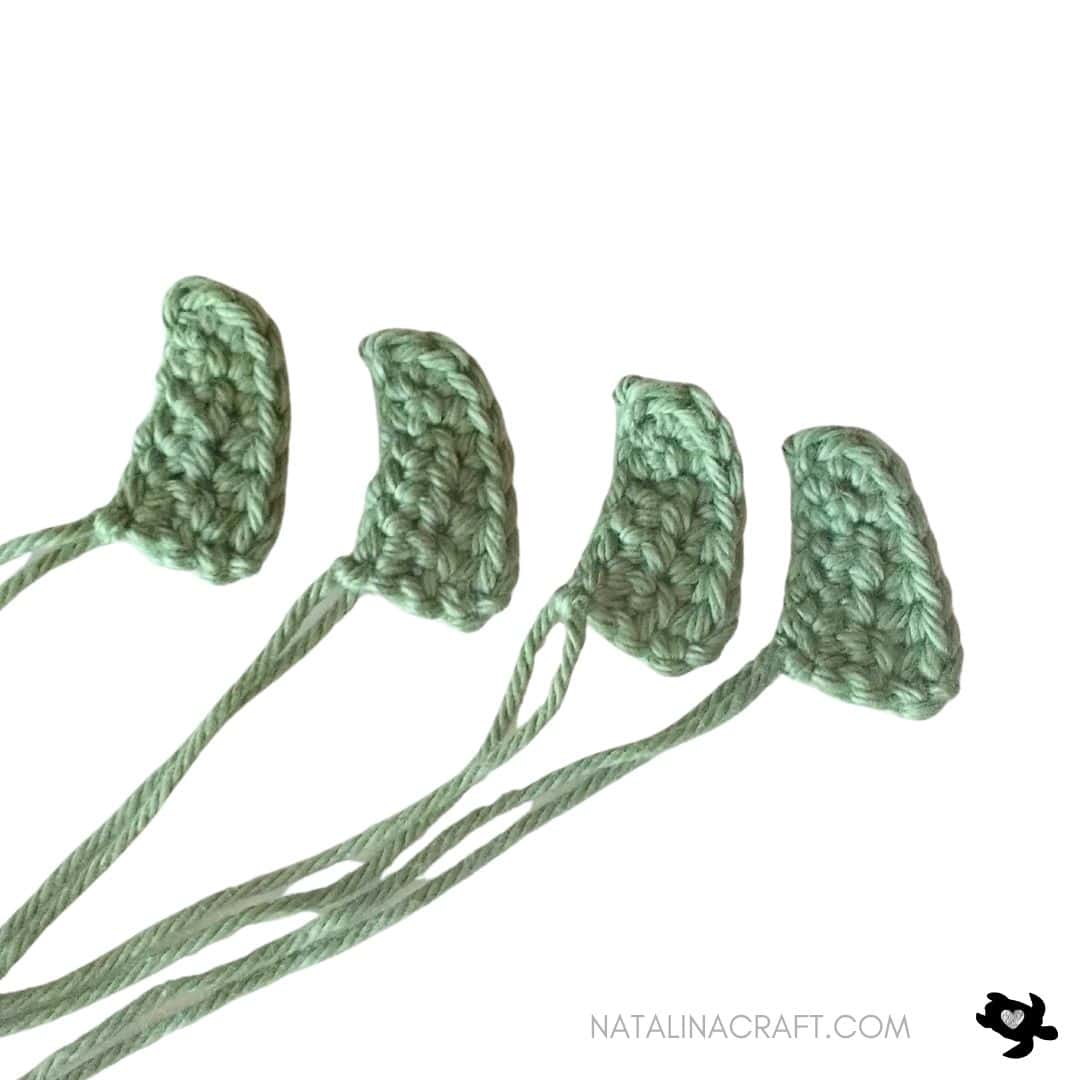
Legs (make 4)
- The legs are worked in rows.
With 3.5 mm hook and green:
- Row 1: ch 8, turn. Starting in the 2nd ch from the hook: 1 sl st, 1 sc in the next 2 st; 1 hdc in the next 2 st; 1 dc in the next 2 st.
- Row 2: ch1, turn: 1 hdc in the next 3 st; 1 sc in the next 3 st.; 1 sl st in the sl st. Working on the other side of the chain: 1 sc in the next sl st
Fasten off.
Tail
- The tail is worked in rows.
With 3.5 mm hook and green:
- Row 1: ch 4, turn. Starting in the 2nd ch from the hook: 1 sl st, 1 sc in the next st, 1 hdc in the next st.
Fasten off.

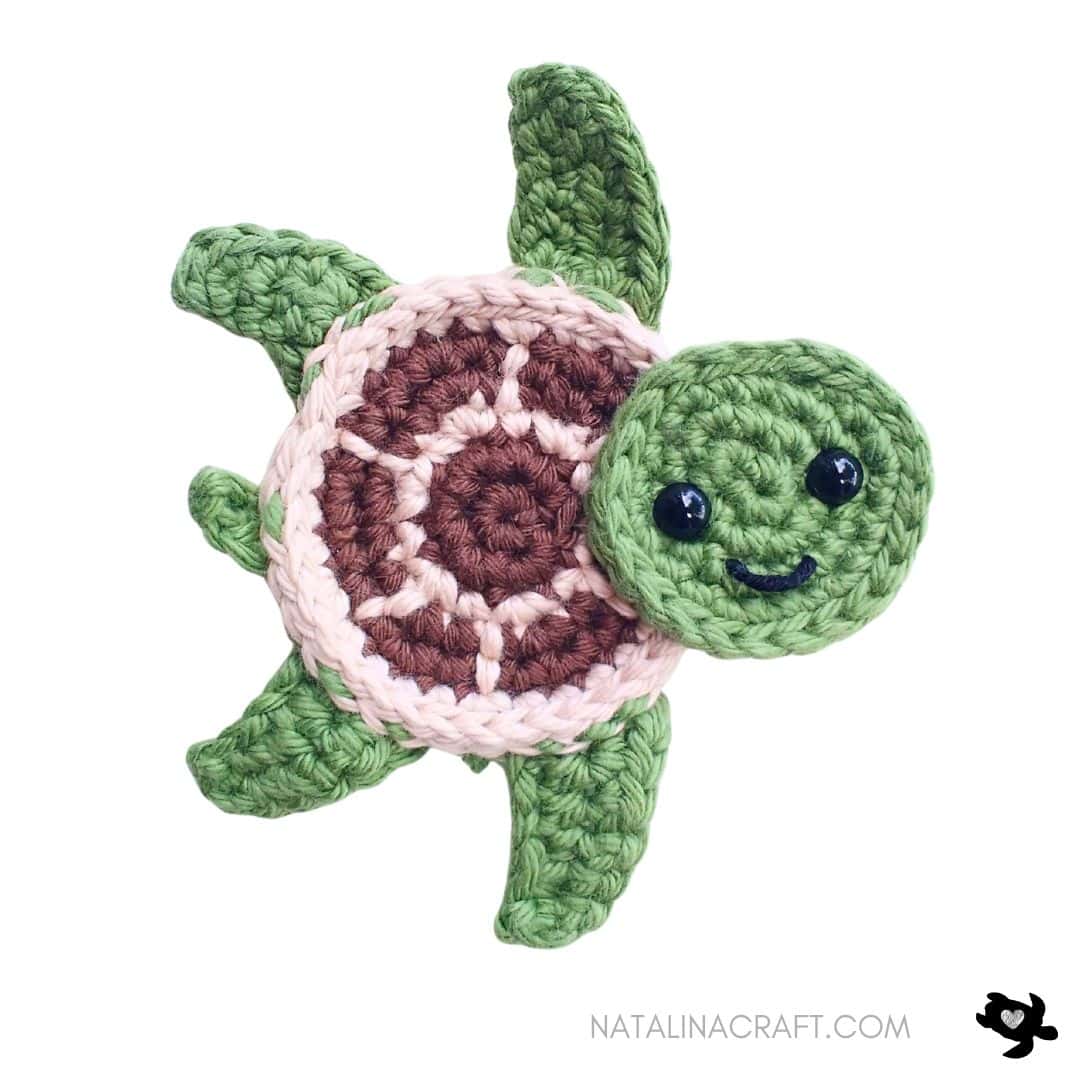
Assembly
-
Sew the head to the shell using green yarn
-
Sew the tail and legs using light brown yarn
-
Place two legs on each side of the shell (adjust placement for longer/shorter leg look)

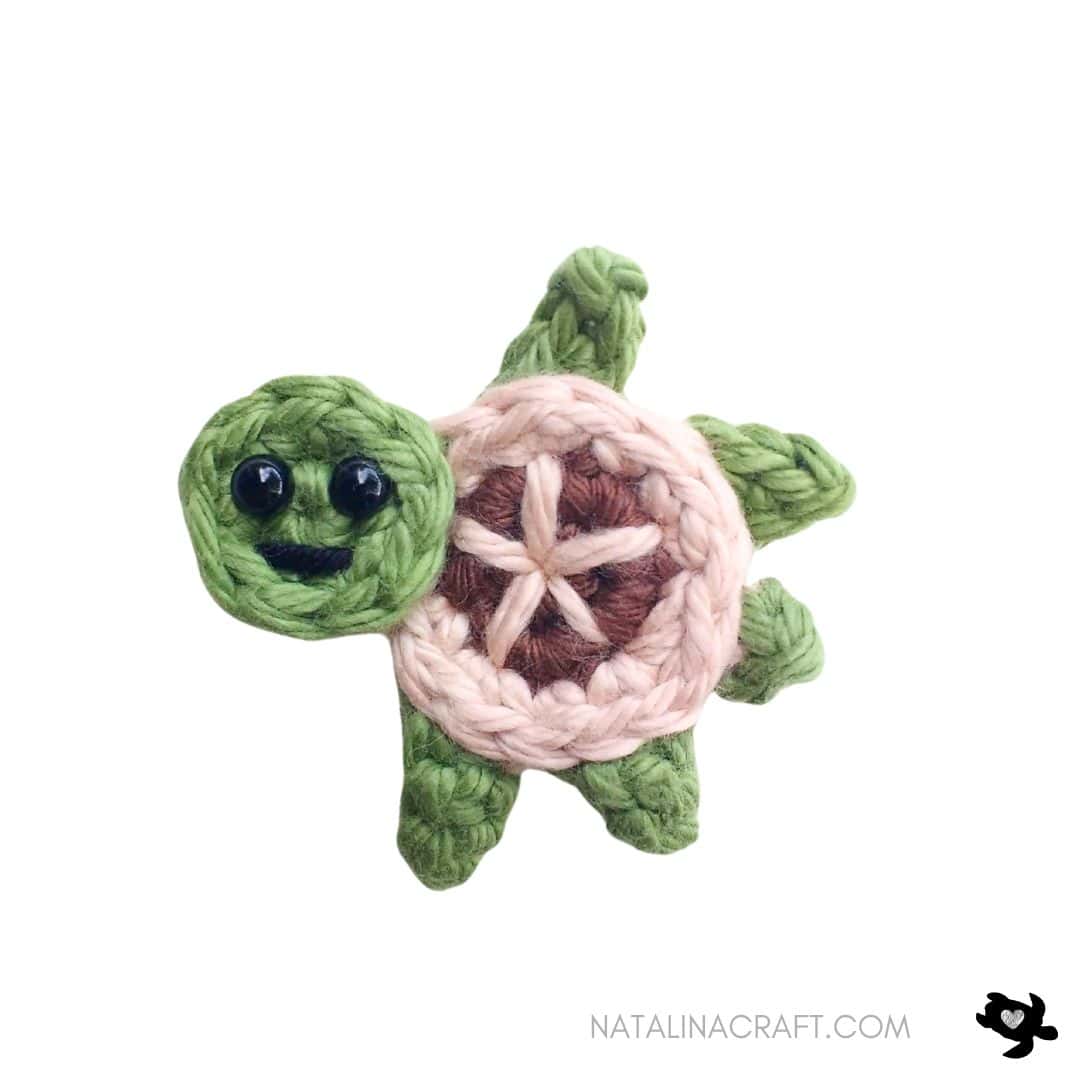
Small turtle crochet pattern

Shell
- The shell is worked in rounds. Use a stitch marker if needed.
With a 3.5 mm hook and dark brown:
- Round 1: 6 sc in a magic ring. (6)
Change to light brown:
- Round 2: 6 inc. (12)
Change to dark brown:
- Round 3: [1 sc in next st, 1 inc in next st] x6. (18)
- Round 4: [1 sc in next 2 st, 1 inc in next st] x6. (24)
Change to light brown:
- Round 5: [1 sc in next 3 st, 1 inc in next st] x6. (30)
Fasten off, leaving a long tail.
Embroider 6 shell lines over Rounds 3 and 4 (see photos).
Head
- The head is worked in rounds. Use a stitch marker if needed.
With 3.5 mm hook and green:
- Round 1: 6 sc in a magic ring (6)
- Round 2: 6 inc. (12)
- Round 3: [1 sc in next st, 1 inc in next st] x6 (18)
Fasten off, leaving a long tail.
-
Place 6 mm eyes between Rounds 1 and 2
-
Embroider a small black mouth
-
Optional: eyelashes for a girl turtle
Legs (make 4)
- The legs are worked in rows.
With 3.5 mm hook and green:
- Row 1: ch 8, turn. Starting in the 2nd ch from the hook: 1 sc in the next 2 st; 1 hdc in the next 2 st; 1 dc in the next 2 st.
Fasten off.
Tail
- The tail is worked in rows.
With 3.5 mm hook and green:
- Row 1: ch 3, turn. Starting in the 2nd ch from the hook: 1 sl st, 1 hdc in the next st.
Fasten off.
Assembly
Sew the head using green yarn.
Sew the tail opposite the head using light brown yarn.
Sew two legs on each side (adjust placement as desired).
Tiny turtle crochet pattern

Shell
- The shell is worked in rounds. Use a stitch marker if needed.
With a 3.5 mm hook and light brown:
- Round 1: 6 sc in a magic ring. (6)
Change to dark brown:
- Round 2: 6 inc. (12)
- Round 3: [1 sc in next st, 1 inc in next st] x6. (18)
Change to light brown
- Round 4: [1 sc in next 2 st, 1 inc in next st] x6. (24)
Fasten off, leaving a long tail.
Embroider 6 shell lines over Rounds 2 and 3 (see photos).
Head
- The head is worked in rounds. Use a stitch marker if needed.
With 3.5 mm hook and green:
- Round 1: 8 sc in a magic ring (8)
- Round 2: 8 inc. (16)
Fasten off, leaving a long tail.
-
Place 6 mm eyes between Rounds 1 and 2
-
Embroider a small black mouth
Legs (make 4)
- The legs are worked in rows.
With 3.5 mm hook and green:
- Row 1: ch 6, turn. Starting in the 2nd ch from the hook: 1 sc in the next 2 st; 1 hdc in the next 2 st; 1 dc in the next st.
Fasten off.
Tail
- The tail is worked in rows.
With 3.5 mm hook and green:
- Row 1: ch 3, turn. Starting in the 2nd ch from the hook: 1 sl st, 1 hdc in the next st.
Fasten off.
Assembly
Sew head with green yarn.
Sew tail opposite head with light brown yarn.
Sew two legs on each side.
Baby turtle crochet pattern
Shell
- The shell is worked in rounds. Use a stitch marker if needed.
With a 3 mm hook and dark brown:
- Round 1: 5 sc in a magic ring. (5)
- Round 2: inc 5 times. (10)
Change to light brown:
- Round 3: [1 sc in next st, 1 inc in next st] x5. (15)
Fasten off, leaving a long tail.
Embroider 5 shell lines over Rounds 1 and 2.
Head
- The head is worked in rounds. Use a stitch marker if needed.
With 3 mm hook and green:
- Round 1: 5 sc in a magic ring (5)
- Round 2: 5 inc. (10)
Fasten off, leaving a long tail.
-
Place 4.5 mm eyes between Rounds 1 and 2
-
Embroider a small black mouth
Legs (make 4)
- The legs are worked in rows.
With 3 mm hook and green:
- Row 1: ch 5, turn. Starting in the 2nd ch from the hook: 1 sl st, 1 sc in the next 3 st.
Fasten off.
Tail
- The tail is worked in rows.
With 3 mm hook and green:
- Row 1: ch 3, turn. Starting in the 2nd ch from the hook: 1 sl st, 1 sc in the next st.
Fasten off.
Assembly
Sew head with green yarn.
Sew tail opposite head with light brown yarn.
Sew two legs on each side.
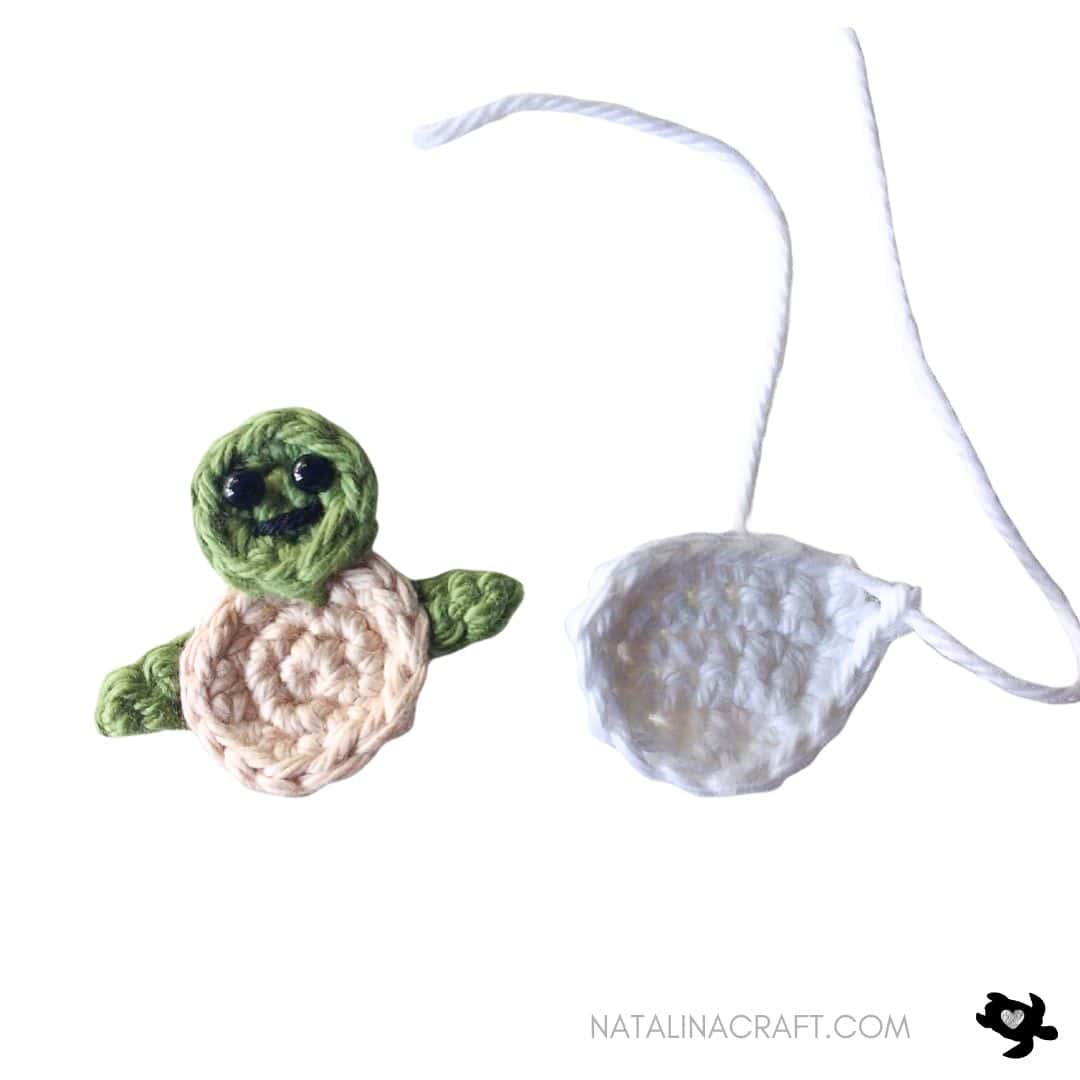
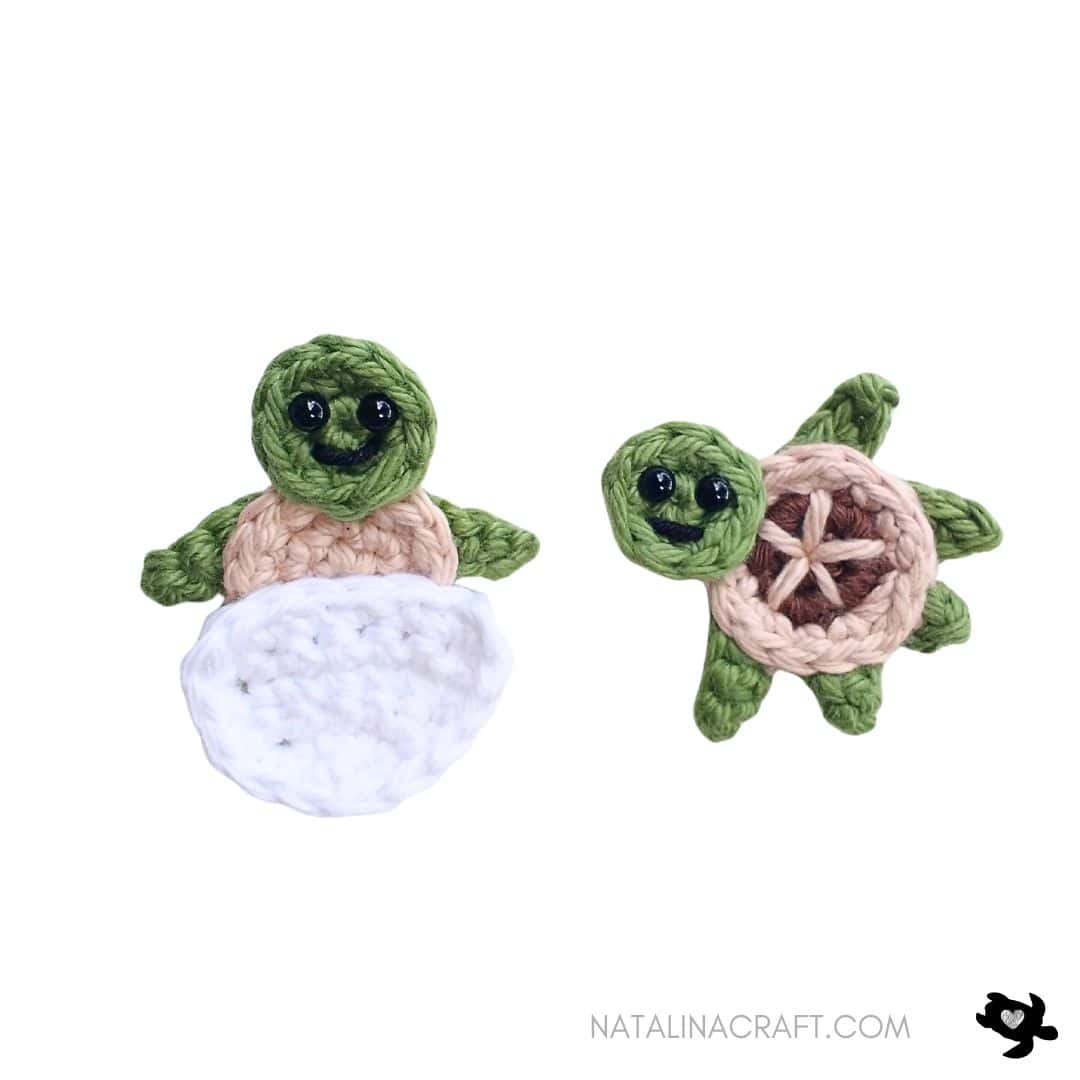
Baby turtle in an eggshell crochet pattern
Shell
- The shell is worked in rounds. Use a stitch marker if needed.
With a 3 mm hook and light brown:
- Round 1: 5 sc in a magic ring. (5)
- Round 2: 5 inc. (10)
- Round 3: [1 sc in next st, 1 inc in next st] x5. (15)
Fasten off, leaving a long tail.
Head
- The head is worked in rounds. Use a stitch marker if needed.
With 3 mm hook and green:
- Round 1: 5 sc in a magic ring (5)
- Round 2: 5 inc. (10)
Fasten off, leaving a long tail.
-
Place 4.5 mm eyes between Rounds 1 and 2
-
Embroider a small black mouth
Legs (make 2)
- The legs are worked in rows.
With 3 mm hook and green:
- Row 1: ch 5, turn. Starting in the 2nd ch from the hook: 1 sl st; 1 sc in the next 3 st.
Fasten off.
Eggshell
- The eggshell is worked in rows.
With 3 mm hook and white yarn:
- Row 1: ch 3, turn. Starting in the 2nd ch from the hook: 1 sc, 1 sc in the next st. (2)
- Row 2: ch1, turn: 2 inc. (4)
- Row 3: ch1, turn: 1 inc, 1 sc in the next 2 st;, 1 inc. (6)
- Rows 4-6: ch1, turn: 1 sc in all st. (6)
- Row 7: do not turn: 1 sc evenly around (about 10 st)
Fasten off, leaving a long tail for sewing.
Assembly
-
Sew the turtle head to the shell using green yarn
-
Sew one leg on each side
-
Attach the eggshell above the body using white yarn
Finished!
Congratulations—your turtle family appliqués are ready! 🐢💚
If you make them, please tag @natalinacraft and use #natalinacraft so I can see your beautiful creations.
Copyright Notice
All rights reserved. This pattern and all accompanying photographs are the property of Natalina Craft and are protected by copyright law. This pattern is for personal use only. Any unauthorized reproduction, redistribution, or publication of this pattern, in whole or in part, is strictly prohibited.
You are welcome to sell finished items made from this pattern in small quantities. While crediting Natalina Craft as the designer is not required, it is always greatly appreciated—especially when selling online—so others can find the original pattern.
Thank you for respecting these guidelines.
Crochet Turtle Appliques
Crochet Turtle Appliques
Instructions
General Information
Finished Sizes (approx.)
- Adult: 4 in / 10 cm
- Kid 1: 3 in / 8 cm
- Kid 2: 2.5 in / 6 cm
- Baby: 1.8 in / 4.5 cm
- Baby in Egg: 2.2 in / 5.5 cm
Sizes are based on the yarn and hooks listed. You can use a smaller or larger hook to make a smaller or larger appliqué.
Materials
- Yarn calling for a 5.5 mm hook in 3 colors(plus a tiny amount of pink for cheeks, black for mouths/eyebrows, and white for the eggshell)
- 3 mm crochet hook
- 3.5 mm crochet hook
- Tapestry needle
- Safety eyes: 6 mm and 4.5 mm
What I used
Light worsted cotton yarn in green, light brown, dark brown, and white(I used I Love This Cotton! from Hobby Lobby.)
Abbreviations (US Terms)
- ch = chain
- sc = single crochet
- dc = double crochet
- hdc = half double crochet
- inc = increase
- dec = decrease
- sl st = slip stitch
- st marker = stitch marker
Big turtle crochet pattern
Shell
- The shell is worked in rounds. Use a stitch marker if needed.
With a 3.5 mm hook and dark brown:
- Round 1: 6 sc in a magic ring. (6)
- Round 2: 6 inc. (12)
Change to light brown:
- Round 3: [1 sc in next st, 1 inc in next st] x6. (18)
Change to dark brown:
- Round 4: [1 sc in next 2 st, 1 inc in next st] x6. (24)
- Round 5: [1 sc in next 3 st, 1 inc in next st] x6. (30)
Change to light brown:
- Round 6: [1 sc in next 4 st, 1 inc in next st] x6. (36)
Fasten off, leaving a long tail.Using light brown yarn and a tapestry needle, embroider 6 shell lines over Rounds 4 and 5 (see photos).
Head
- The head is worked in rounds. Use a stitch marker if needed.
With 3.5 mm hook and green:
- Round 1: 6 sc in a magic ring (6)
- Round 2: 6 inc. (12)
- Round 3: [1 sc in next st, 1 inc in next st] x6 (18)
- Round 4: [1 sc in next 2 st, 1 inc in next st] x6 (24)
Fasten off, leaving a long tail for sewing.
Face (Options)
- For male and female: place 6 mm safety eyes between Rounds 2 and 3
- Embroider a small black mouth
- For a female turtle (optional): add black eyelashes and pink cheeks
Legs (make 4)
- The legs are worked in rows.
With 3.5 mm hook and green:
- Row 1: ch 8, turn. Starting in the 2nd ch from the hook: 1 sl st, 1 sc in the next 2 st; 1 hdc in the next 2 st; 1 dc in the next 2 st.
- Row 2: ch1, turn: 1 hdc in the next 3 st; 1 sc in the next 3 st.; 1 sl st in the sl st. Working on the other side of the chain: 1 sc in the next sl st
Fasten off.
Tail
- The tail is worked in rows.
With 3.5 mm hook and green:
- Row 1: ch 4, turn. Starting in the 2nd ch from the hook: 1 sl st, 1 sc in the next st, 1 hdc in the next st.
Fasten off.
Assembly
- Sew the head to the shell using green yarn
- Sew the tail and legs using light brown yarn
- Place two legs on each side of the shell (adjust placement for longer/shorter leg look)
Small turtle crochet pattern
Shell
- The shell is worked in rounds. Use a stitch marker if needed.
With a 3.5 mm hook and dark brown:
- Round 1: 6 sc in a magic ring. (6)
Change to light brown:
- Round 2: 6 inc. (12)
Change to dark brown:
- Round 3: [1 sc in next st, 1 inc in next st] x6. (18)
- Round 4: [1 sc in next 2 st, 1 inc in next st] x6. (24)
Change to light brown:
- Round 5: [1 sc in next 3 st, 1 inc in next st] x6. (30)
Fasten off, leaving a long tail.Embroider 6 shell lines over Rounds 3 and 4 (see photos).
Head
- The head is worked in rounds. Use a stitch marker if needed.
With 3.5 mm hook and green:
- Round 1: 6 sc in a magic ring (6)
- Round 2: 6 inc. (12)
- Round 3: [1 sc in next st, 1 inc in next st] x6 (18)
Fasten off, leaving a long tail.
- Place 6 mm eyes between Rounds 1 and 2
- Embroider a small black mouth
- Optional: eyelashes for a girl turtle
Legs (make 4)
- The legs are worked in rows.
With 3.5 mm hook and green:
- Row 1: ch 8, turn. Starting in the 2nd ch from the hook: 1 sc in the next 2 st; 1 hdc in the next 2 st; 1 dc in the next 2 st.
Fasten off.
Tail
- The tail is worked in rows.
With 3.5 mm hook and green:
- Row 1: ch 3, turn. Starting in the 2nd ch from the hook: 1 sl st, 1 hdc in the next st.
Fasten off.
Assembly
Sew the head using green yarn.Sew the tail opposite the head using light brown yarn.Sew two legs on each side (adjust placement as desired).
Tiny turtle crochet pattern
Shell
- The shell is worked in rounds. Use a stitch marker if needed.
With a 3.5 mm hook and light brown:
- Round 1: 6 sc in a magic ring. (6)
Change to dark brown:
- Round 2: 6 inc. (12)
- Round 3: [1 sc in next st, 1 inc in next st] x6. (18)
Change to light brown
- Round 4: [1 sc in next 2 st, 1 inc in next st] x6. (24)
Fasten off, leaving a long tail.Embroider 6 shell lines over Rounds 2 and 3 (see photos).
Head
- The head is worked in rounds. Use a stitch marker if needed.
With 3.5 mm hook and green:
- Round 1: 8 sc in a magic ring (8)
- Round 2: 8 inc. (16)
Fasten off, leaving a long tail.
- Place 6 mm eyes between Rounds 1 and 2
- Embroider a small black mouth
Legs (make 4)
- The legs are worked in rows.
With 3.5 mm hook and green:
- Row 1: ch 6, turn. Starting in the 2nd ch from the hook: 1 sc in the next 2 st; 1 hdc in the next 2 st; 1 dc in the next st.
Fasten off.
Tail
- The tail is worked in rows.
With 3.5 mm hook and green:
- Row 1: ch 3, turn. Starting in the 2nd ch from the hook: 1 sl st, 1 hdc in the next st.
Fasten off.
Assembly
Sew head with green yarn.Sew tail opposite head with light brown yarn.Sew two legs on each side.
Baby turtle crochet pattern
Shell
- The shell is worked in rounds. Use a stitch marker if needed.
With a 3 mm hook and dark brown:
- Round 1: 5 sc in a magic ring. (5)
- Round 2: inc 5 times. (10)
Change to light brown:
- Round 3: [1 sc in next st, 1 inc in next st] x5. (15)
Fasten off, leaving a long tail.Embroider 5 shell lines over Rounds 1 and 2.
Head
- The head is worked in rounds. Use a stitch marker if needed.
With 3 mm hook and green:
- Round 1: 5 sc in a magic ring (5)
- Round 2: 5 inc. (10)
Fasten off, leaving a long tail.
- Place 4.5 mm eyes between Rounds 1 and 2
- Embroider a small black mouth
Legs (make 4)
- The legs are worked in rows.
With 3 mm hook and green:
- Row 1: ch 5, turn. Starting in the 2nd ch from the hook: 1 sl st, 1 sc in the next 3 st.
Fasten off.
Tail
- The tail is worked in rows.
With 3 mm hook and green:
- Row 1: ch 3, turn. Starting in the 2nd ch from the hook: 1 sl st, 1 sc in the next st.
Fasten off.
Assembly
Sew head with green yarn.Sew tail opposite head with light brown yarn.Sew two legs on each side.
Baby turtle in an eggshell crochet pattern
Shell
- The shell is worked in rounds. Use a stitch marker if needed.
With a 3 mm hook and light brown:
- Round 1: 5 sc in a magic ring. (5)
- Round 2: 5 inc. (10)
- Round 3: [1 sc in next st, 1 inc in next st] x5. (15)
Fasten off, leaving a long tail.
Head
- The head is worked in rounds. Use a stitch marker if needed.
With 3 mm hook and green:
- Round 1: 5 sc in a magic ring (5)
- Round 2: 5 inc. (10)
Fasten off, leaving a long tail.
- Place 4.5 mm eyes between Rounds 1 and 2
- Embroider a small black mouth
Legs (make 2)
- The legs are worked in rows.
With 3 mm hook and green:
- Row 1: ch 5, turn. Starting in the 2nd ch from the hook: 1 sl st; 1 sc in the next 3 st.
Fasten off.
Eggshell
- The eggshell is worked in rows.
With 3 mm hook and white yarn:
- Row 1: ch 3, turn. Starting in the 2nd ch from the hook: 1 sc, 1 sc in the next st. (2)
- Row 2: ch1, turn: 2 inc. (4)
- Row 3: ch1, turn: 1 inc, 1 sc in the next 2 st;, 1 inc. (6)
- Rows 4-6: ch1, turn: 1 sc in all st. (6)
- Row 7: do not turn: 1 sc evenly around (about 10 st)
Fasten off, leaving a long tail for sewing.
Assembly
- Sew the turtle head to the shell using green yarn
- Sew one leg on each side
- Attach the eggshell above the body using white yarn
Finished!
Congratulations—your turtle family appliqués are ready! 🐢💚If you make them, please tag @natalinacraft and use #natalinacraft so I can see your beautiful creations.
Copyright Notice
All rights reserved. This pattern and all accompanying photographs are the property of Natalina Craft and are protected by copyright law. This pattern is for personal use only. Any unauthorized reproduction, redistribution, or publication of this pattern, in whole or in part, is strictly prohibited.
You are welcome to sell finished items made from this pattern in small quantities. While crediting Natalina Craft as the designer is not required, it is always greatly appreciated—especially when selling online—so others can find the original pattern. Thank you for respecting these guidelines.
Llindas creaciones gracias por los patrones
bendiciones.
Muchas gracias!
Thank you for the turtle pattern. It really enhances my baby blanket of sea creatures.
You are very welcome!
Thank you so much for the turtle patterns! I searched for a long time before I found this pattern – I was looking for a motif to put on my grandson’s stocking that I crocheted for him. It is perfect! If I could post a photo here, I would.
Thank you very much. I am so glad you like it! I wish I could see your grandson’s stocking too!
May I ask how the turtle starts? Magic circle or how? I’m new to crochet and that part confuses me a wee bit. I understand working in rounds but like how many chains? I’m lost. Thank you for any help!!!! 💕
Hi, I am sorry for not replying earlier! I just saw your second message and I am glad you figured it out. Let me know if you have any more questions!
Sorry, I just read how to do these adorable turtles!! Thank you!! 🙏🏻💕
Awesome! You are very welcome!
it’s not on your YouTube channel 😞
I am sorry! I am just starting with youtube. I have a 2-year-old at home full time with me, and making videos is hard. I will try to make one, I am not sure when, however!
How can I get a hard copy of the turtles. I think they are so cute, but I don’t and can’t do YouTube.
I am sorry, I do not have any hard copy at the moment
Tiny turtle legs
It says ch6, but that doesn’t work. I ch7 and followed the pattern. Wasn’t sure if missing a stitch was better or not. I’ll just sew it further under if I think it looks too big. Didn’t really know the best way to approach it. I’m fairly new to crocheting. Taught myself in the COVID pandemic
Dear Sally, Apologies for missing your message earlier! Sewing them further under sounds like a great idea—I’ll review the pattern soon to check. It’s wonderful to see how many people picked up crochet during the pandemic. I’m so glad more people are discovering it—it’s such a therapeutic and enjoyable pastime!
bonjour,
merci pour tous ces modèles très mignons 👍🙏😉
Bonjour, merci beaucoup pour votre gentil message.