
If you love fun and spooky crochet projects, you’ll adore this green ghost amigurumi crochet pattern! This free crochet ghost pattern is inspired by a classic, playful green ghost and makes a perfect cute amigurumi for Halloween crochet projects, movie-inspired decor, or fun handmade gifts.
This easy amigurumi crochet pattern is beginner-friendly, works up quickly, and uses simple stitches to create a soft, squishy crochet ghost toy full of personality. Made with small amounts of yarn, it’s also a great scrap yarn crochet project and ideal for fast makes.
Whether you’re decorating for Halloween, adding a spooky touch to your crochet collection, or looking for a fun ghost amigurumi pattern, this little green ghost is sure to bring smiles (not scares!).
Join my Facebook group, where you can ask questions, share your finished projects, and help me choose future designs!
I hope you enjoy the pattern and find it easy to follow. If you have questions, feel free to reach out—I’ll do my best to help. I’d love to see your ghost! Share your finished projects using #natalinacraft.


Crochet Pattern – Free Crochet Pattern Green Ghost
Start Here
- Please read the entire pattern before starting.
- This pattern is written using US crochet terms.
- You can use different yarn weights; size will vary. (Mine was made with light worsted yarn.)
Finished Size
Approximately 4 inches (11 cm) tall using light worsted yarn.
Material:
- Yarn calling for a 5.5 mm hook in: green, pink, red, and white
- Small amount of black yarn/thread (eyebrows)
- 3.5 mm crochet hook
- 2 black safety eyes (7.5 mm)
- Polyfill stuffing
- Stitch marker (optional)
- Tapestry needle
Abbreviations
- ch = chain
- mr = magic ring
- sc = single crochet
- inc = increase
- dec = invisible decrease
- sl st = slip stitch
- hdc = half double crochet
- dc = double crochet
How to crochet a little green ghost?
Mouth Piece (Pink)
- This piece creates the mouth opening. You will attach it to the head later.
- The mouth is worked in continuous rounds (as a spiral). Use a stitch marker if needed.
With pink yarn and a 3.5 mm hook:
- Round 1: 6 sc in a magic ring. (6)
- Round 2: [1 inc in all st]. (12)
- Round 3: [1 sc in the next st, 1 inc] x6. (18)
- Round 4: [1 sc in the 2 next st, 1 inc] x6. (24)
- Round 5: [1 sc in the 3 next st, 1 inc] x6. (30)
- 1 sl st in the next st.
- Leave a long tail and cut the yarn
Fasten off, leaving a long tail.
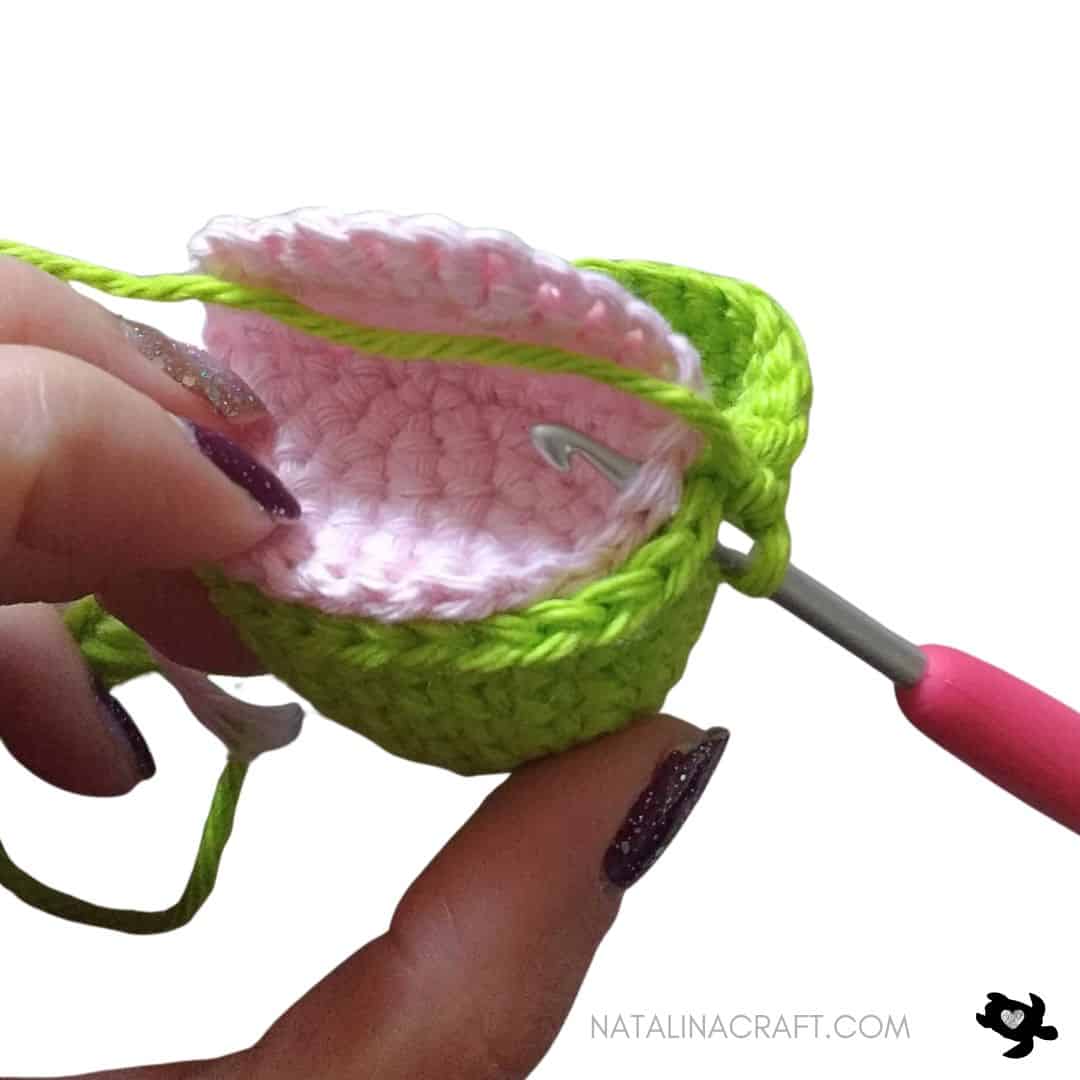
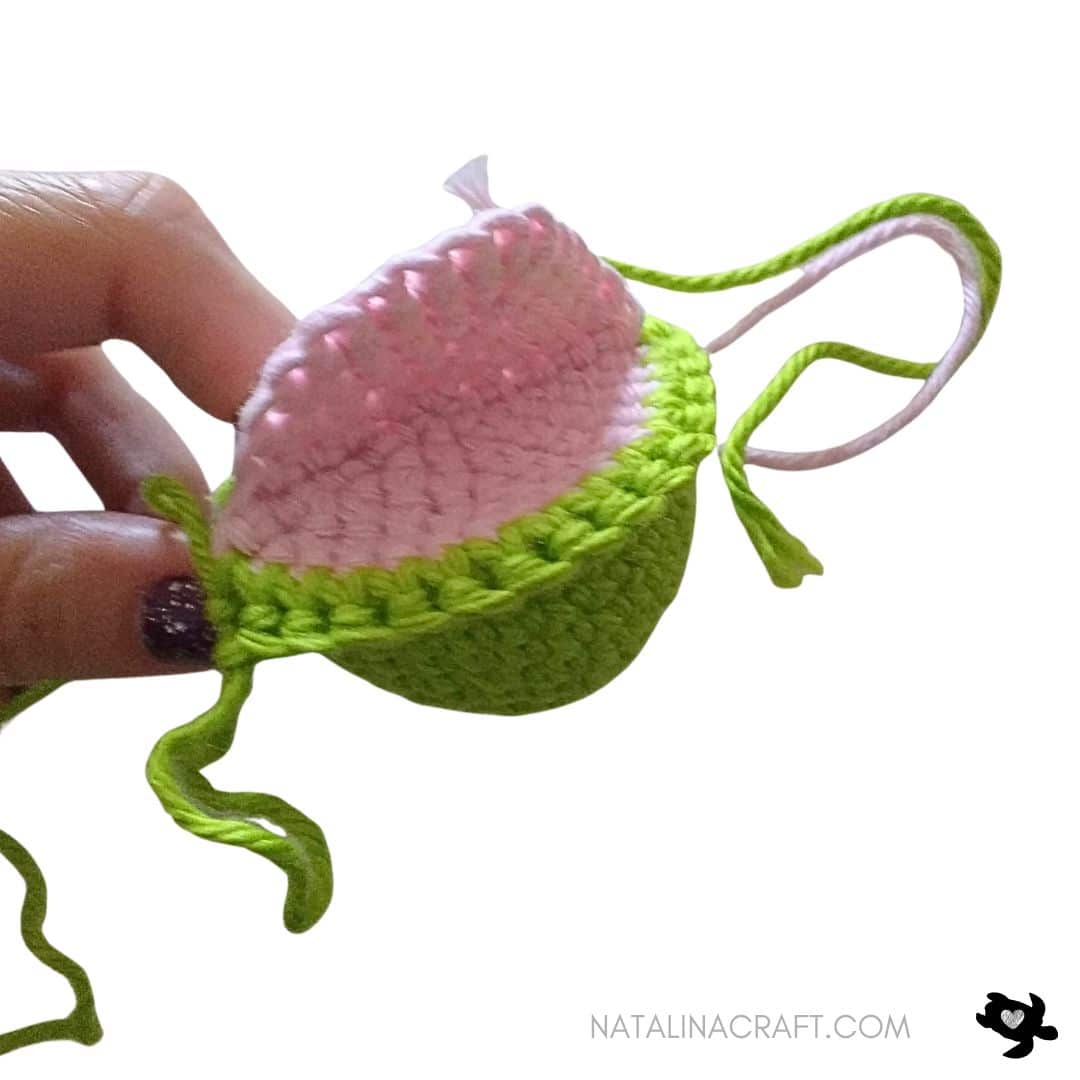
Fold the circle in half and crochet along the flat edge (about 8 sc) to shape the mouth opening. (Use your photos as reference.)
Set aside for later.


Body + Head (Green)
- The body is worked in continuous rounds (as a spiral). Use a stitch marker if needed.
- We start by the head.
With green yarn and a 3.5 mm hook:
- Round 1: start 6 sc in a magic ring. (6)
- Round 2: [1 inc in all st]. (12)
- Round 3: [1 sc in the next st, 1 inc] x6. (18)
- Round 4: [1 sc in the 2 next st, 1 inc] x6. (24)
- Round 5: [1 sc in all st]. (24)
- Round 6: [1 sc in the 3 next st, 1 inc] x6. (30)
- Rounds 7 to 9: [1 sc in all st]. (30)
Insert safety eyes between Rounds 6 and 7, spaced 4 stitches apart.
Embroider:
-
eyebrows with black thread/yarn above the eyes
-
a small nose with green yarn below the eyes

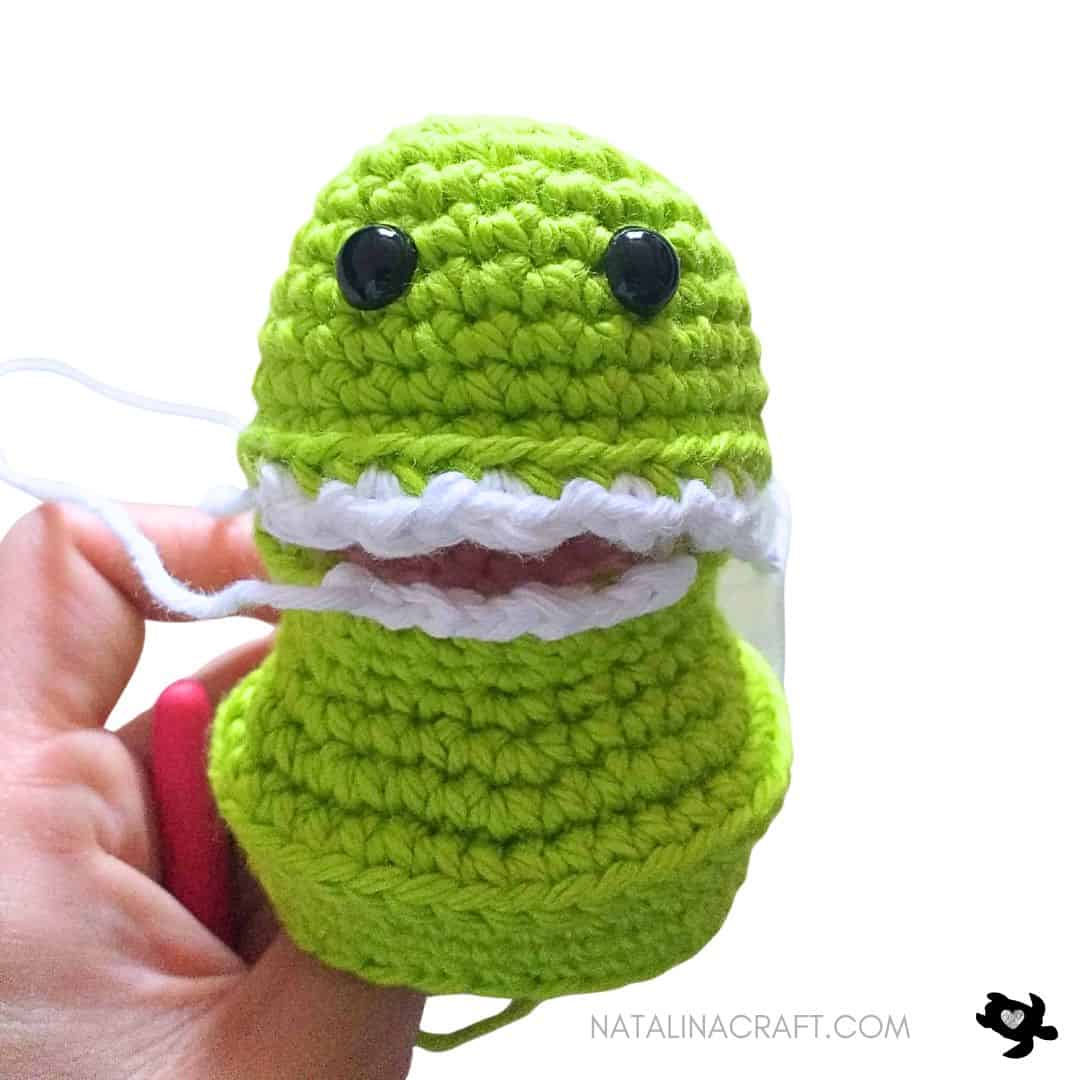
Attach the Mouth Piece
- Round 10: You will now crochet through stitches from the head + mouth piece to join them together:
– 1 sc in the next 15 stitches, working through BOTH layers (green + pink). Note: These 15 stitches at the front of the head will remain unused afterward and will be used later to attach the teeth.
– then 1 sc in the next 15 stitches, working in green stitches only (head only). Note: These stitches are at the back of the head and will be used to continue shaping the body.
(30)
- Round 11:
Begin shaping the mouth area first, then finish the round at the back of the head:
(3 sc, 1 dec) × 3 along the lower mouth area, then 1 sc in the next 15 stitches. (27)

- Round 12: Working in the front loops only: (2 sc, 1 dec) × 3; then working in both loops: 1 sc in the next 15 stitches. (24)
Stuff the head lightly. Do not overstuff—you want the mouth to stay flat and be able to close nicely.
- Round 13: [1 sc in the next 24 st]. (24)
- Round 14: [(1 sc in the 2 next st, 1 inc) x3; 1 sc in the next 15 st]. (27)
- Round 15: [(1 sc in the 3 next st, 1 inc) x3; 1 sc in the next 15 st]. (30)
- Round 16: [1 sc in the next 2 st, 1 inc] x10. (40)
- Round 17: working in the front loops only: [1 sc in all st]. (40)
- Round 18: working in the back loops left from round 16: [1 sc in the next 2 st, 1 dec] x10. (30)
- Rounds 19 to 21: [1 sc in all st]. (30)

- Round 22: [1 sc in the next 2 st, 1 inc] x10. (40)
- Round 23: working in the front loops only: [1 sc in all st]. (40)
- Round 24: working in the back loops left from round 22: [1 sc in the next 2 st, 1 dec] x10. (30)
- Rounds 25 to 26: [1 sc in all st]. (30)
- Round 27: [1 sc in the 3 next st, 1 dec] x6. (24)
- Round 28: working in the back loops only: [1 sc in all st]. (24)


- Round 29: [1 sc in the 2 next st, 1 dec] x6. (18)
- Round 30: [1 sc in the next st, 1 dec] x6. (12)
Stuff the body.
- Round 31: [6 dec]. (6)
Fasten off and close the opening.
Teeth (White)
Upper Teeth
With white yarn and a 3.5 mm hook:
Hold the ghost upside down. Join white yarn in the 4th stitch from the right of Round 10. Work in back loops only:
1 sc in same stitch, ch 1, 1 sl st in next stitch.
( 1 sc in next stitch, ch 1, 1 sl st in next stitch ) × 4.
You should have 5 teeth. Fasten off.

Lower Teeth
Hold the ghost facing you. Join white yarn in the 3rd stitch from the right (in the back loops of Round 11):
1 sc in same stitch, ch 1, 1 sl st in next stitch.
( 1 sc in next stitch, ch 1, 1 sl st in next stitch ) × 2.
1 sc in next stitch.
You should have 4 teeth. Fasten off.
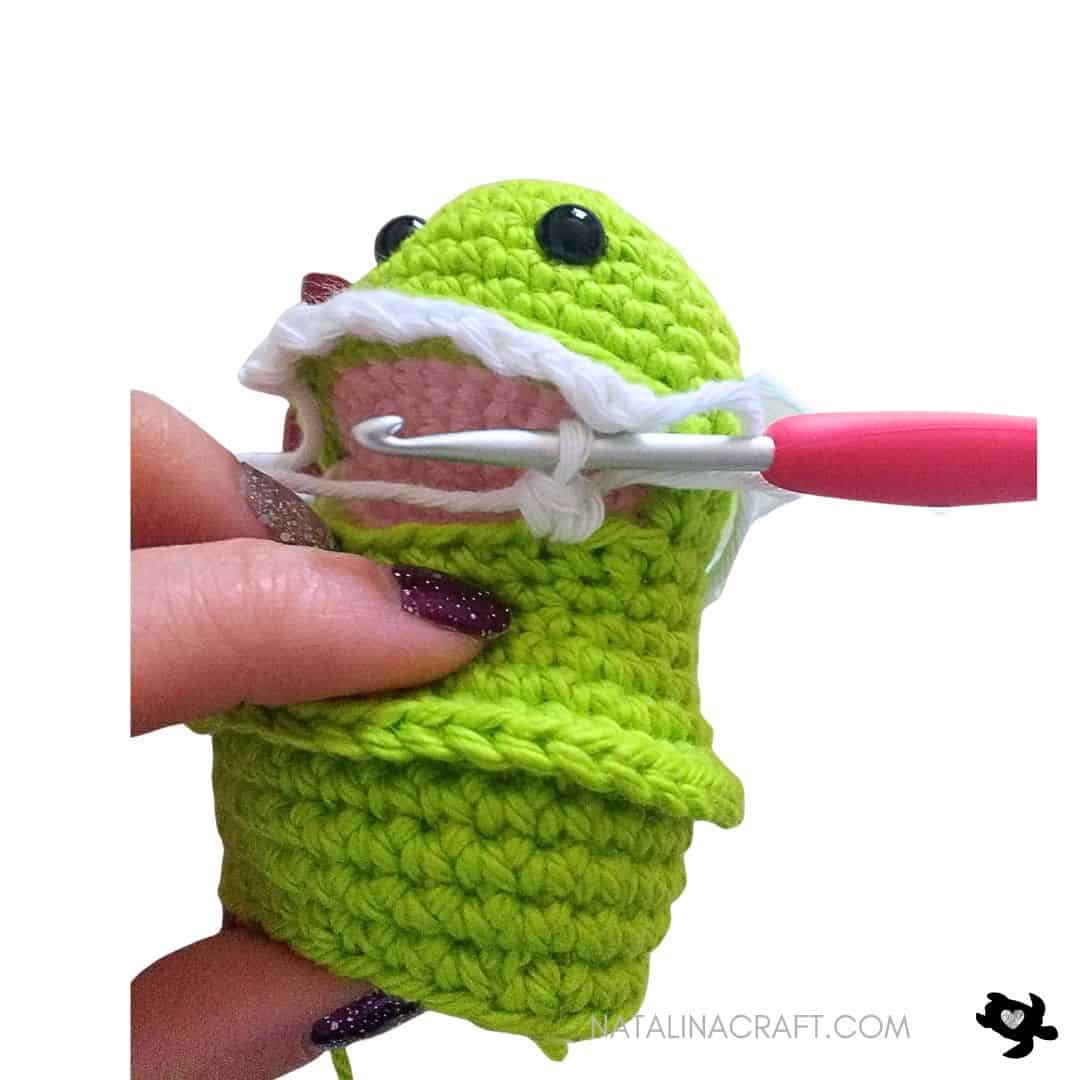
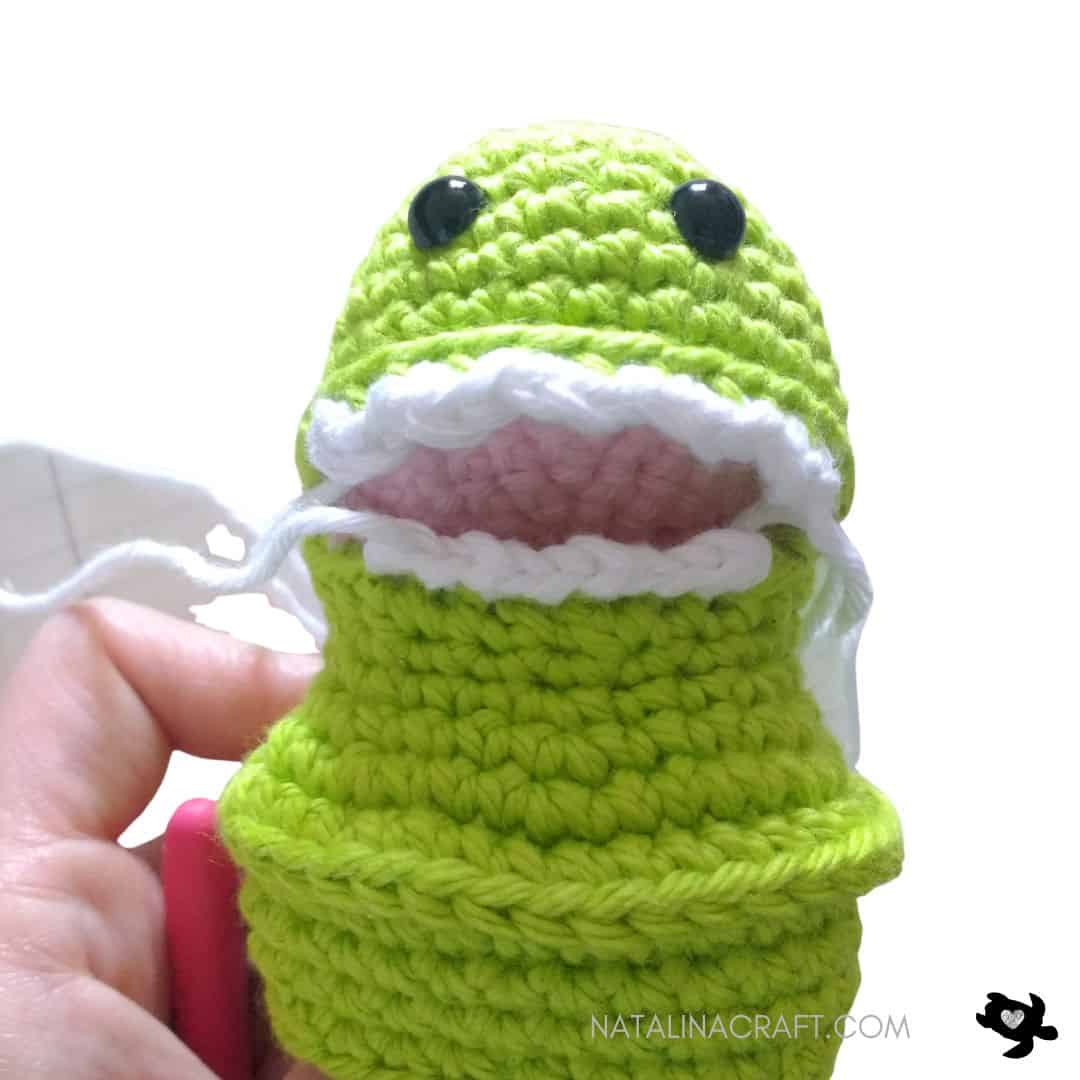
Tongue (Red)
- The tongue is worked in rows.
With red yarn and a 3.5 mm hook:
- Row 1: ch2; starting in 2nd ch from hook: 1 sc. (1)
- Row 2: ch1, turn; 2 sc in the stitch. (2)
- Rows 3 to 8: ch 1, turn; 1 sc in each stitch. (2)
Fasten off, leaving a long tail.
Sew the tongue in the center of the mouth.


Arms (make 2)
- The arms are worked in rounds. Use a stitch marker if needed
With green yarn and a 3.5 mm hook:
- Round 1:6 sc in a magic ring. (6)
- Round 2: [1 inc in all st]. (12)
- Rounds 3 to 4: [1 sc in all st]. (12)
- Round 5: [6 dec]. (6)
- Rounds 6 to 11: [1 sc in all st]. (6)
Do not stuff the arms.
Fasten off, leaving a long tail.
Sew the arms to the sides of the body, with the top of the arms aligned with Round 13.


🎉 Congratulations! Your little green ghost is complete! I hope you enjoyed making this spooky-cute amigurumi. 
Copyright Notice
All rights reserved. This pattern and all accompanying photographs are the property of Natalina Craft and are protected by copyright law. This pattern is for personal use only. Any unauthorized reproduction, redistribution, or publication of this pattern, in whole or in part, is strictly prohibited.
You are welcome to sell finished items made from this pattern in small quantities. While crediting Natalina Craft as the designer is not required, it is always greatly appreciated—especially when selling online—so others can find the original pattern.
Thank you for respecting these guidelines.
Free Crochet Pattern Green Ghost
Free crochet pattern - Green ghost
Instructions
Crochet Pattern - Free Crochet Pattern Green Ghost
Start Here
- Please read the entire pattern before starting.
- This pattern is written using US crochet terms.
- You can use different yarn weights; size will vary. (Mine was made with light worsted yarn.)
Finished Size
Approximately 4 inches (11 cm) tall using light worsted yarn.
Material:
- Yarn calling for a 5.5 mm hook in: green, pink, red, and white
- Small amount of black yarn/thread (eyebrows)
- 3.5 mm crochet hook
- 2 black safety eyes (7.5 mm)
- Polyfill stuffing
- Stitch marker (optional)
- Tapestry needle
Abbreviations
- ch = chain
- mr = magic ring
- sc = single crochet
- inc = increase
- dec = invisible decrease
- sl st = slip stitch
- hdc = half double crochet
- dc = double crochet
You may also like:
Pattern: How to crochet a little green ghost?
Mouth Piece (Pink)
- This piece creates the mouth opening. You will attach it to the head later.
- The mouth is worked in continuous rounds (as a spiral). Use a stitch marker if needed.
With pink yarn and a 3.5 mm hook:
- Round 1: start 6 sc in a magic ring. (6)
- Round 2: [1 inc in all st]. (12)
- Round 3: [1 sc in the next st, 1 inc] x6. (18)
- Round 4: [1 sc in the 2 next st, 1 inc] x6. (24)
- Round 5: [1 sc in the 3 next st, 1 inc] x6. (30)
- 1 sl st in the next st.
- Leave a long tail and cut the yarn
Fasten off, leaving a long tail.
Fold the circle in half and crochet along the flat edge (about 8 sc) to shape the mouth opening. (Use your photos as reference.)Set aside for later.
Body + Head (Green)
- The body is worked in continuous rounds (as a spiral). Use a stitch marker if needed.
- We start by the head.
With green yarn and a 3.5 mm hook:
- Round 1: start 6 sc in a magic ring. (6)
- Round 2: [1 inc in all st]. (12)
- Round 3: [1 sc in the next st, 1 inc] x6. (18)
- Round 4: [1 sc in the 2 next st, 1 inc] x6. (24)
- Round 5: [1 sc in all st]. (24)
- Round 6: [1 sc in the 3 next st, 1 inc] x6. (30)
- Rounds 7 to 9: [1 sc in all st]. (30)
Insert safety eyes between Rounds 6 and 7, spaced 4 stitches apart.
Embroider:
- eyebrows with black thread/yarn above the eyes
- a small nose with green yarn below the eyes
Attach the Mouth Piece
- Round 10: You will now crochet through stitches from the head + mouth piece to join them together:
- 1 sc in the next 15 stitches, working through BOTH layers (green + pink). Note: These 15 stitches at the front of the head will remain unused afterward and will be used later to attach the teeth.
- then 1 sc in the next 15 stitches, working in green stitches only (head only). Note: These stitches are at the back of the head and will be used to continue shaping the body.
(30)
- Round 11:Begin shaping the mouth area first, then finish the round at the back of the head:
(3 sc, 1 dec) × 3 along the lower mouth area, then 1 sc in the next 15 stitches. (27)
- Round 12: Working in the front loops only: (2 sc, 1 dec) × 3; then working in both loops: 1 sc in the next 15 stitches. (24)
Stuff the head lightly. Do not overstuff—you want the mouth to stay flat and be able to close nicely.
- Round 13: [1 sc in the next 24 st]. (24)
- Round 14: [(1 sc in the 2 next st, 1 inc) x3; 1 sc in the next 15 st]. (27)
- Round 15: [(1 sc in the 3 next st, 1 inc) x3; 1 sc in the next 15 st]. (30)
- Round 16: [1 sc in the next 2 st, 1 inc] x10. (40)
- Round 17: working in the front loops only: [1 sc in all st]. (40)
- Round 18: working in the back loops left from round 16: [1 sc in the next 2 st, 1 dec] x10. (30)
- Rounds 19 to 21: [1 sc in all st]. (30)
- Round 22: [1 sc in the next 2 st, 1 inc] x10. (40)
- Round 23: working in the front loops only: [1 sc in all st]. (40)
- Round 24: working in the back loops left from round 22: [1 sc in the next 2 st, 1 dec] x10. (30)
- Rounds 25 to 26: [1 sc in all st]. (30)
- Round 27: [1 sc in the 3 next st, 1 dec] x6. (24)
- Round 28: working in the back loops only: [1 sc in all st]. (24
- Round 29: [1 sc in the 2 next st, 1 dec] x6. (18)
- Round 30: [1 sc in the next st, 1 dec] x6. (12)
Stuff the body.
- Round 31: [6 dec]. (6)
Fasten off and close the opening.
Teeth (White)
Upper Teeth
With white yarn and a 3.5 mm hook:
Hold the ghost upside down. Join white yarn in the 4th stitch from the right of Round 10. Work in back loops only:
1 sc in same stitch, ch 1, 1 sl st in next stitch.( 1 sc in next stitch, ch 1, 1 sl st in next stitch ) × 4.
You should have 5 teeth. Fasten off.
Lower Teeth
Hold the ghost facing you. Join white yarn in the 3rd stitch from the right (in the back loops of Round 11):
1 sc in same stitch, ch 1, 1 sl st in next stitch.( 1 sc in next stitch, ch 1, 1 sl st in next stitch ) × 2.1 sc in next stitch.
You should have 4 teeth. Fasten off.
Tongue (Red)
- The tongue is worked in rows.
With red yarn and a 3.5 mm hook:
- Row 1: ch2; starting in 2nd ch from hook: 1 sc. (1)
- Row 2: ch1, turn; 2 sc in the stitch. (2)
- Rows 3 to 8: ch 1, turn; 1 sc in each stitch. (2)
Fasten off, leaving a long tail.Sew the tongue in the center of the mouth.
Arms (make 2)
- The arms are worked in rounds. Use a stitch marker if needed
With green yarn and a 3.5 mm hook:
- Round 1:6 sc in a magic ring. (6)
- Round 2: [1 inc in all st]. (12)
- Rounds 3 to 4: [1 sc in all st]. (12)
- Round 5: [6 dec]. (6)
- Rounds 6 to 11: [1 sc in all st]. (6)
Do not stuff the arms.Fasten off, leaving a long tail.
Sew the arms to the sides of the body, with the top of the arms aligned with Round 13.
🎉 Congratulations! Your little green ghost is complete! I hope you enjoyed making this spooky-cute amigurumi.
Copyright Notice
All rights reserved. This pattern and all accompanying photographs are the property of Natalina Craft and are protected by copyright law. This pattern is for personal use only. Any unauthorized reproduction, redistribution, or publication of this pattern, in whole or in part, is strictly prohibited.
You are welcome to sell finished items made from this pattern in small quantities. While crediting Natalina Craft as the designer is not required, it is always greatly appreciated—especially when selling online—so others can find the original pattern. Thank you for respecting these guidelines.
I loved making this little cutie. Only problem I have is which one of Natalina’s patterns do I start next?
🫶🏻thanks to Natalina for sharing her talent. 🫶🏻
Thank you very much. Your message made my day!
I am newer to crochet, but I found the attaching the mouth part to be difficult to understand. especially when we put the eyes on. there was no direction on where to put the eyes. clearer instructions on that part would be nice.
Thank you for your feedback. I am sorry the pattern was not clear enough. I will try to make it better.
Have trouble with the mouth. I agree with the previous comment about that too. Also about the eyes. Where I placed the eyes – the next thing about the mouth wasn’t working out correctly.
Hi Barbara, thank you for your message! I’m sorry the pattern wasn’t very clear — it’s one of my first designs, and now that I’ve read it again, I can see it definitely needs more details. I’ll work on updating it as soon as I finish my kids’ school costumes.