
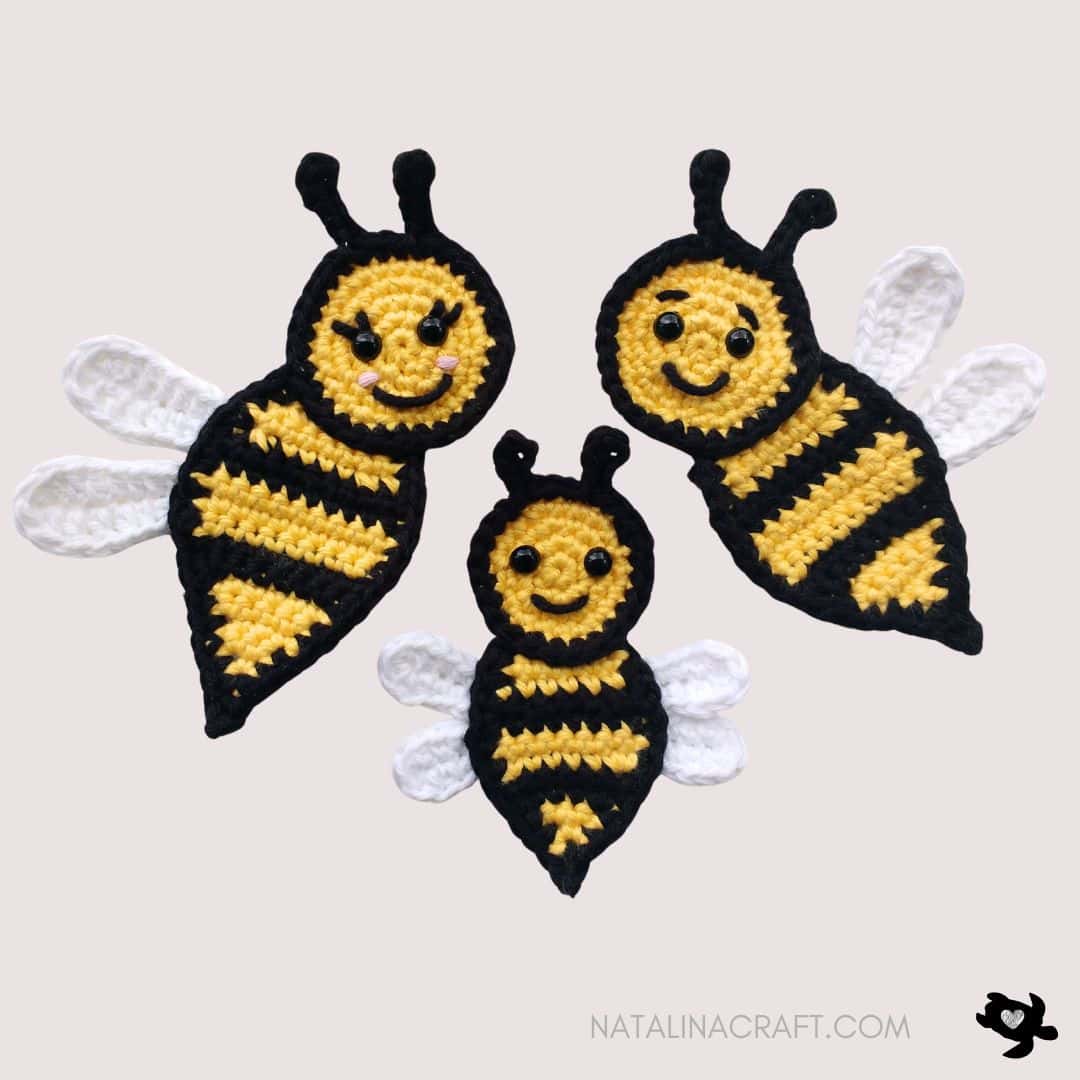
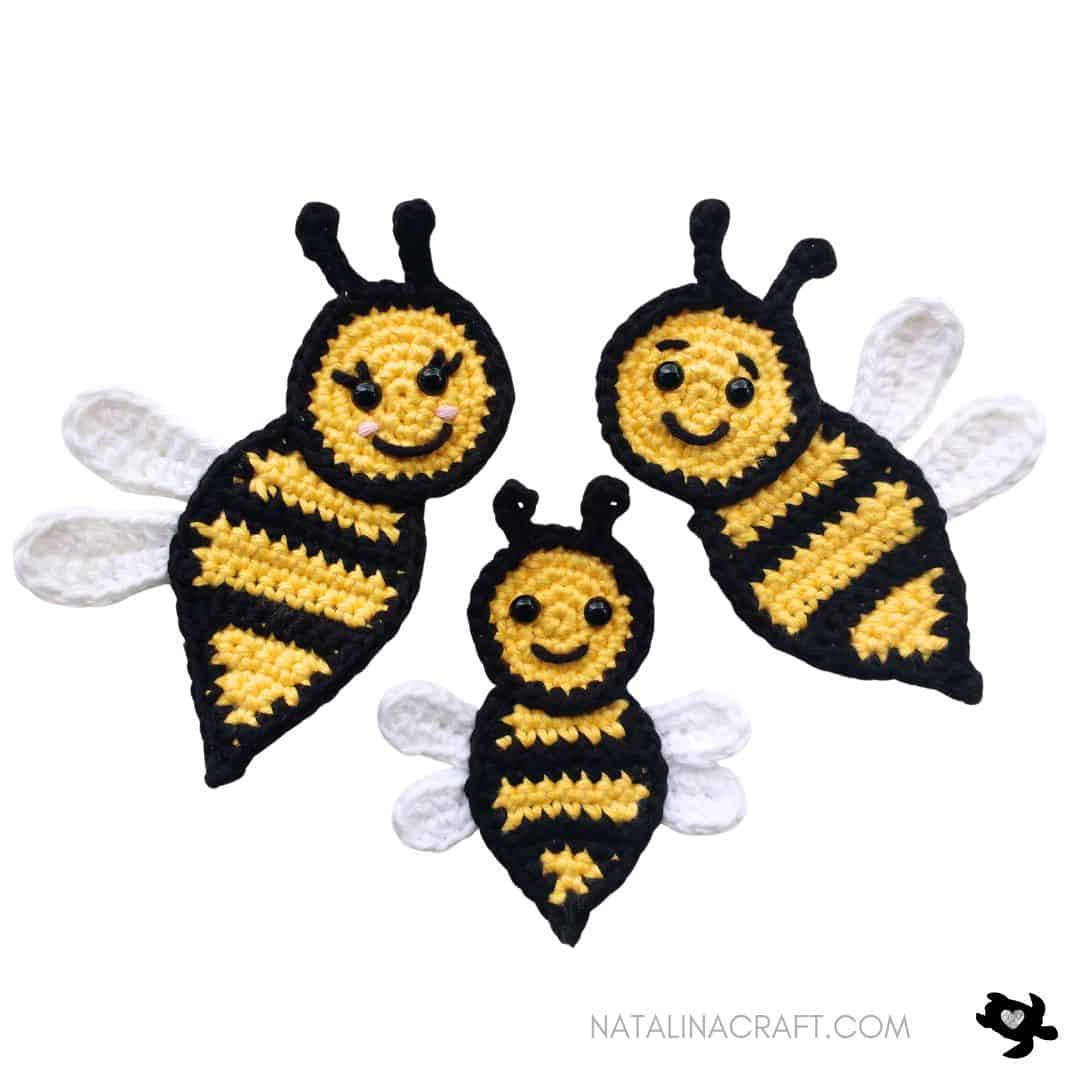
Yesterday was Earth Day, and I couldn’t think of a better way to celebrate than by designing these adorable crochet bee appliques 🐝🌼
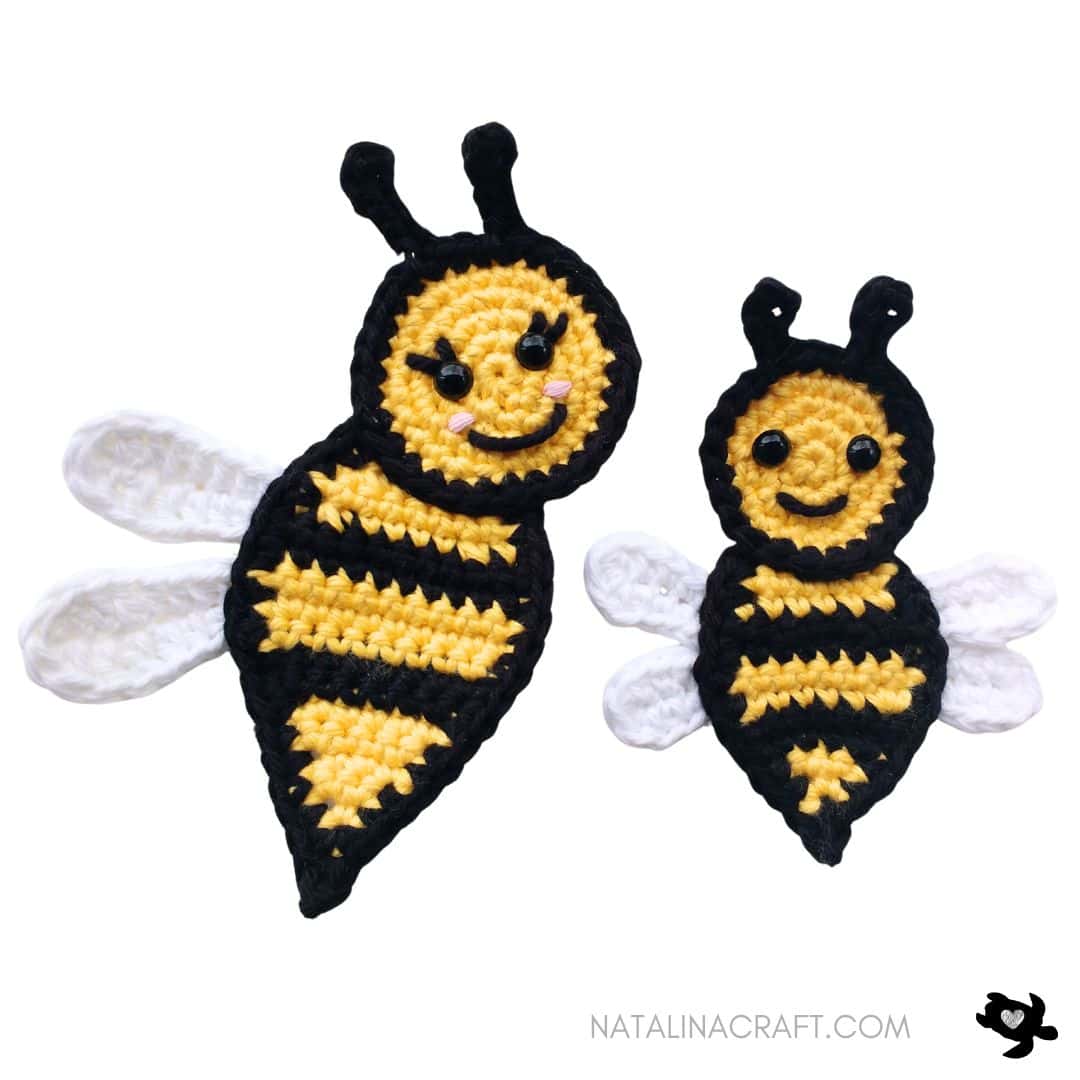
This free crochet bee pattern lets you create cute bee appliques in two sizes, perfect for adding a handmade touch to crochet blankets, bags, hats, baby items, and other children’s projects.
These easy crochet bee appliques are quick to make, beginner-friendly, and use only small amounts of yarn—making them a great scrap yarn crochet project. Whether you’re decorating a spring-themed blanket, creating nature-inspired crochet appliques, or looking for a sweet bee amigurumi-style applique, this pattern is both fun and versatile.
With this free bee applique crochet pattern, you can mix and match colors, add cute facial details, and create charming little bees that work beautifully for spring crochet projects, Earth Day crafts, and handmade gifts.
Join my Facebook group here, where you can ask questions, share your finished projects, and help me choose future designs!
If you make some of these crochet bee appliques, don’t forget to snap a photo and share it using #natalinacraft on Instagram or Facebook—I absolutely love seeing your creations!
I hope you enjoy this free pattern and find it easy to follow. If you have any questions, feel free to write to me—I’ll be happy to help.
Free Crochet Bee Pattern
Size
- Big bee: approx. 5” / 12.5 cm tall
- Small bee: approx. 4” / 10 cm tall
Sizes are based on the indicated yarn and hook sizes. You can use a smaller or larger hook to adjust the size of your applique.
Materials
- Worsted yarn in three colors: Yellow. Black, White (plus a small amount of pink yarn for the female cheeks)
- 3.5 mm crochet hook
- 4 mm crochet hook
- 7.5 mm black safety eyes
- Tapestry needle
Yarn Used
Light worsted cotton yarn in yellow, black, and white
Brand: I Love This Cotton! (Hobby Lobby)
Colors used: Curry (326), Black (02), White (06), Pink (74)
Abbreviations
- ch = chain
- mr = magic ring
- sc = single crochet
- inc = increase
- dec = invisible decrease
- sl st = slip stitch
- hdc = half double crochet
- dc = double crochet
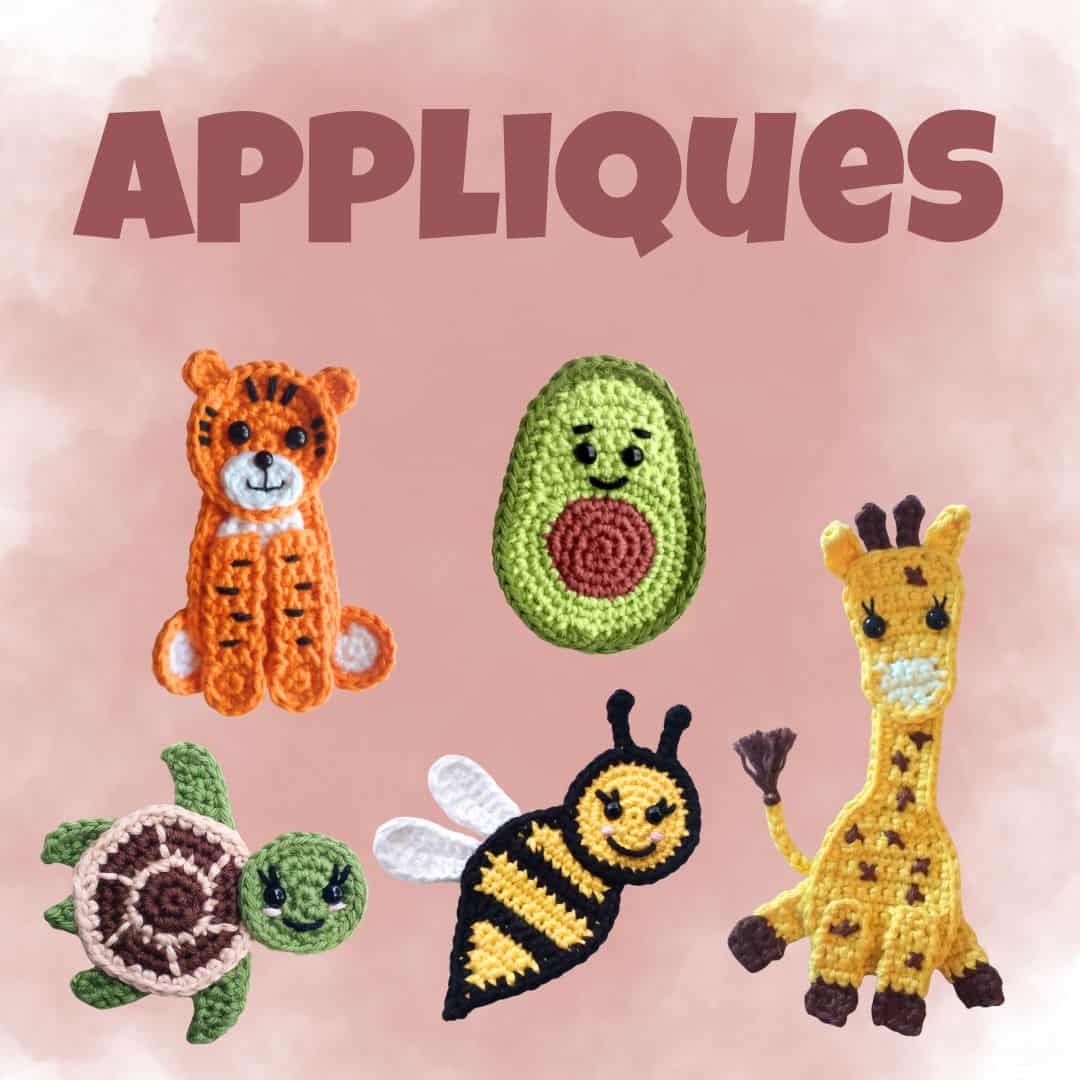
Looking for more appliques?
How to crochet a bee applique?
PART 1 – The Head
Big Bee Head
- Worked in rounds. Do not turn unless stated.
Use a stitch marker if needed.
With yellow yarn and a 3.5 mm hook:
- Round 1: 6 sc in a magic circle. (6)
- Round 2: 6 inc. (12)
- Round 3: [1 sc in next st, 1 inc in next st] x6. (18)
- Round 4: [1 sc in next 2 st, 1 inc in next st] x6. (24)
- Round 5: [1 sc in next 3 st, 1 inc in next st] x6. (30)
Switch to black yarn and a 4 mm hook:
- Round 6:
- sc 6
- Change to 3.5 mm hook
- 1 sc in next st (place stitch marker), ch 6 for the first antenna
- Turn; 2 sc in 2nd ch from hook, sl st in next 4 ch
- Sl st in marked stitch
- sc 2
- 1 sc in next st (place stitch marker), ch 6 for second antenna
- Turn; 2 sc in 2nd ch from hook, sl st in next 4 ch
- Sl st in marked stitch
- Change back to 4 mm hook, sc 20
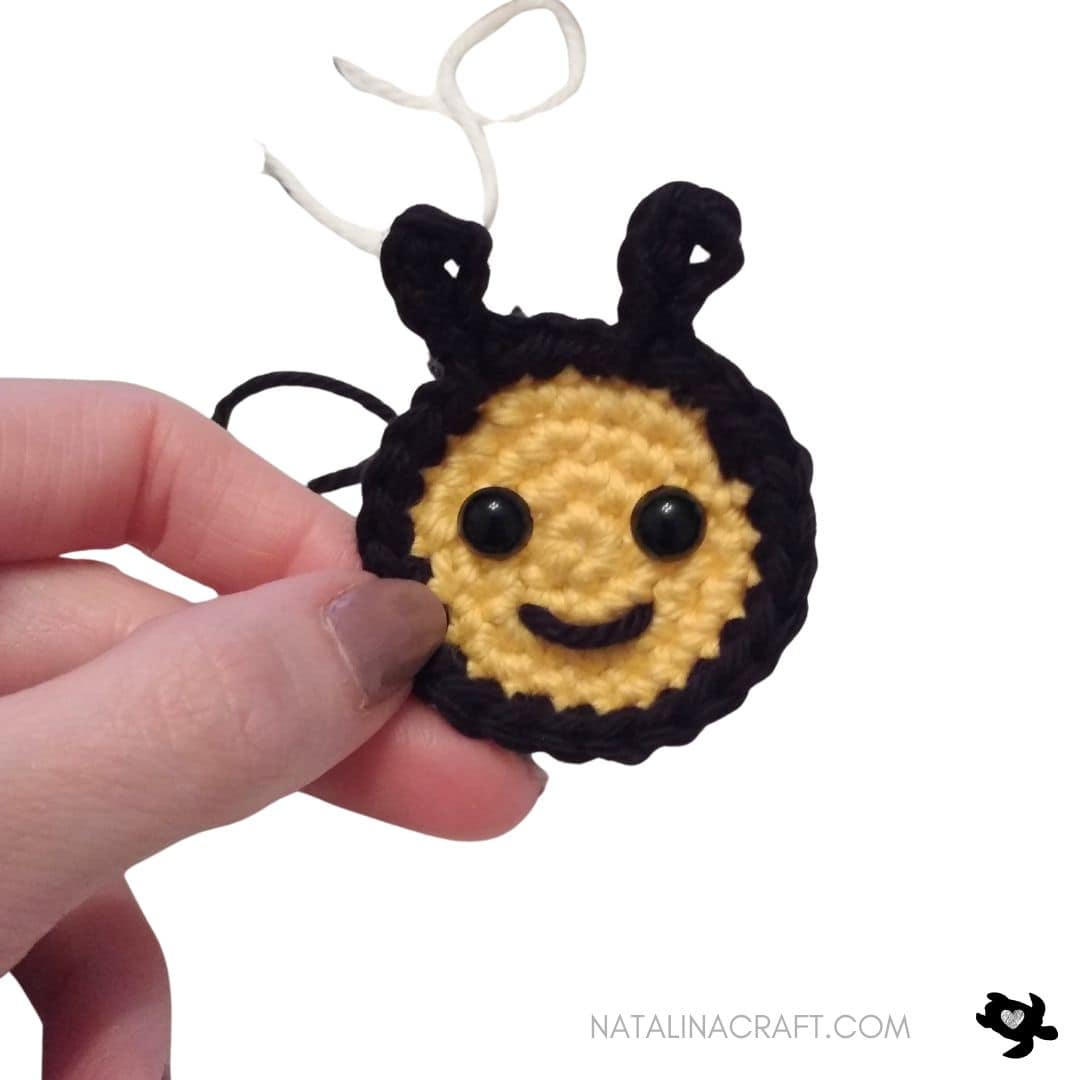
Small Bee Head
With yellow yarn and a 3.5 mm hook:
- Round 1: 6 sc in a magic ring. (6)
- Round 2: 6 inc. (12)
- Round 3: [1 sc in next st, 1 inc in next st] x6. (18)
- Round 4: [1 sc in next 2 st, 1 inc in next st] x6. (24)
Switch to black yarn and a 4 mm hook:
- Round 5:
- sc 6
- Change to 3.5 mm hook
- 1 sc (place stitch marker), ch 4 for antenna
- Turn; 2 sc in 2nd ch, sl st in next 2 ch
- Sl st in marked stitch
- sc 2
- Repeat for second antenna
- Change back to 4 mm hook, sc 14
PART 2 – The Body
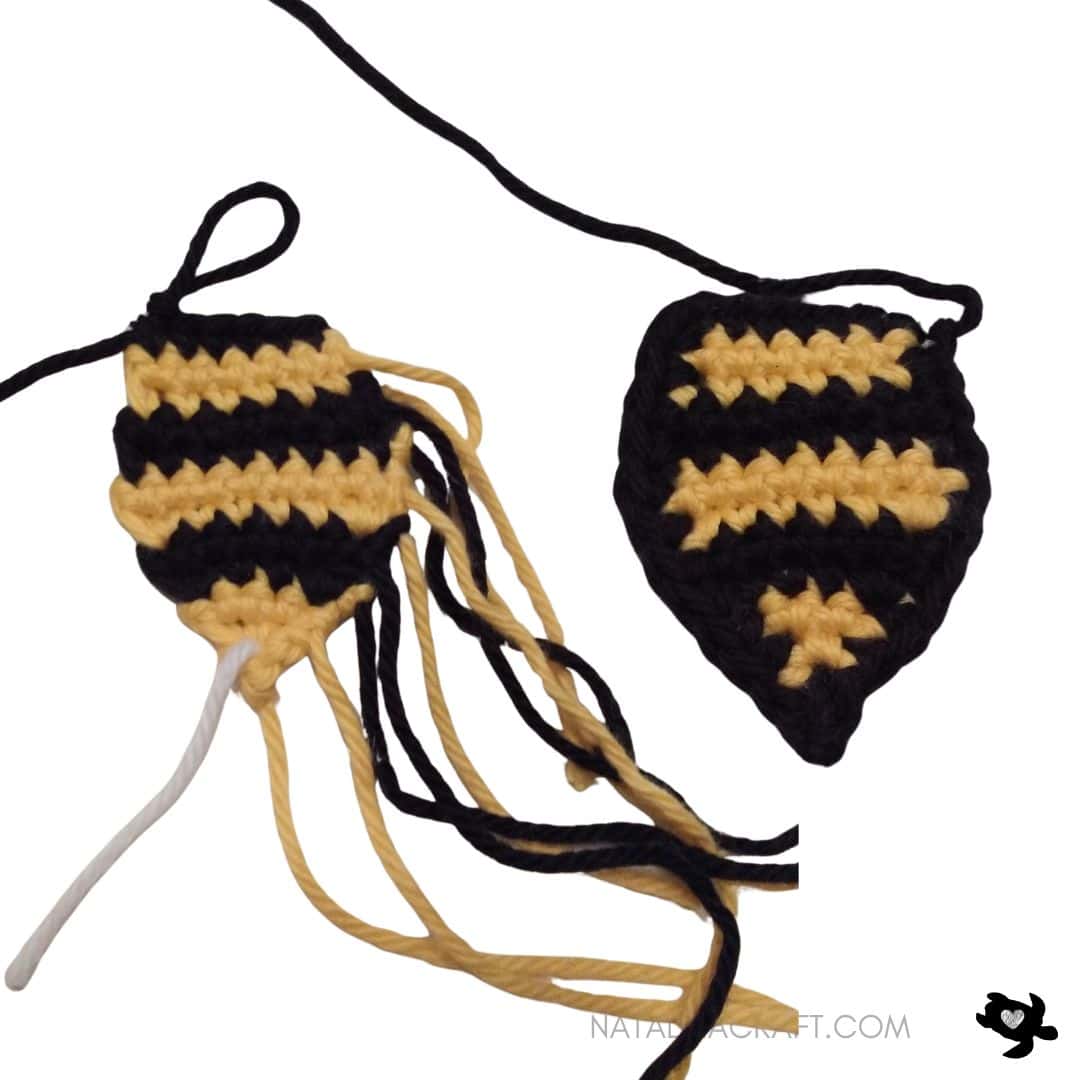
Big Bee Body
Worked in rows using a 3.5 mm hook.
Start with yellow yarn:
- Row 1: ch2
- Row 2: turn; 1 sc in 2nd ch from hook. Place stitch marker (1)
- Row 3: ch1, turn; 1 inc. (2)
- Row 4: ch1, turn; inc in all. (4)
- Row 5: ch1, turn; 1 sc in all st. (4)
- Row 6: ch1, turn; 1 inc, sc in next 2, 1 inc. (6)
- Row 7: ch1, turn; 1 sc in all st. (6)
Change to black yarn:
- Row 8: ch1, turn; 1 inc, sc in next 4, 1 inc. (8)
- Row 9: ch1, turn; 1 sc in all st. (8)
Change to yellow yarn:
- Row 10: ch1, turn; 1 inc, sc in next 6, 1 inc. (10)
- Row 11: ch1, turn; 1 sc in all st. (10)
- Row 12: ch1, turn; 1 sc in all st. (10)
Change to black yarn:
- Row 13: ch1, turn; 1 sc in all st. (10)
- Row 14: ch1, turn; 1 sc in all st. (10)
Change to yellow yarn:
- Row 15: ch1, turn; 1 dec, sc in next 6, 1 dec. (8)
- Row 16: ch1, turn; 1 sc in all st. (8)
- Row 17: ch1, turn; 1 dec, sc in next 4, 1 dec. (6)
Change to black yarn:
- Row 18: ch1, turn; 1 sc in all st. (6)
- Row 19: ch1, turn; 1 sc in all st. (6)
Do not turn.
Switch to a 4 mm hook and work 16 sc evenly along the edge to the stitch marker.
Switch back to 3.5 mm hook, 1 sc in marked stitch, ch 3, turn; starting in the 2nd ch from the hook: 1 sc in next 2 ch, 1 sc in marked stitch.
Switch to 4 mm hook, work 16 sc evenly along the opposite edge.
Leave a long tail for sewing.
Small Bee Body
Worked in rows using a 3.5 mm hook.
Start with yellow yarn:
- Row 1: ch2
- Row 2: turn; 1 sc in 2nd ch from hook. Place stitch marker (1)
- Row 3: ch1, turn; 1 inc. (2)
- Row 4: ch1, turn; inc in all. (4)
- Row 5: ch1, turn; 1 inc, sc in next 2, 1 inc. (6)
Change to black yarn:
- Row 6: ch1, turn; 1 sc in all st. (6)
- Row 7: ch1, turn; 1 sc in all st. (6)
Change to yellow yarn:
- Row 8: ch1, turn; 1 inc, sc in next 4, 1 inc. (8)
- Row 9: ch1, turn; 1 sc in all st. (8)
Change to black yarn:
- Row 10: ch1, turn; 1 sc in all st. (8)
- Row 11: ch1, turn; 1 dec, sc in next 4, 1 dec. (6)
Change to yellow yarn:
- Row 12: ch1, turn; 1 sc in all st. (6)
- Row 13: ch1, turn; 1 sc in all st. (6)
Change to black yarn:
- Row 14: ch1, turn; 1 sc in all st. (6)
Do not turn.
Switch to a 4 mm hook and work 10 sc evenly along the edge to the stitch marker.
Switch back to 3.5 mm hook, 1 sc in marked stitch, ch 2, turn; starting in 2nd ch from the hook: 1 sc in next ch, 1 sc in marked stitch.
Switch to 4 mm hook, work 10 sc evenly along the opposite edge.
Leave a long tail for sewing.
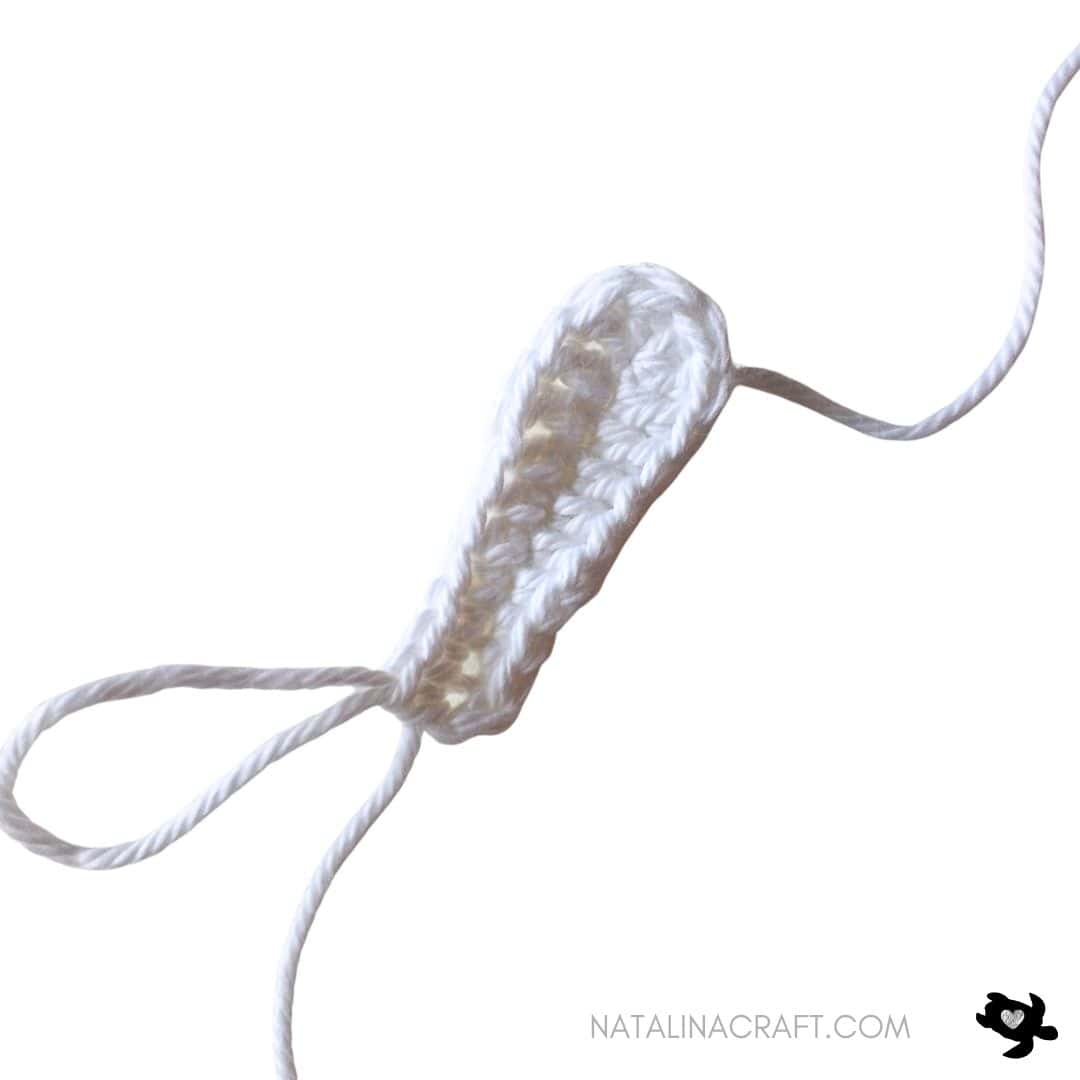
PART 3 – The Wings
Big Bee Wings (Make 2)
With white yarn and a 3.5 mm hook:
ch 11
From 2nd ch from hook:
- sc 4
- hdc 3
- dc 2
- 4 dc in last ch
Continue on the opposite side of the chain:
- dc 2
- hdc 3
- sc 4
- sl st
Leave a long tail for sewing.
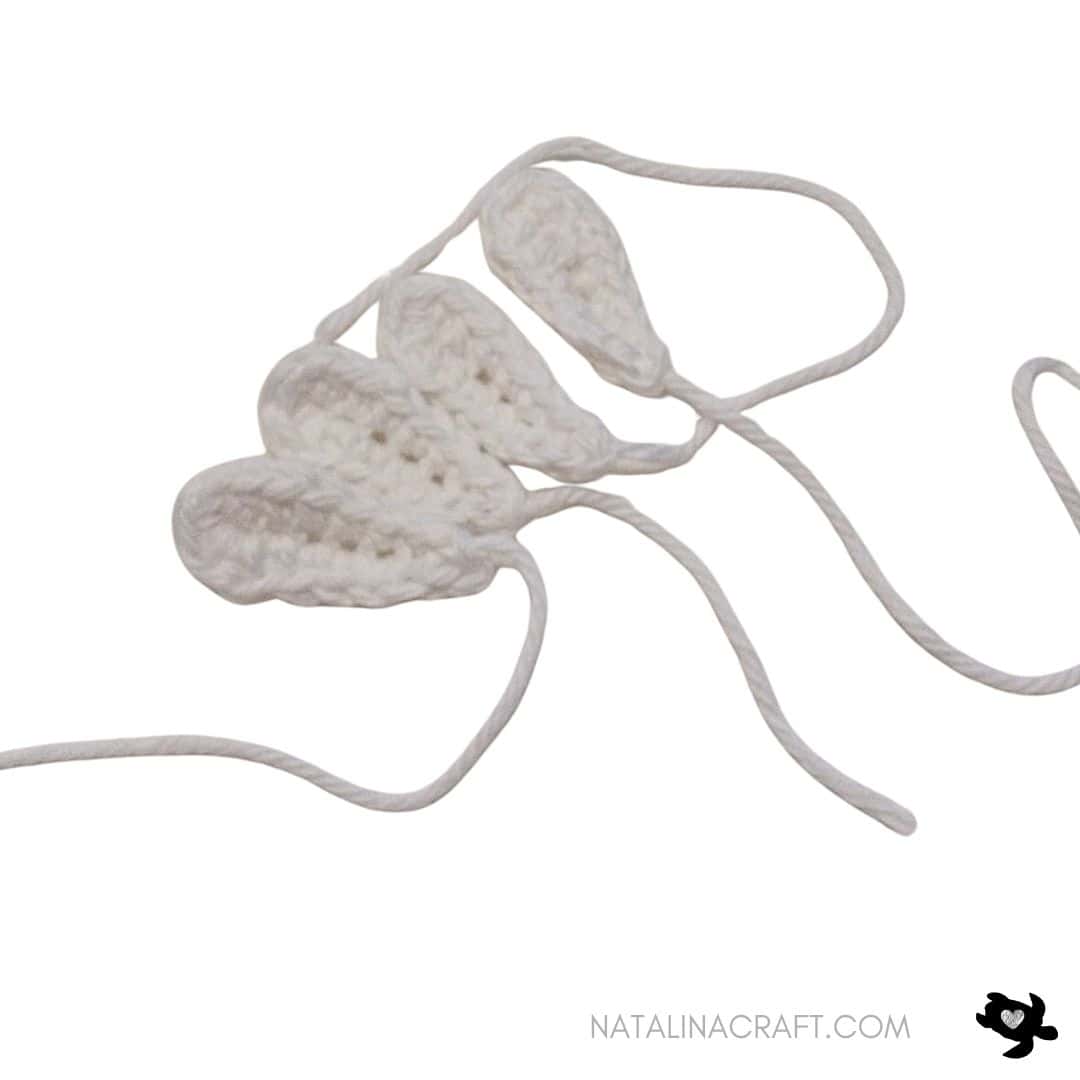
Small Bee Wings (Make 4)
With white yarn:
ch 8
From 2nd ch from the hook:
- sl st 2
- sc 3
- hdc 1
- 4 hdc in last ch
Continue on the opposite side of the chain:
- hdc 1
- sc 3
- sl st 2
- sl st
Leave a long tail.
PART 4 – Faces
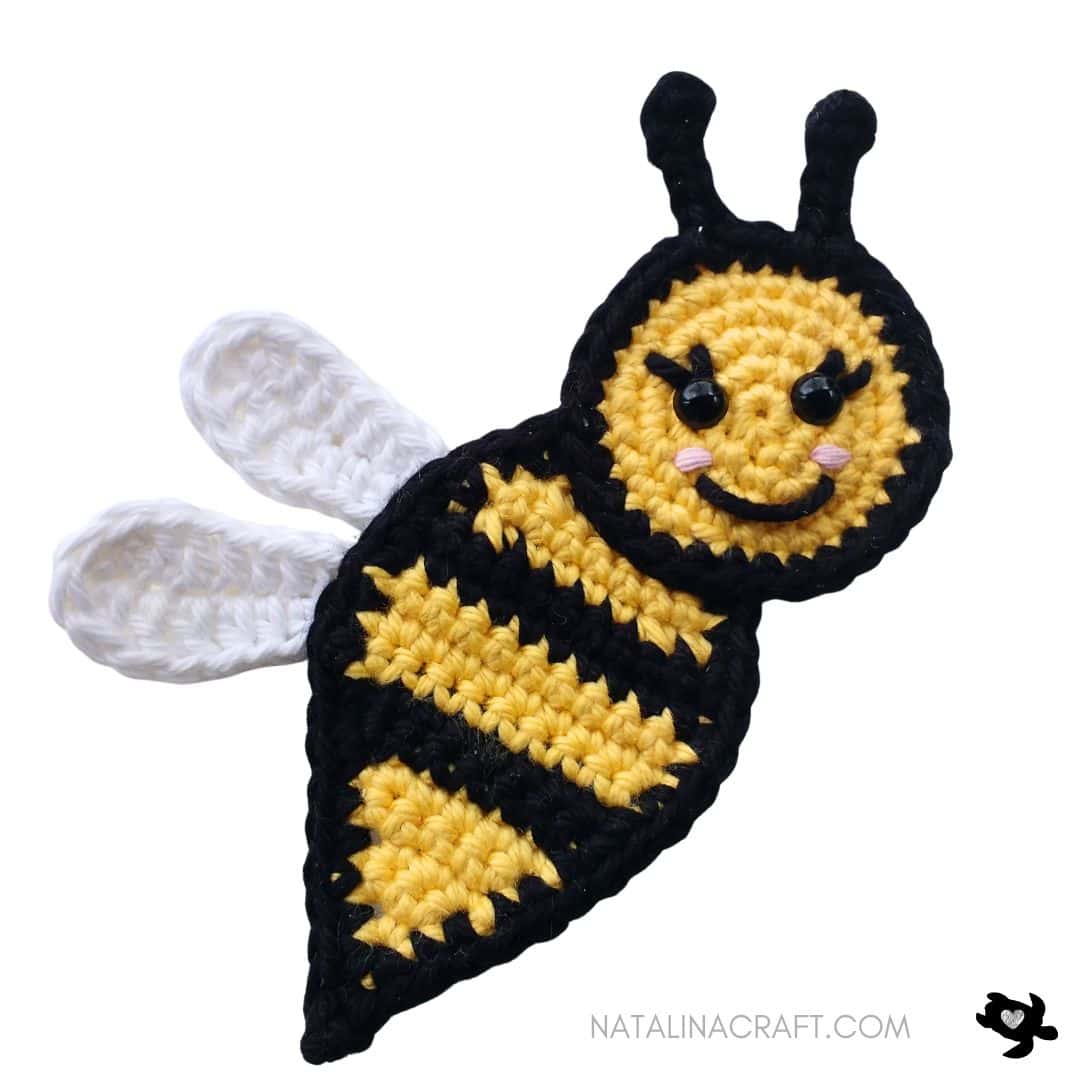
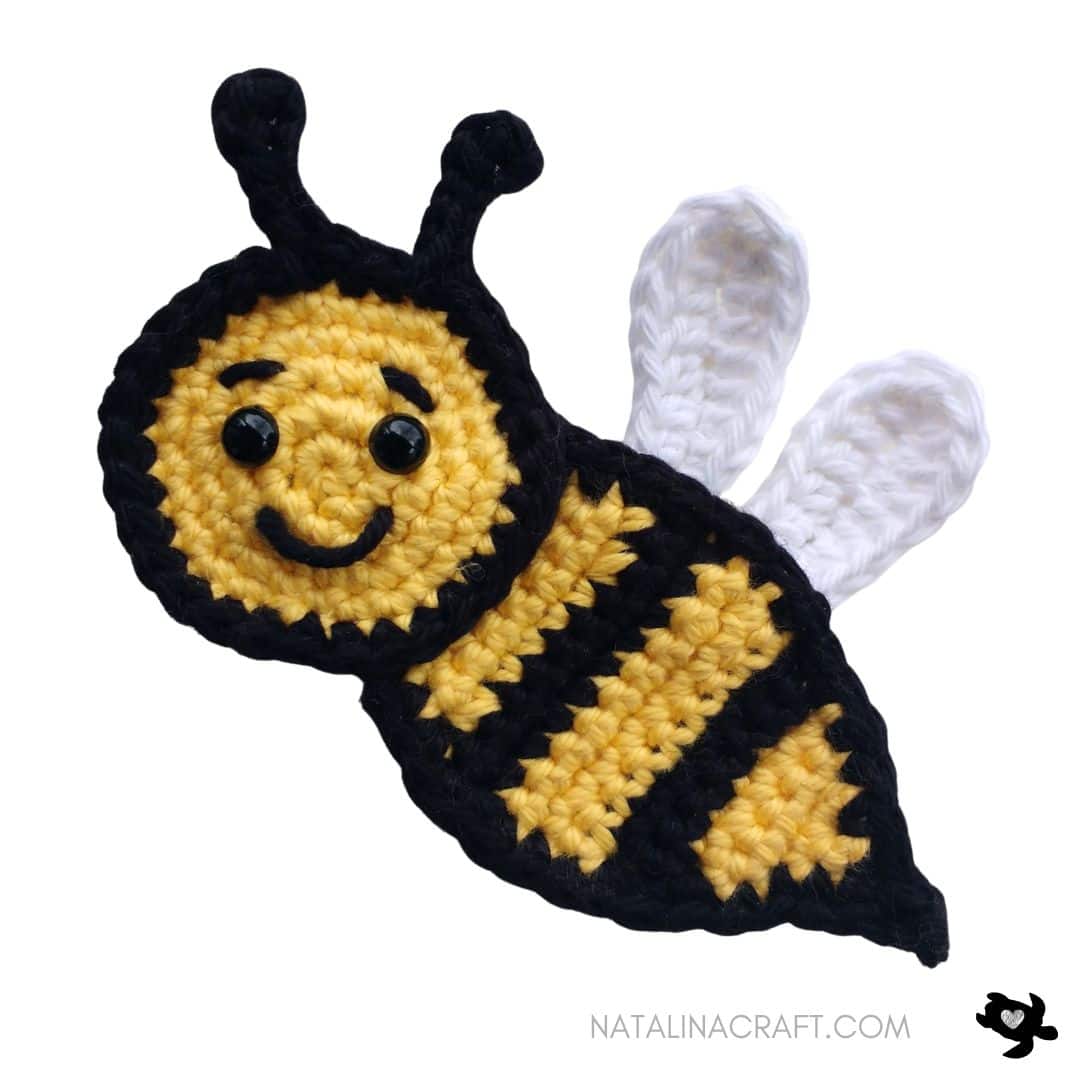
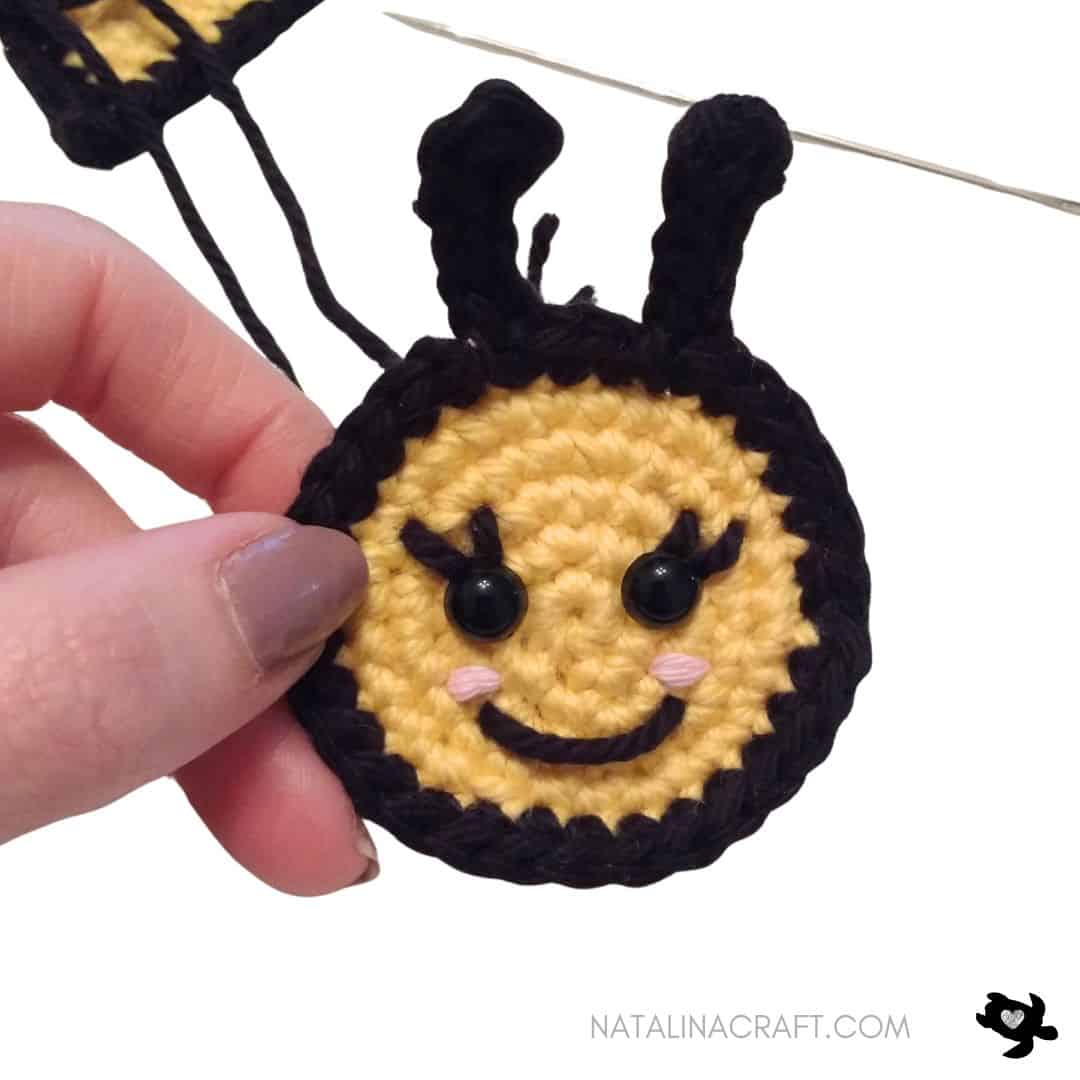
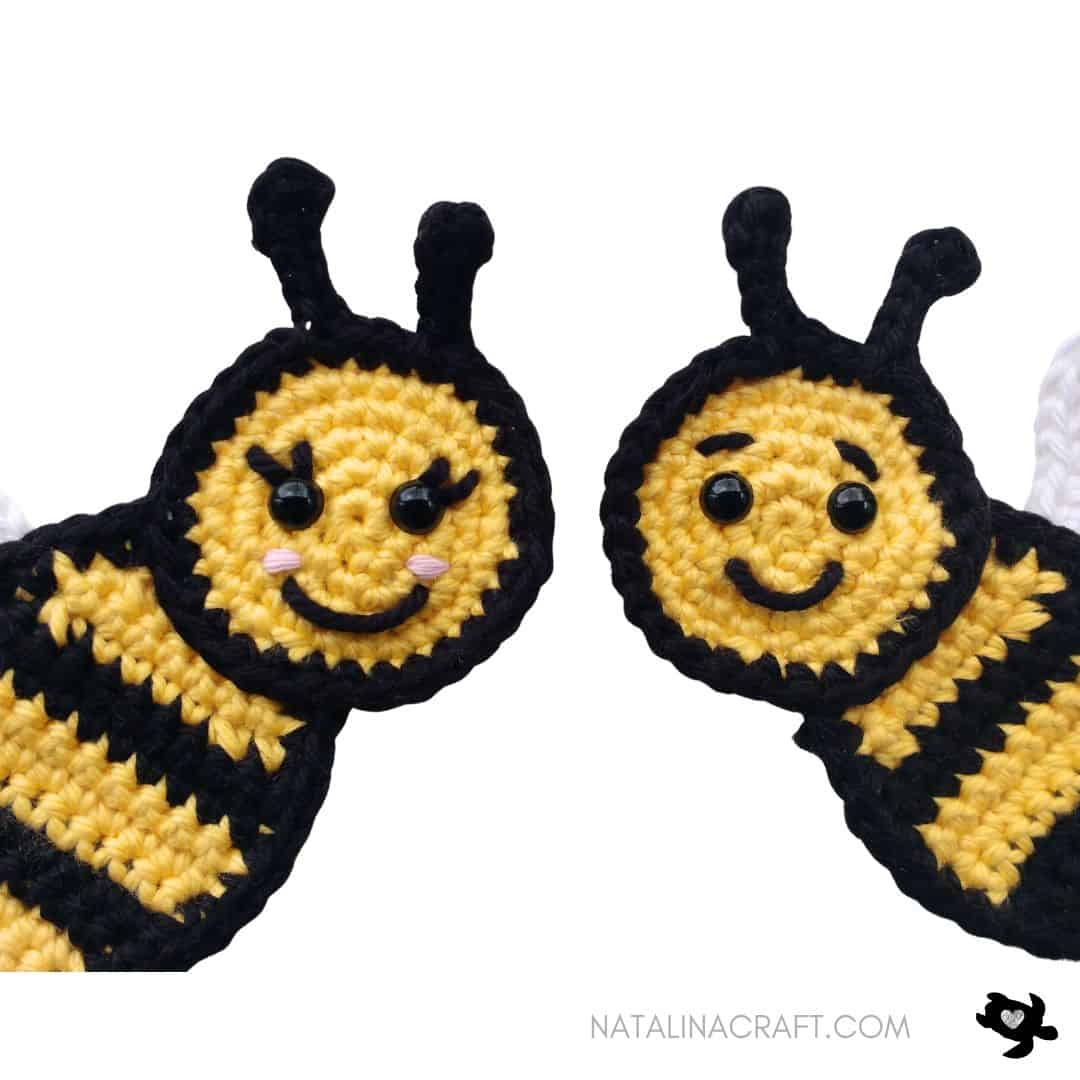
- Male bee: Eyes between Rounds 2–3, spaced 3 stitches apart. Embroider eyebrows and mouth.
- Female bee: Add eyelashes before inserting eyes. Embroider mouth and pink cheeks.
- Small bee: Eyes between Rounds 2–3, embroider a simple mouth.
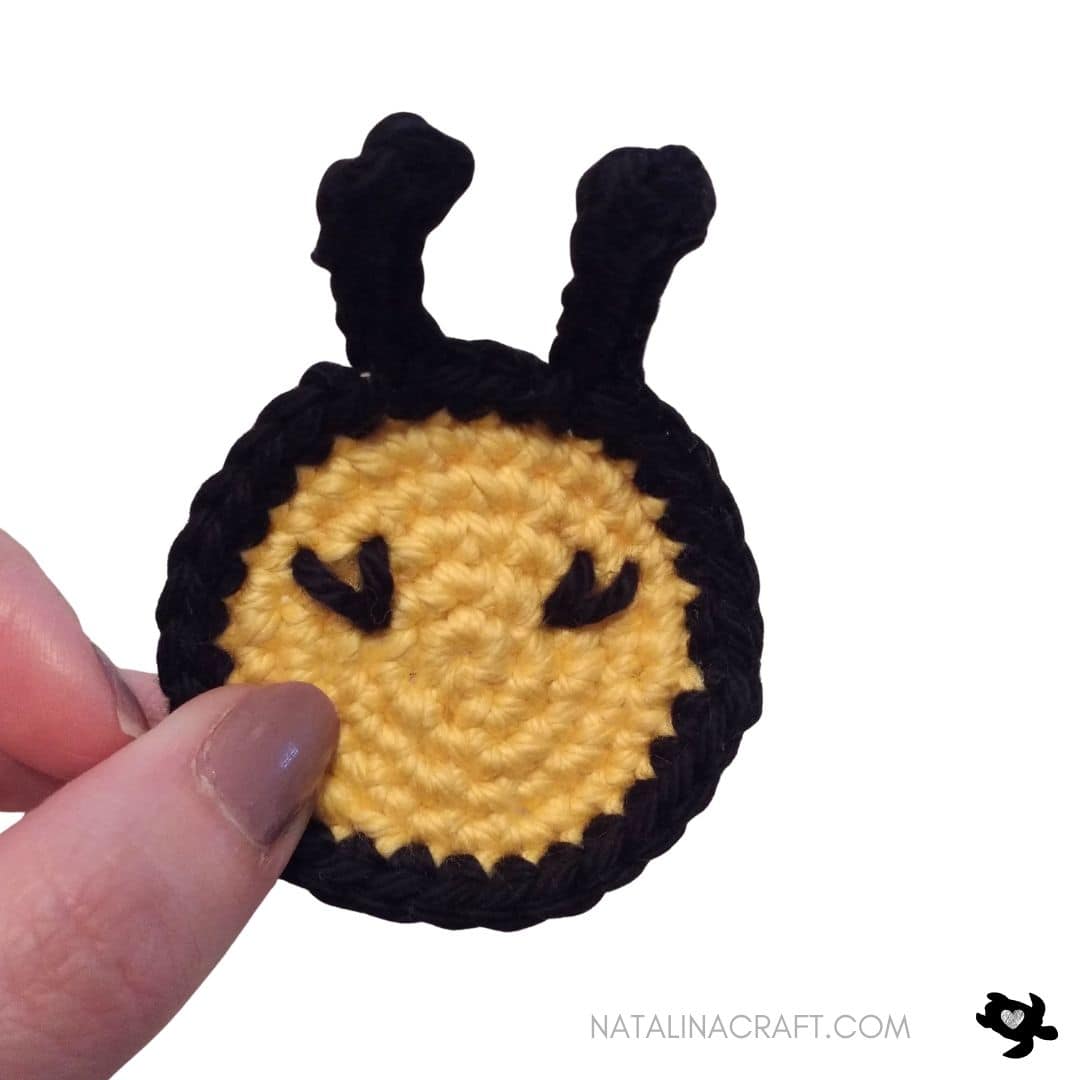
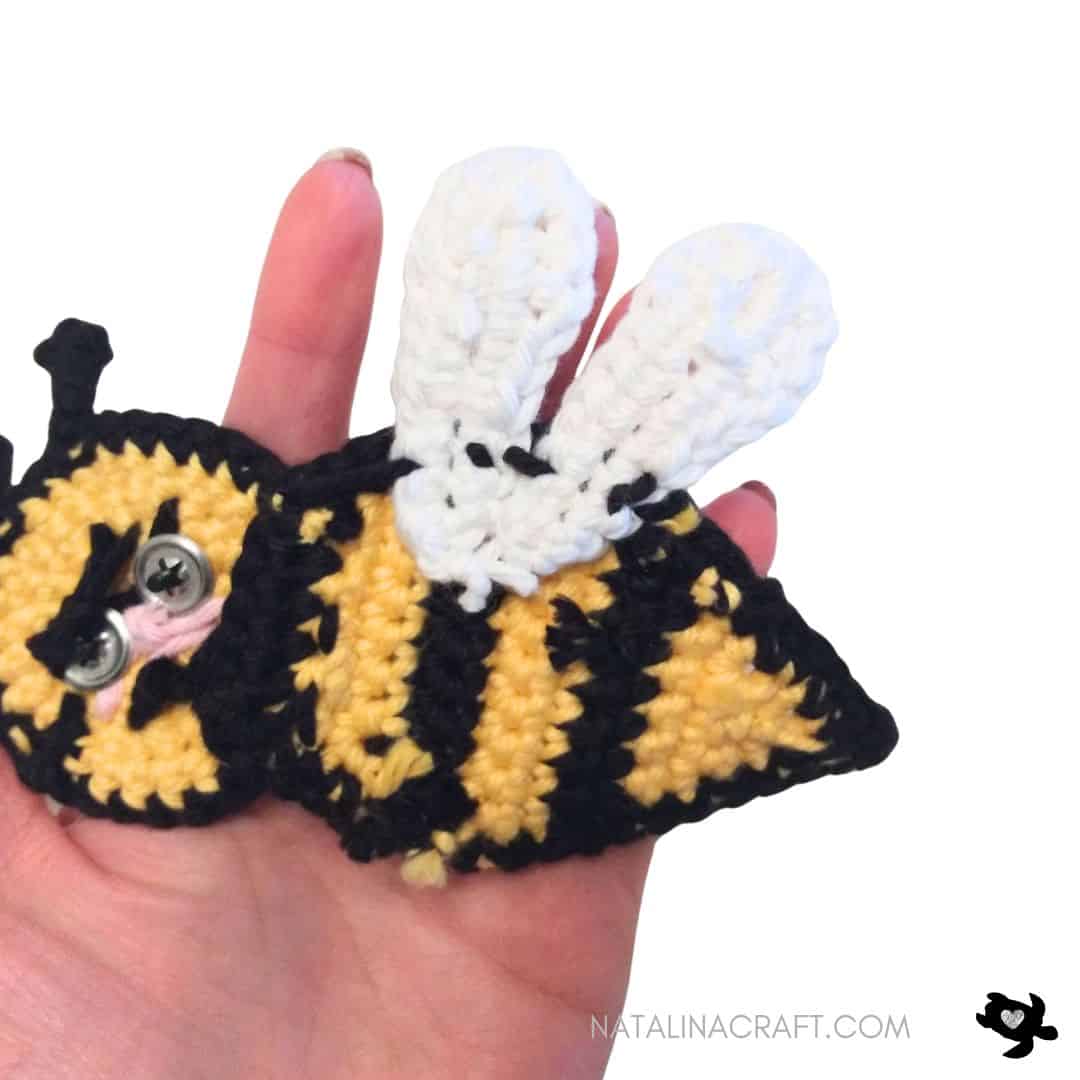
PART 5 – Assembly
- Sew the head to the body (centered or offset—your choice).
- Attach wings on the inside of the body.
- Big bee: wings attached at the top
- Small bee: wings attached on each side
Hide approx. 0.8” / 1.5 cm of the wings inside the body for a neat finish.
🐝 Congratulations! Your crochet bee appliques are complete!
This project uses very little yarn and makes the sweetest little bumble bees. My official tester absolutely loved them—and even introduced them to the crochet avocado family! 🥑💛


Copyright Notice
All rights reserved. This pattern and all accompanying photographs are the property of Natalina Craft and are protected by copyright law. This pattern is for personal use only. Any unauthorized reproduction, redistribution, or publication of this pattern, in whole or in part, is strictly prohibited.
You are welcome to sell finished items made from this pattern in small quantities. While crediting Natalina Craft as the designer is not required, it is always greatly appreciated—especially when selling online—so others can find the original pattern.
Thank you for respecting these guidelines.
Bee Applique Crochet Pattern
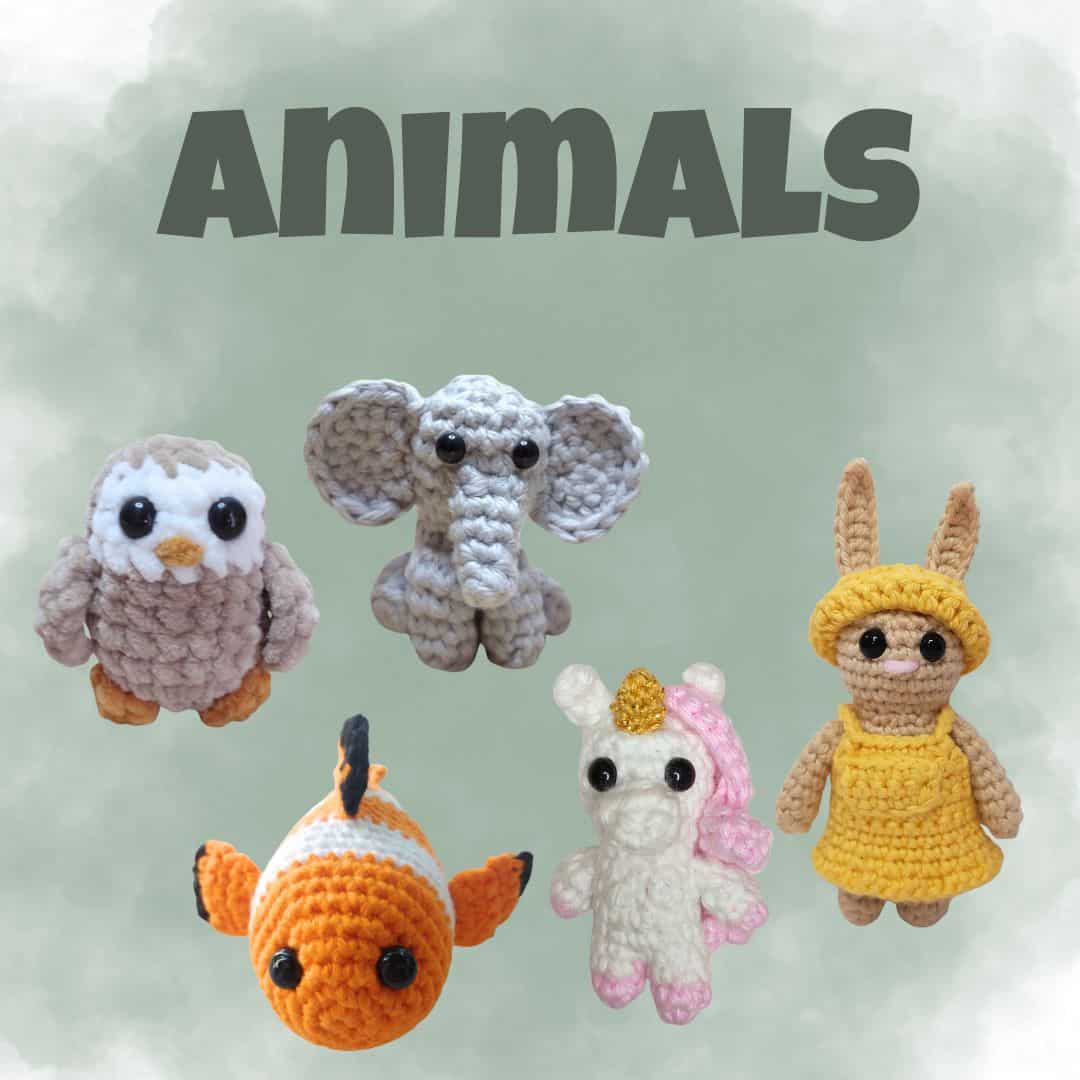
Looking for more Animal ideas?
Crochet Bee - Appliques
Instructions
Free Crochet Bee Pattern
Size
- Big bee: approx. 5” / 12.5 cm tall
- Small bee: approx. 4” / 10 cm tall
Sizes are based on the indicated yarn and hook sizes. You can use a smaller or larger hook to adjust the size of your applique.
Materials
- Worsted yarn in three colors: Yellow. Black, White (plus a small amount of pink yarn for the female cheeks)
- 3.5 mm crochet hook
- 4 mm crochet hook
- 7.5 mm black safety eyes
- Tapestry needle
Yarn Used
Light worsted cotton yarn in yellow, black, and whiteBrand: I Love This Cotton! (Hobby Lobby)Colors used: Curry (326), Black (02), White (06), Pink (74)
Abbreviations
- ch = chain
- mr = magic ring
- sc = single crochet
- inc = increase
- dec = invisible decrease
- sl st = slip stitch
- hdc = half double crochet
- dc = double crochet
How to crochet a bee applique?
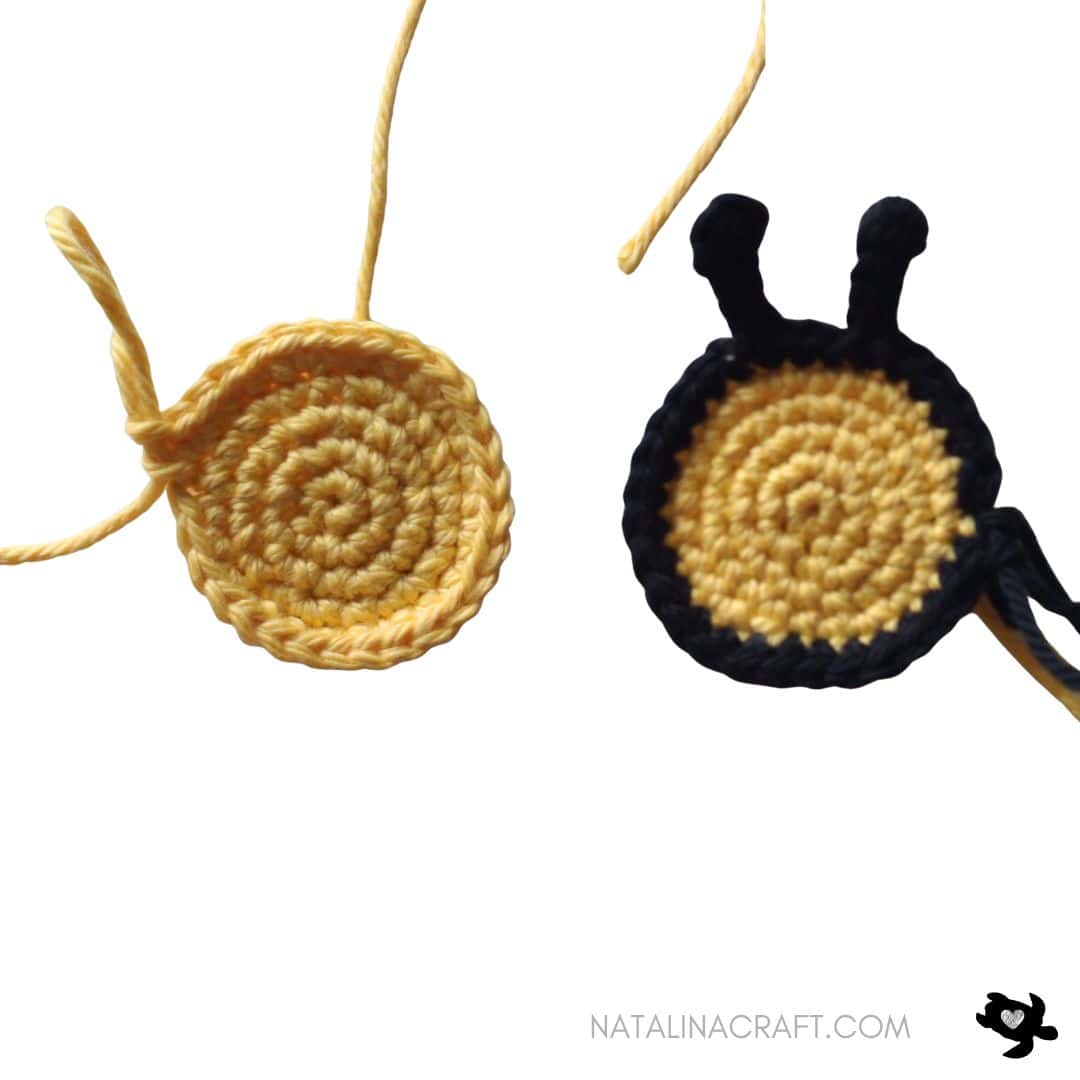
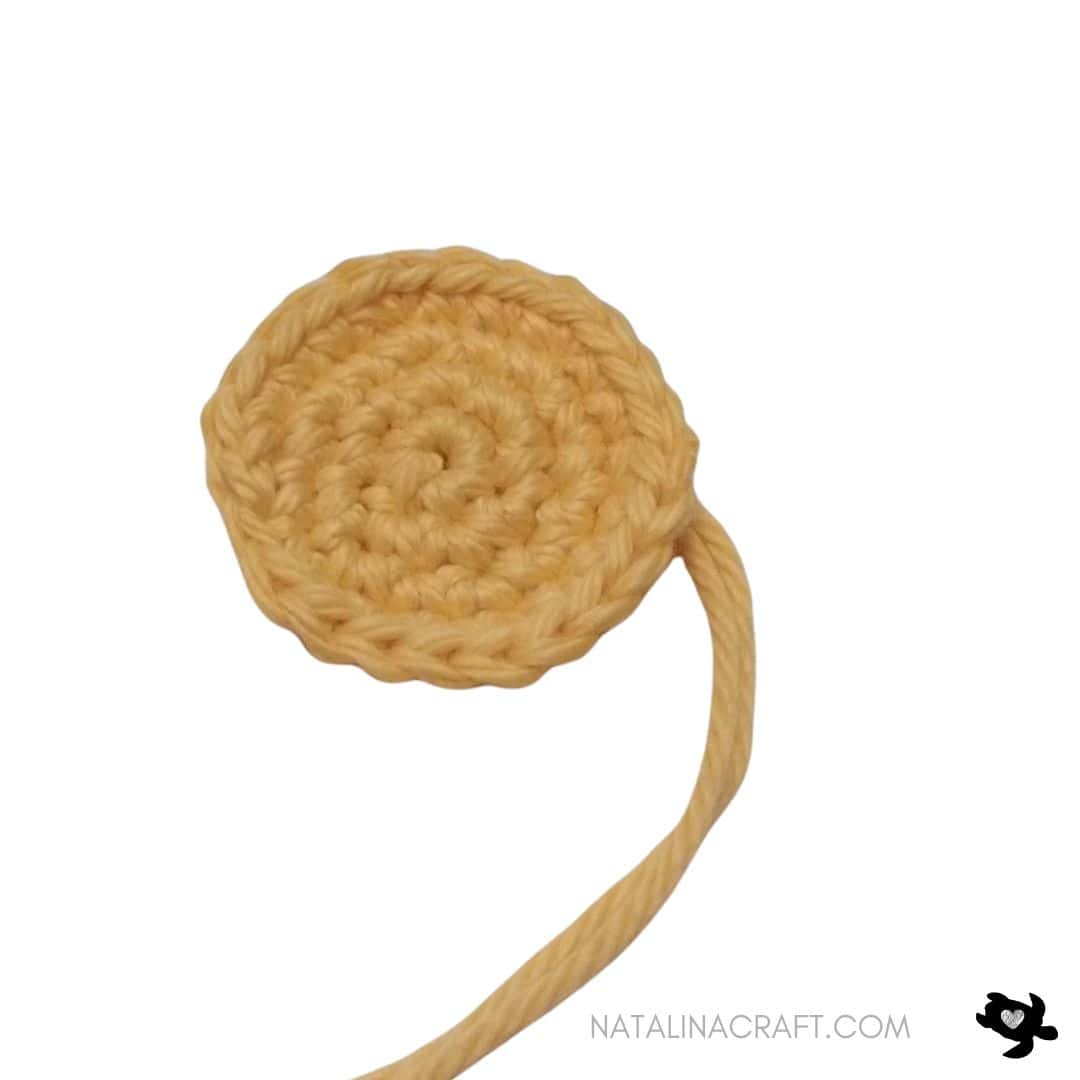
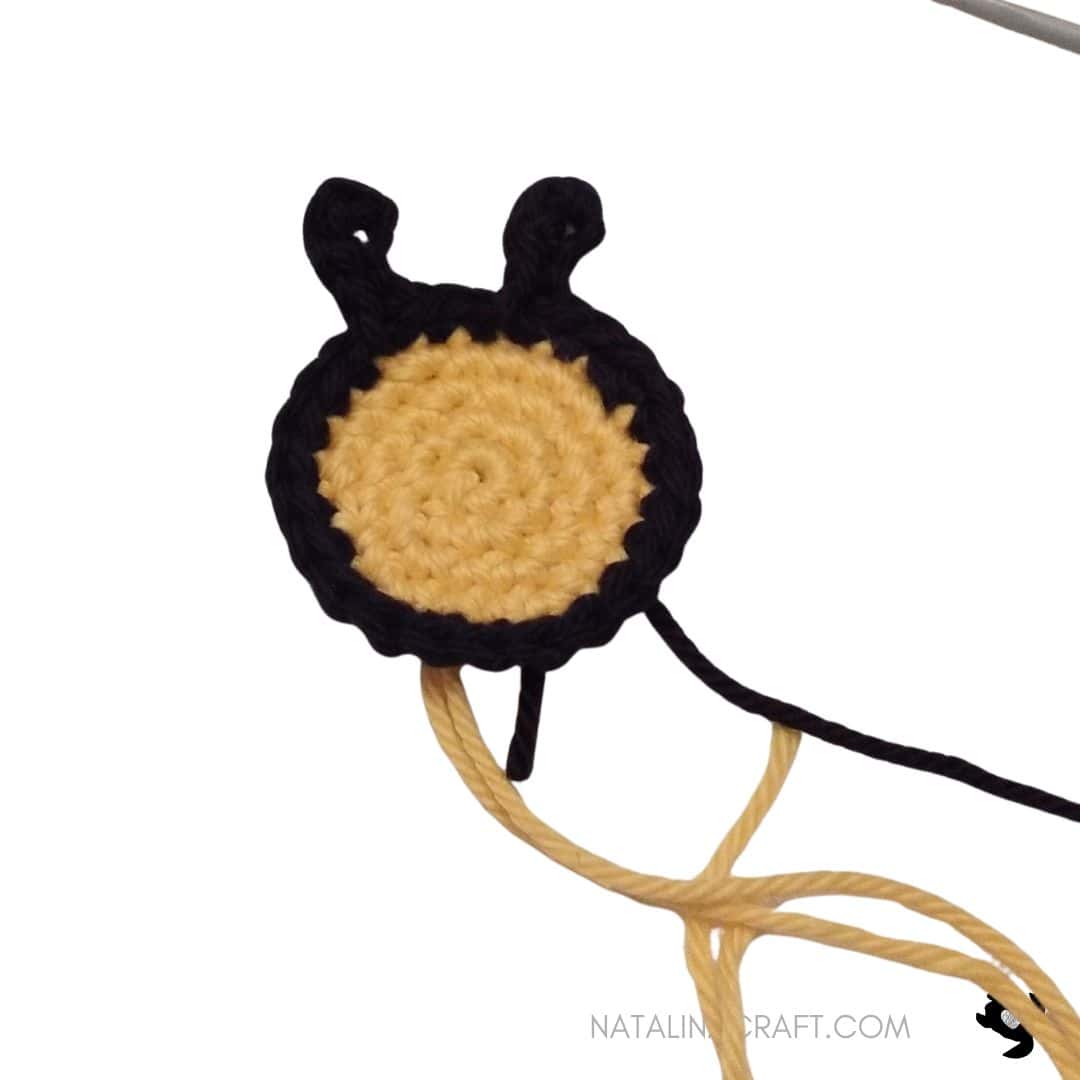
PART 1 – The Head
Big Bee Head
- Worked in rounds. Do not turn unless stated.Use a stitch marker if needed.
With yellow yarn and a 3.5 mm hook:
- Round 1: 6 sc in a magic circle. (6)
- Round 2: 6 inc. (12)
- Round 3: [1 sc in next st, 1 inc in next st] x6. (18)
- Round 4: [1 sc in next 2 st, 1 inc in next st] x6. (24)
- Round 5: [1 sc in next 3 st, 1 inc in next st] x6. (30)
Switch to black yarn and a 4 mm hook:
- Round 6:
- sc 6
- Change to 3.5 mm hook
- 1 sc in next st (place stitch marker), ch 6 for the first antenna
- Turn; 2 sc in 2nd ch from hook, sl st in next 4 ch
- Sl st in marked stitch
- sc 2
- 1 sc in next st (place stitch marker), ch 6 for second antenna
- Turn; 2 sc in 2nd ch from hook, sl st in next 4 ch
- Sl st in marked stitch
- Change back to 4 mm hook, sc 20
Small Bee Head
With yellow yarn and a 3.5 mm hook:
- Round 1: 6 sc in a magic ring. (6)
- Round 2: 6 inc. (12)
- Round 3: [1 sc in next st, 1 inc in next st] x6. (18)
- Round 4: [1 sc in next 2 st, 1 inc in next st] x6. (24)
Switch to black yarn and a 4 mm hook:
- Round 5:
- sc 6
- Change to 3.5 mm hook
- 1 sc (place stitch marker), ch 4 for antenna
- Turn; 2 sc in 2nd ch, sl st in next 2 ch
- Sl st in marked stitch
- sc 2
- Repeat for second antenna
- Change back to 4 mm hook, sc 14
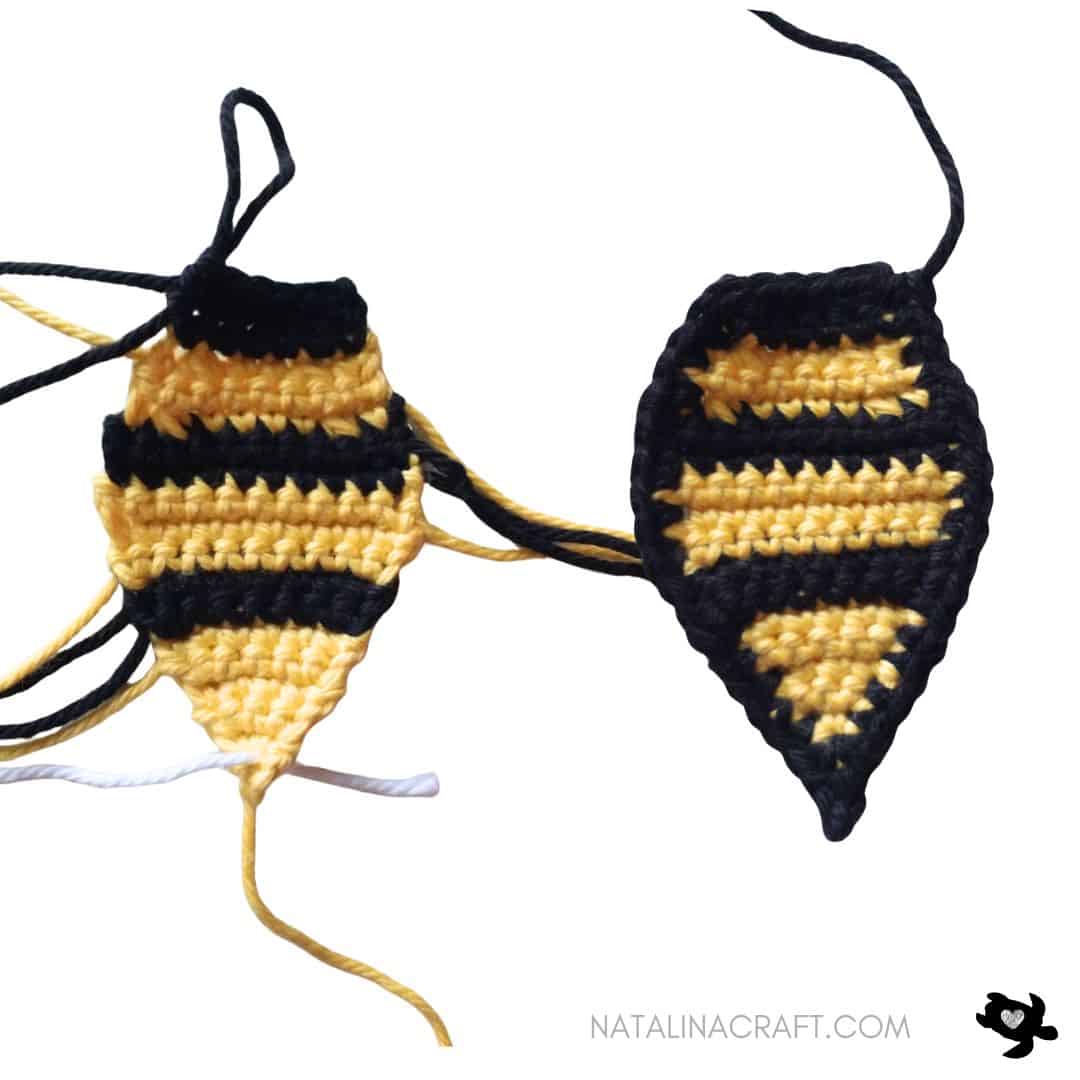
PART 2 – The Body
Big Bee Body
Worked in rows using a 3.5 mm hook.
Start with yellow yarn:
- Row 1: ch2
- Row 2: turn; 1 sc in 2nd ch from hook. Place stitch marker (1)
- Row 3: ch1, turn; 1 inc. (2)
- Row 4: ch1, turn; inc in all. (4)
- Row 5: ch1, turn; 1 sc in all st. (4)
- Row 6: ch1, turn; 1 inc, sc in next 2, 1 inc. (6)
- Row 7: ch1, turn; 1 sc in all st. (6)
Change to black yarn:
- Row 8: ch1, turn; 1 inc, sc in next 4, 1 inc. (8)
- Row 9: ch1, turn; 1 sc in all st. (8)
Change to yellow yarn:
- Row 10: ch1, turn; 1 inc, sc in next 6, 1 inc. (10)
- Row 11: ch1, turn; 1 sc in all st. (10)
- Row 12: ch1, turn; 1 sc in all st. (10)
Change to black yarn:
- Row 13: ch1, turn; 1 sc in all st. (10)
- Row 14: ch1, turn; 1 sc in all st. (10)
Change to yellow yarn:
- Row 15: ch1, turn; 1 dec, sc in next 6, 1 dec. (8)
- Row 16: ch1, turn; 1 sc in all st. (8)
- Row 17: ch1, turn; 1 dec, sc in next 4, 1 dec. (6)
Change to black yarn:
- Row 18: ch1, turn; 1 sc in all st. (6)
- Row 19: ch1, turn; 1 sc in all st. (6)
Do not turn.Switch to a 4 mm hook and work 16 sc evenly along the edge to the stitch marker.Switch back to 3.5 mm hook, 1 sc in marked stitch, ch 3, turn; starting in the 2nd ch from the hook: 1 sc in next 2 ch, 1 sc in marked stitch.Switch to 4 mm hook, work 16 sc evenly along the opposite edge.
Leave a long tail for sewing.
Small Bee Body
Worked in rows using a 3.5 mm hook.
Start with yellow yarn:
- Row 1: ch2
- Row 2: turn; 1 sc in 2nd ch from hook. Place stitch marker (1)
- Row 3: ch1, turn; 1 inc. (2)
- Row 4: ch1, turn; inc in all. (4)
- Row 5: ch1, turn; 1 inc, sc in next 2, 1 inc. (6)
Change to black yarn:
- Row 6: ch1, turn; 1 sc in all st. (6)
- Row 7: ch1, turn; 1 sc in all st. (6)
Change to yellow yarn:
- Row 8: ch1, turn; 1 inc, sc in next 4, 1 inc. (8)
- Row 9: ch1, turn; 1 sc in all st. (8)
Change to black yarn:
- Row 10: ch1, turn; 1 sc in all st. (8)
- Row 11: ch1, turn; 1 dec, sc in next 4, 1 dec. (6)
Change to yellow yarn:
- Row 12: ch1, turn; 1 sc in all st. (6)
- Row 13: ch1, turn; 1 sc in all st. (6)
Change to black yarn:
- Row 14: ch1, turn; 1 sc in all st. (6)
Do not turn.Switch to a 4 mm hook and work 10 sc evenly along the edge to the stitch marker.Switch back to 3.5 mm hook, 1 sc in marked stitch, ch 2, turn; starting in 2nd ch from the hook: 1 sc in next ch, 1 sc in marked stitch.Switch to 4 mm hook, work 10 sc evenly along the opposite edge.
Leave a long tail for sewing.
PART 3 – The Wings
Big Bee Wings (Make 2)
With white yarn and a 3.5 mm hook:
ch 11From 2nd ch from hook:
- sc 4
- hdc 3
- dc 2
- 4 dc in last ch
Continue on the opposite side of the chain:
- dc 2
- hdc 3
- sc 4
- sl st
Leave a long tail for sewing.
Small Bee Wings (Make 4)
With white yarn:
ch 8From 2nd ch from the hook:
- sl st 2
- sc 3
- hdc 1
- 4 hdc in last ch
Continue on the opposite side of the chain:
- hdc 1
- sc 3
- sl st 2
- sl st
Leave a long tail.
PART 4 – Faces
- Male bee: Eyes between Rounds 2–3, spaced 3 stitches apart. Embroider eyebrows and mouth.
- Female bee: Add eyelashes before inserting eyes. Embroider mouth and pink cheeks.
- Small bee: Eyes between Rounds 2–3, embroider a simple mouth.
PART 5 – Assembly
- Sew the head to the body (centered or offset—your choice).
- Attach wings on the inside of the body.
- Big bee: wings attached at the top
- Small bee: wings attached on each side
Hide approx. 0.8” / 1.5 cm of the wings inside the body for a neat finish.
🐝 Congratulations! Your crochet bee appliques are complete!This project uses very little yarn and makes the sweetest little bumble bees. My official tester absolutely loved them—and even introduced them to the crochet avocado family! 🥑💛
Copyright Notice
All rights reserved. This pattern and all accompanying photographs are the property of Natalina Craft and are protected by copyright law. This pattern is for personal use only. Any unauthorized reproduction, redistribution, or publication of this pattern, in whole or in part, is strictly prohibited.
You are welcome to sell finished items made from this pattern in small quantities. While crediting Natalina Craft as the designer is not required, it is always greatly appreciated—especially when selling online—so others can find the original pattern. Thank you for respecting these guidelines.
Thank you for the pattern of bumble bees. My daughter loves bumble bees and her kitchen is the bees. You are very talented. Your beautiful.
Dear Mary, Thank you very much! I hope your daughter will like them. I would love to see your work if you make them! Let me know if you have any questions 🙂
Hi..
Thank you so much for your pattern..
Referred this pattern to make a crochet garland for a little girl’s Bumblebee themed birthday party and she loved it..
You are very welcome!
Thank you for the pattern. I have made them and they were exactly what I envisioned on our first grandchildren baby blanket. Their theme is bees.
I am so glad! Thank you for your kind words!
You say at the beginning head part to start with black is that correct.
Hi Mary, I am sorry about that. You should start the head with the yellow yarn. Thank you for letting me know.
I love your bee family & am currently working on making them! Your instructions are very easy to follow 🙂 Thank you for sharing! #savethebees
Thank you very much!
Do you have the elephant applique free pattern in pdf? For some reason it will not print all of it from your web site
Hi, no I am sorry I don’t have any pdf pattern yet.
I made up mine today, Ihave made it into a badge to wear to the kinder where I work, we are looking at bugs at the moment
That’s awesome! I am working on more bugs right now.
I’m doing the bees for a blanket for a baby. Can u tell me how i can correct the last row (in black) on the face so it lines up with the first black stitch? Mine turn out off very time. I know that’s caused by working in the round but not sure how to correct. Thanks!
I will try to make a quick video as soon as possible!
Hi Esther, I just updated a video. I hope it will help!
https://www.natalinacraft.com/crochet-stitches-tutorial/
I am sorry but I think if you do the invisible stitch or loop or slip stitch it does line up. I have been reading and jst doing small projects but I have come across many who have said that when asked, Good luck!
Thank you very much for sharing your patterns for the bee appliques !! I am Currently making a bee chemo cap for a child and was looking for the perfect kind of bees to put on the hat (instead of a stuffed bee on the top of the hat, which it called for, But I didn’t like that. I thought it looked kind of funny, So l was on the hunt for the perfect kind of bees to put on the hat And when I saw your Pattern for the appliques of the bees, I was smitten ! I’m getting ready to make the 2 Small bees that are facing each other like you have pictured above… I would love to send you a picture of the finished hat, after I’ve completed everything. I’ve never sent anything on Instagram or facebook using a hashtag Could you please tell me how to go about doing so ?? Thanks again !! I have a group starting next month called Crochet Along For A Cause, Where we’ll be making chemo caps for kids & adults. And this hat is the 1st one I’m making for any child with cancer, who happens to want this cap. Your bees are so cute that I think any child would like it !😍😊😍😉🤗😍
Thank you so much for your kind words! I am so glad you will be using my bee applique for such a great cause! If you use instagram, you can add @natalinacraft to the description of your picture and I will be able to see it! Or you can share a picture in my facebook group (https://www.facebook.com/groups/457569141479095/). I would love to see your work. Thank you <3
How can I copy & paste so I don’t have to work from my tablet? I have been unable to select text to copy.
I am sorry, this option is not available at the moment.