
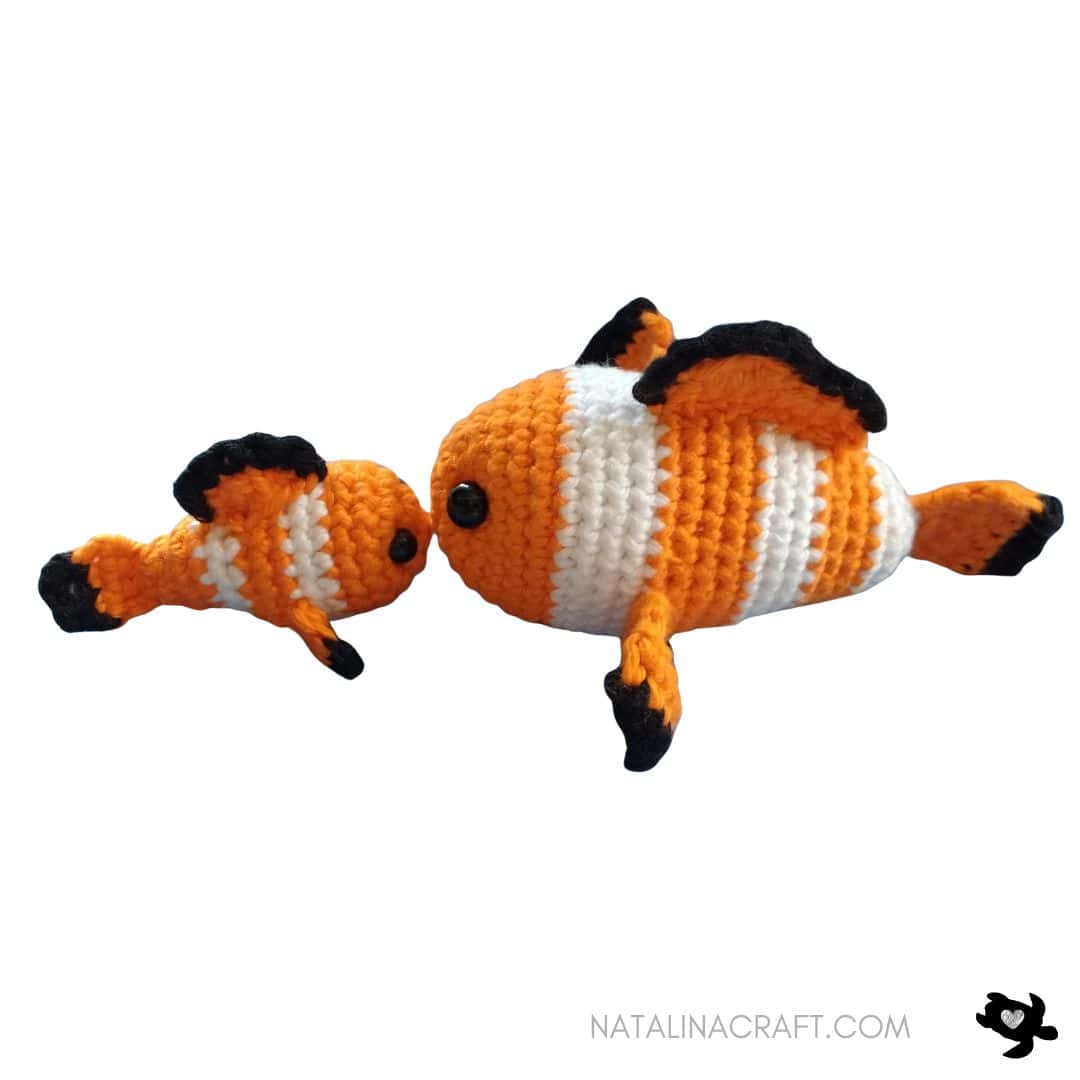
If your house is anything like mine, Finding Nemo is on repeat! 🎬 When my 3-year-old son became absolutely obsessed with the movie, he didn’t just want to watch it—he wanted to hold it. He specifically asked for Marlin and Nemo to keep him company during playtime. But there was a catch: he wanted a dad fish and a baby fish!
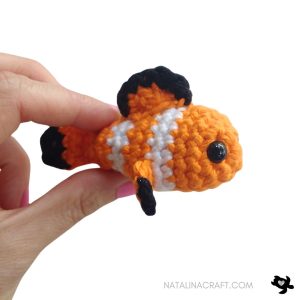
Since I already had a pattern for a tiny, pocket-sized clownfish (perfect for little Nemo!), I set out to design a larger, more detailed companion to be Marlin. This pattern is the result: a sturdy, 4-inch-tall clownfish that fits perfectly in a child’s hand. This design features distinct white stripes and flat, realistic fins that capture the classic movie look. While small, cute, and fast to make, it’s also ideal for gifts or adding to your crochet animal collection.
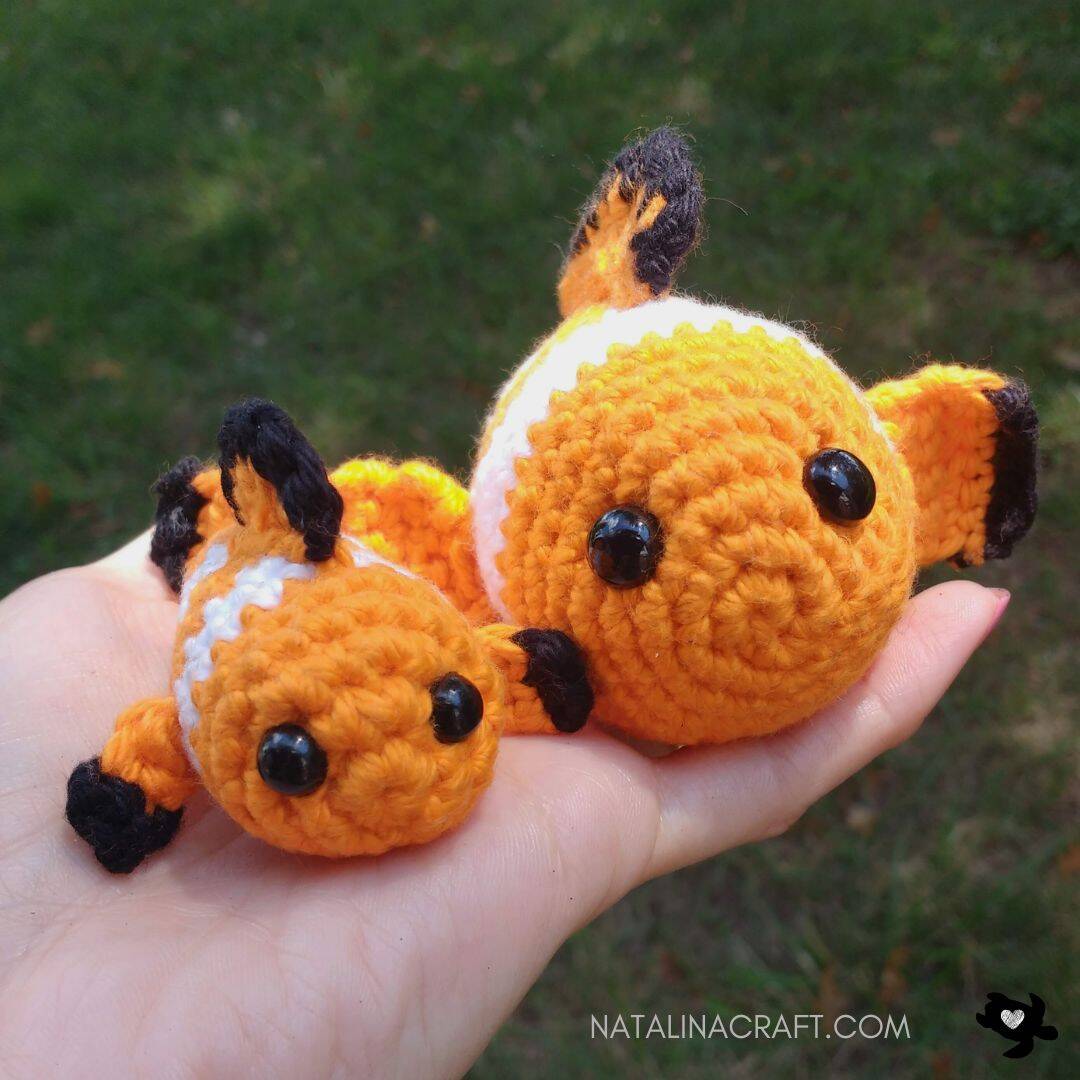
This design features distinct white stripes and flat, realistic fins that capture the classic movie look. I’ll be honest: I initially worried the flat fins might look too floppy, but I discovered that using 100% cotton yarn helps them hold their shape beautifully. However, don’t let that stop you if you only have acrylic or wool in your stash! If your fins end up a bit droopier than mine, just think of it as your fish having a relaxed, swimming-in-the-current look. Every handmade toy has its own personality, and a slightly floppy fin just adds to the charm.
This free crochet pattern uses simple stitches and minimal shaping, making it great for beginners or anyone looking for a fun and relaxing project.
Whether you are making a matching set like we did (grab the Mini Clownfish pattern here for the baby!) or just need a quick, cheerful gift, this project works up in about an hour.
Below, you’ll find the full free pattern. I’ve included notes on yarn choices and how to attach the fins so they look great, no matter what fiber you use. Let’s swim into the stitches!”
Join my Facebook group here, where you can ask questions, share your finished projects, and help me choose future designs!
🌊 Ready to swim? I can’t wait to see your Marlin and Nemo duos!
Show me your work: Snap a photo of your finished clownfish and tag me @NatalinaCraft on Instagram or use the hashtag #NatalinaCraft. I feature my favorite makes in my stories every week!
Have a question? Did your fins turn out perfectly straight, or did they get that cute ‘relaxed’ droop? Let me know in the comments below!
What’s next? If you loved making this fish, check out my [Mini Zebra] or [Mini Giraffe] to start your whole animal collection!

Looking for more Animal ideas?
Pattern Quick Facts:
- Skill Level: Beginner (Confident Beginner recommended for color changes)
- Finished Size: Approx. 4 inches (11 cm) long (excluding tail)
- Time to Complete: 60–90 minutes
- Sewing Level: Minimal (Flat fins are easy to attach!)
- Yarn Weight: Light Worsted (Category 3) – Cotton recommended, but any yarn works!
- Hook Size: US E (3.5 mm)
- Terms: US Crochet Terms
Designer Notes & Tips for Success:
- Yarn Choice & The “Floppy Fin” Factor: I used I Love This Cotton because its natural stiffness helps the flat fins stand up a bit more. But please use what you have! If you use acrylic or plush, your fins might be softer and droop a little. Don’t worry! This just gives your clownfish a relaxed, “swimming with the current” vibe. It adds character and makes your fish unique.
- About the Stripes: The white stripes are created by simply switching yarn colors at the start of the rounds. It’s a straightforward technique! If your tension feels a bit tight when switching colors, just try to relax your grip on the yarn for that first stitch to keep the line smooth.
- Flat Fins = Easy Sewing: Because the fins are worked flat and left unstuffed, they are incredibly easy to sew onto the body. Just pinch the base slightly as you stitch to give them a tiny bit of curve, or leave them completely flat for a cartoon-accurate look!
- Baby-Safe Option: This pattern uses 9mm safety eyes. However, if making for a child under 3, you must embroider the eyes with black yarn instead to prevent choking hazards.
Why You’ll Love This Clownfish
- Quick and satisfying project
- Beginner-friendly stitches
- Cute and recognizable design
- Perfect for ocean-themed collections
- Great for gifts or small toys
FAQ
Is this clownfish crochet pattern beginner-friendly?
Yes! It uses basic stitches and simple construction, making it suitable for beginners.
How big is the finished clownfish?
It measures about 4 inches long, depending on your yarn and hook size.
Can I make this pattern without sewing?
This pattern includes a few small fins that require sewing, but the process is simple and beginner-friendly.
What yarn works best for this pattern?
Cotton , acrylic or plush yarn works well. Use a smaller hook for tighter stitches.
Materials
- Light worsted yarn in: Orange, White, Black
- US E (3.5 mm) (you may adjust hook size to suit your tension)
- 2 black safety eyes (9 mm)
- Polyfill stuffing
- Stitch marker (optional)
- Tapestry needle
Abbreviations
- ch = chain
- mr = magic ring
- sc = single crochet
- inc = increase
- dec = invisible decrease
- sl st = slip stitch
- hdc = half double crochet
- dc = double crochet
Yarn Used
I used light worsted cotton yarn in orange, white, and black.
Brand: I Love This Cotton! by Hobby Lobby
Colors: Black (02), White (06), Glowing (102)
How to crochet a clownfish amigurumi?
Head and Body
- Worked in continuous rounds. Do not turn unless stated. Use a stitch marker if needed.
With orange yarn and a 3.5 mm hook:
- Round 1: 6 sc in a magic ring. (6)
- Round 2: 6 inc. (12)
- Round 3: [1 sc in next st, 1 inc in next st] x6. (18)
- Round 4: [1 sc in next 2 st, 1 inc in next st] x6. (24)
- Round 5: [1 sc in next 3 st, 1 inc in next st] x6. (30)
- Rounds 6 to 7: 1 sc in all st. (30)
- Round 8: [1 sc in next 4 st, 1 inc in next st] x6. (36)
Insert 9 mm safety eyes between Rounds 4 and 5, spaced 5 stitches apart.
Change to white yarn:
- Rounds 9 to 12: 1 sc in all st. (36)
Change to orange yarn:
- Round 13: 1 sc in all st. (36)
- Round 14: [1 sc in next 4 st, 1 dec in next st] x6. (30)
- Rounds 15 to 16: 1 sc in all st. (30)
Change to white yarn:
- Round 17: 1 sc in all st. (30)
- Round 18: [1 sc in next 3 st, 1 dec in next st] x6. (24)
- Round 19: 1 sc in all st. (24)
Change to orange yarn:
- Round 20: 1 sc in all st. (24)
- Round 21: [1 sc in next 2 st, 1 dec in next st] x6. (18)
- Round 22: 1 sc in all st. (18)
Change to white yarn:
- Rounds 23 to 24: 1 sc in all st. (18)
- Round 25: [1 sc in next st, 1 dec in next st] x6. (12)
- Round 26: 6 dec. (6)
Stuff the body firmly.
Fasten off, leaving a long tail to attach the caudal (tail) fin.


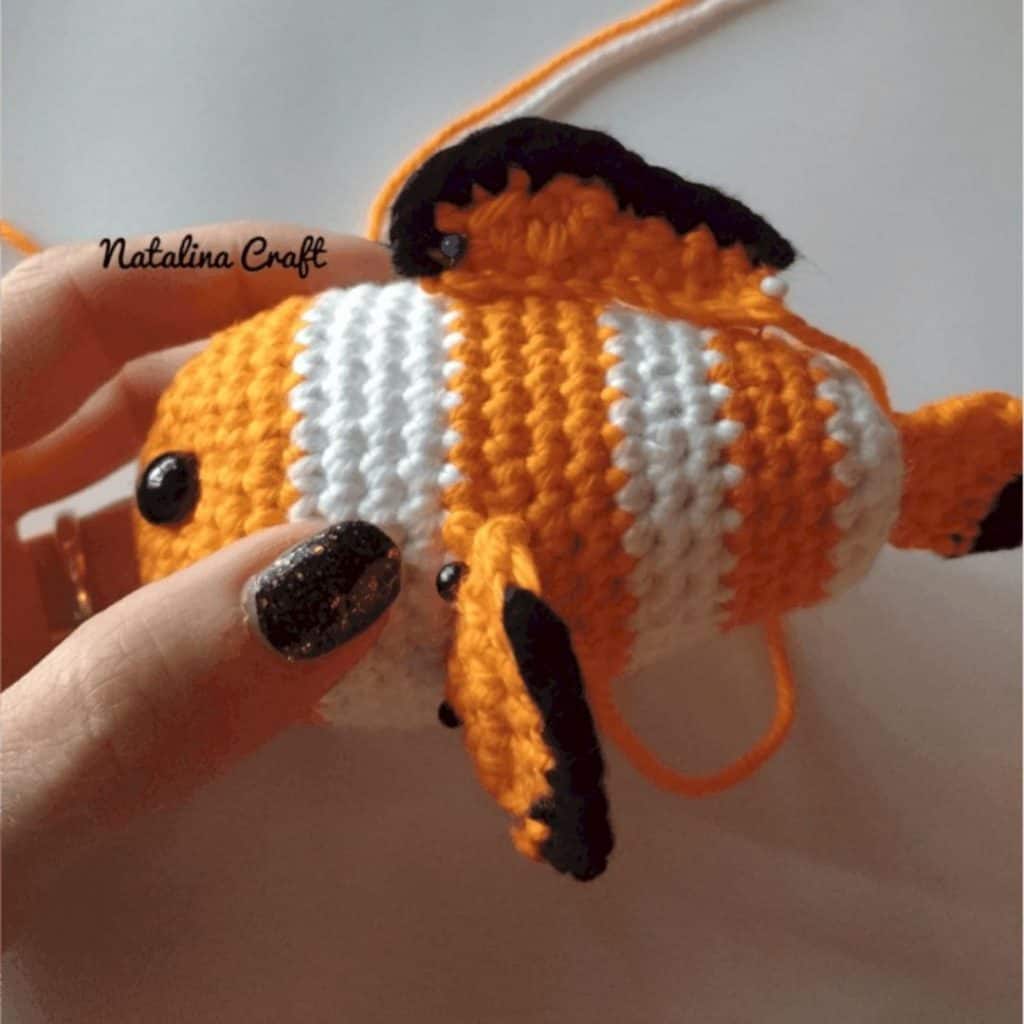
Tail Fin and Pectoral Fins (Make 3)
These three fins are made the same way.
With black yarn and a 3.5 mm hook:
- Row 1: ch 7. (7)
- Row 2: 1 sc in the second chain from the hook, 1 sc in the 5 next st. (6)
Change to orange yarn:
- Row 3: ch 1, turn. 1 sc in the 6 st. (6)
- Row 4: ch 1, turn. 1 sc in the first 2 st, 1 dec, 1 sc in the last 2 st. (5)
- Row 5: ch 1, turn. 1 sc in the 5 st. (5)
- Row 6: ch 1, turn. 1 sc in the 5 st. (5)
- Row 7: ch 1, turn. 1 dec, 1 sc in the next st, 1 dec. (3)
Fasten off, leaving long tails for sewing.
Assembly
- Attach one fin to the back of the body as the tail (caudal) fin
- Attach the two remaining fins to each side of the body between Rounds 12 and 13


Dorsal Fin
With orange yarn and a 3.5 mm hook:
- Row 1: ch 10. (10)
- Row 2: 1 sc in 2nd ch from hook, 1 sc in the 8 next st. (9)
- Row 3: ch 1, turn. 1 sc, 1 hdc, 1 dc, 1 hdc, 1 sc in the next 2 st, 1 hdc in the next 2 st, 1 sc. (9)
Change to black yarn:
- Row 4: ch 1, turn. 1 sc, 1 hdc in the next 2 st, 1 sc in the next 2 st, 1 hdc, 1 dc, 1 hdc, 1 sc. (9). Keep working and make 1 sc in the next 2 st working into Rows 2 and 3 (You should have a total of 11 black stitches.)
Fasten off.
Attach the dorsal fin to the top center of the body, with the front of the fin placed between Rounds 12 and 13.


“🎉 Congratulations on your new crochet buddy!
I’d love to see how yours turned out. Did you go with the stiff cotton look or the relaxed acrylic droop? Tell me in the comments! 👇
Share the love: Tag @NatalinaCraft on Instagram with #NatalinaCraft for a chance to be featured on my page.


Copyright Notice
All rights reserved. This pattern and all accompanying photographs are the property of Natalina Craft and are protected by copyright law. This pattern is for personal use only. Any unauthorized reproduction, redistribution, or publication of this pattern, in whole or in part, is strictly prohibited.
You are welcome to sell finished items made from this pattern in small quantities. While crediting Natalina Craft as the designer is not required, it is always greatly appreciated—especially when selling online—so others can find the original pattern.
Thank you for respecting these guidelines.
Crochet Clownfish – Amigurumi
Looking for more Low-Sew/No-Sew crochet ideas?
Crochet Clownfish - Amigurumi
Instructions
Start Here
- Please read the entire pattern before starting.
- This pattern is written using US crochet terms.
Finished Size
Approximately 4 inches (11 cm) long (measured without the tail) when made with the indicated yarn.
Materials
- Light worsted yarn calling for a 5.5 mm hook in: Orange, White, Black
- 3.5 mm crochet hook (you may adjust hook size to suit your tension)
- 2 black safety eyes (9 mm)
- Polyfill stuffing
- Stitch marker (optional)
- Tapestry needle
Abbreviations
- ch = chain
- mr = magic ring
- sc = single crochet
- inc = increase
- dec = invisible decrease
- sl st = slip stitch
- hdc = half double crochet
- dc = double crochet
Yarn Used
I used light worsted cotton yarn in orange, white, and black. Brand: I Love This Cotton! by Hobby LobbyColors: Black (02), White (06), Glowing (102)
How to crochet a clownfish amigurumi?
Head and Body
- Worked in continuous rounds. Do not turn unless stated. Use a stitch marker if needed.
With orange yarn and a 3.5 mm hook:
- Round 1: 6 sc in a magic ring. (6)
- Round 2: 6 inc. (12)
- Round 3: [1 sc in next st, 1 inc in next st] x6. (18)
- Round 4: [1 sc in next 2 st, 1 inc in next st] x6. (24)
- Round 5: [1 sc in next 3 st, 1 inc in next st] x6. (30)
- Rounds 6 to 7: 1 sc in all st. (30)
- Round 8: [1 sc in next 4 st, 1 inc in next st] x6. (36)
Insert 9 mm safety eyes between Rounds 4 and 5, spaced 5 stitches apart.
Change to white yarn:
- Rounds 9 to 12: 1 sc in all st. (36)
Change to orange yarn:
- Round 13: 1 sc in all st. (36)
- Round 14: [1 sc in next 4 st, 1 dec in next st] x6. (30)
- Rounds 15 to 16: 1 sc in all st. (30)
Change to white yarn:
- Round 17: 1 sc in all st. (30)
- Round 18: [1 sc in next 3 st, 1 dec in next st] x6. (24)
- Round 19: 1 sc in all st. (24)
Change to orange yarn:
- Round 20: 1 sc in all st. (24)
- Round 21: [1 sc in next 2 st, 1 dec in next st] x6. (18)
- Round 22: 1 sc in all st. (18)
Change to white yarn:
- Rounds 23 to 24: 1 sc in all st. (18)
- Round 25: [1 sc in next st, 1 dec in next st] x6. (12)
- Round 26: 6 dec. (6)
Stuff the body firmly. Fasten off, leaving a long tail to attach the caudal (tail) fin.
Tail Fin and Pectoral Fins (Make 3)
These three fins are made the same way.
With black yarn and a 3.5 mm hook:
- Row 1: ch 7. (7)
- Row 2: 1 sc in the second chain from the hook, 1 sc in the 5 next st. (6)
Change to orange yarn:
- Row 3: ch 1, turn. 1 sc in the 6 st. (6)
- Row 4: ch 1, turn. 1 sc in the first 2 st, 1 dec, 1 sc in the last 2 st. (5)
- Row 5: ch 1, turn. 1 sc in the 5 st. (5)
- Row 6: ch 1, turn. 1 sc in the 5 st. (5)
- Row 7: ch 1, turn. 1 dec, 1 sc in the next st, 1 dec. (3)
Fasten off, leaving long tails for sewing.
Assembly
- Attach one fin to the back of the body as the tail (caudal) fin
- Attach the two remaining fins to each side of the body between Rounds 12 and 13
Dorsal Fin
With orange yarn and a 3.5 mm hook:
- Row 1: ch 10. (10)
- Row 2: 1 sc in 2nd ch from hook, 1 sc in the 8 next st. (9)
- Row 3: ch 1, turn. 1 sc, 1 hdc, 1 dc, 1 hdc, 1 sc in the next 2 st, 1 hdc in the next 2 st, 1 sc. (9)
Change to black yarn:
- Row 4: ch 1, turn. 1 sc, 1 hdc in the next 2 st, 1 sc in the next 2 st, 1 hdc, 1 dc, 1 hdc, 1 sc. (9). Keep working and make 1 sc in the next 2 st working into Rows 2 and 3 (You should have a total of 11 black stitches.)
Fasten off.
Attach the dorsal fin to the top center of the body, with the front of the fin placed between Rounds 12 and 13.
🎉 Congratulations! Your crochet clownfish is complete!If you make one, don’t forget to tag @natalinacraft and use #natalinacraft—I’d love to see your beautiful work.
Copyright Notice
All rights reserved. This pattern and all accompanying photographs are the property of Natalina Craft and are protected by copyright law. This pattern is for personal use only. Any unauthorized reproduction, redistribution, or publication of this pattern, in whole or in part, is strictly prohibited.
You are welcome to sell finished items made from this pattern in small quantities. While crediting Natalina Craft as the designer is not required, it is always greatly appreciated—especially when selling online—so others can find the original pattern.Thank you for respecting these guidelines.
Thank you so much. Exactly what I’ve been looking for.
You are very welcome! Let me know if you need any help.
Hi,
Thank you for ur amazing patterns. Loved them. Can I more of these.
Take care
Thank you very much for your nice words!
When do i use the 5.5 hook
Thanks mary
Hi, you don’t need a 5.5 mm hook, only a 3.5 mm hook. I was just talking about the weight of the yarn for the 5.5 mm hook.
Hola, buenas noches. Necesito un nemo de 20 centímetros, como le puedo hacer. De antemano, gracias.
Hola, I am so sorry for my late reply, I had to take a break from my blog. I would just use bigger yarn (or 2 strands of yarn) and a bigger crochet, It should work!
Making these for our church to take to Guatemala for the little kids and small bears. Thanks for having patterns free. God bless
That’s amazing and makes me so happy. Thank you very much for letting me know!
This is the cutest pattern I’ve seen. It made me happy to see it. Wonderful work.
Thank you very much
Hola, necesito ayuda… No entiendo algunos términos, y en la vuelta número 3, me da 17 puntos ☹️
Hi Maria, you should have 12 st in your ound 2 (Round 2: inc 6 times. (12)). Then you need to make 1 sc in the next st, and 1 inc in the following st and repeat this pattern 5 more times. You should have a total of 18 st at the end.
How do u decrease new to reading g patterns
Hi Lucinda, sorry for my late reply. I use the invisible decrease as shown in this video (https://www.youtube.com/watch?v=OUBbOZ1Ennk). I hope it helps!
Hola soy adriana mendez, chilena, y me encanto este patrón, recién estoy tejiendo y me encanta
MUCHAS GRACIAS
Muchas gracias!
Hermoso trabajo y fácil. Es la primera vez que hago animales amigurumis. estoy tratando de hacer una pecera. Gracias por compartir tu trabajo,Saludos
Muchas gracias!
Do you have a pattern for Dory? I would love to make my grandaughters both
I don’t have one yet but I can try to make one!
I have just made a knitted jumper for my 7month old lovely Greatgrandson, he is SO fond of Nemo I knitted in a kangaroo pocket across his tummy for Nemo to tuck in! Now I have to crochet a baby Nemo to live in this pocket. Do you also have the pattern for the smaller one you designed please?
This is such a sweet and clever idea! You can find the pattern for the baby here: https://www.natalinacraft.com/free-crochet-pattern-baby-clownfish-amigurumi-patron-gratuit-bebe-poisson-clown/
Good morning, I’m assuming this pattern is in US terms, is that right? I’m from the UK so would need to change the stitches to uk version. Many thanks, take care Judith
Hello, yes it is in US terms.
Sorry for the confusion.
Best regards, Nathalie
I am so glad I found your pattern. I am going to a baby shower in September and they are asking for a book instead of a card. I found your pattern and I will be getting the book Finding Nemo. Thank you for the great pattern.
Thank you so much for your nice words.
This is a wonderful idea.
For the smaller version, did you just use lighter yarn and a smaller hook? And about how long was it? Thanks!
Hi, I have another pattern for the smaller one. You can find it here:
https://www.natalinacraft.com/nemo-crochet-pattern/
I hope it helps!
How do you hide the ends when you change colours on the fins? Easy to hide them inside the body, but I’ve never changed colours on a flat piece before. Thank you.
Hi, I usually make a tiny knot and just pass the ends back and forth in the fins
Hello! Loveeeeeee this pattern, it’s so cute. Just finished making all the pieces for the fish and now i’m kind of stuck on how to connect the fins to the body. Would it be easier to crochet or sew them on? Thanks in advance.
Hi, thank you for your nice words. I usually sew them on. I find it easier that way as the pieces are quite small.
love the pattern, made and happy with end result.
only thing I think would have helped was to start the back dorsal fin was to start with a tail of wool to sew it on with, as this was not mentioned
thank you for the pattern though ❤️
Thank you very much for your nice words and your suggestion!
Il est magnifique, j’ai trouvé un tout petit pour aquarium. Mais le votre est magnifique et va faire le bonheur d’un Loulou . MERCI
Merci beaucoup!
Love this. Thank you so much.
Thank you very much.